Scheduling a bulk update for a collection can be useful when a group of objects needs to be updated on a regular basis. A scheduled bulk update on a collection can reduce the amount of time required to make those same updates manually. For example, if products from a specific supplier include a measurement with 'millimeters' spelled out, but the STEP requires 'mm', a scheduled bulk update that makes the change periodically can be an effective data management tool.
Important: Consider the time zone of the application server compared to the workbench (the client) where the schedule is created or viewed. When scheduling a job, the local time zone is displayed in the workbench, but the time zone of the server is used to run the background process. Once the process is scheduled, the Schedule field shows the server time zone regardless of the time zone of the user who scheduled the process. The Next Run field shows the local time zone.
For information on how to schedule bulk updates for collections in Web UI, refer to the Scheduling a Collection Refresh in Web UI topic.
Prerequisites
Complete the following tasks before scheduling a collection to run a bulk update.
-
Create a collection. For more on creating a collection, refer to the Creating Collections topic in the Getting Started documentation.
-
Create a bulk update configuration. Refer to Creating a Bulk Update topic for more on how to configure a bulk update.
Scheduling Bulk Updates
To perform a bulk update on a collection at regular intervals, create a schedule that applies to the collection. The bulk update is then automatically run at the scheduled time.
-
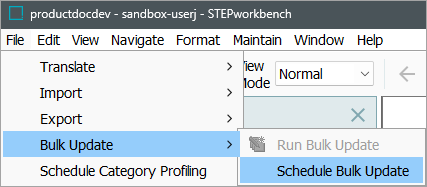
From the File menu, select Bulk Updates and Schedule Bulk Update.
-
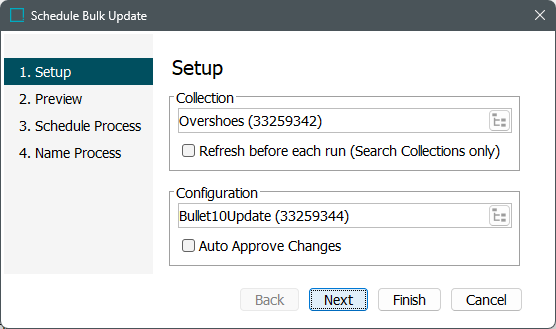
On the Schedule Bulk Update wizard, for the Collection parameter, click the selector button (
 ) to locate and select the relevant collection. This option is not valid if the collection is created from the Run Bulk Update option.
-
For the Refresh before each run (Search Collections only) parameter, if the selected collection was created using the search criteria, check this option to refresh the collection based on the current data using search criteria before executing the bulk update operation(s).
-
-
For the Configuration parameter, click the selector button (
) to locate and select the relevant configuration. -
For the Auto approve changes parameter, check this option to place the updated objects in the approved workspace immediately after the update.
-
-
Set the Skip Preview parameter as required. Depending on the operations in the bulk update configuration, the Preview step can execute irreversible actions such as email notifications or REST calls.
-
Check to skip the preview step, which is the default.
-
Uncheck to display the preview results and run associated business rules.
-
-
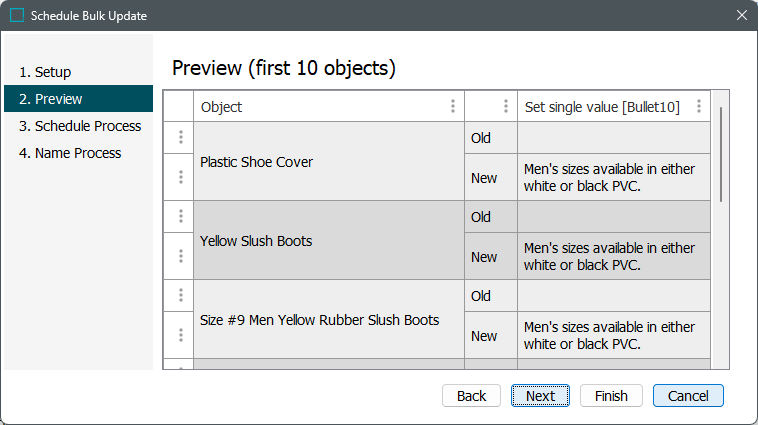
Click Next to display the optional Preview step (based on the Skip Preview parameter selection in the Configuration step).
If the Preview is available, review the example results of the update.
-
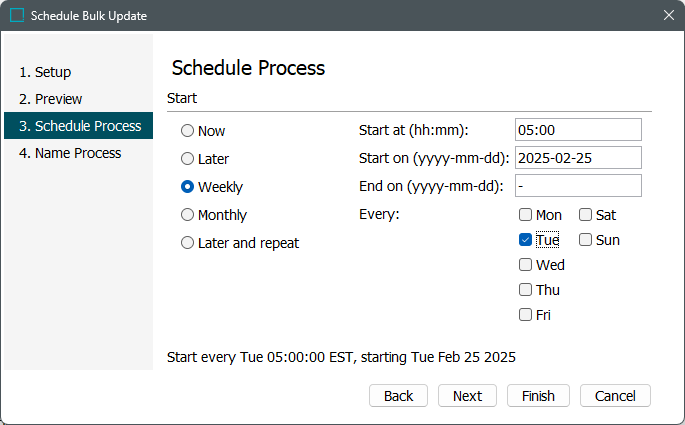
Click Next to display the Schedule Process step and create the time schedule by selecting either Now, Later, Weekly, Monthly, or Later and repeat. Complete the options related to the schedule.
-
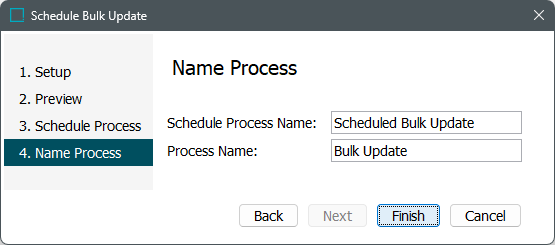
Click Next to display Name Process and enter a name for the Schedule Process Name parameter. The Process Name parameter displays the name displayed in the Background Processes tab.
-
Click Finish to complete the wizard.
-
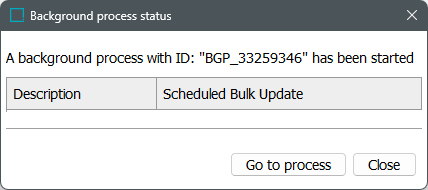
On the Background Processes dialog choose an option:
-
Click Go to process to display the background process.
-
Click Close to display the workbench while the background process runs.
-
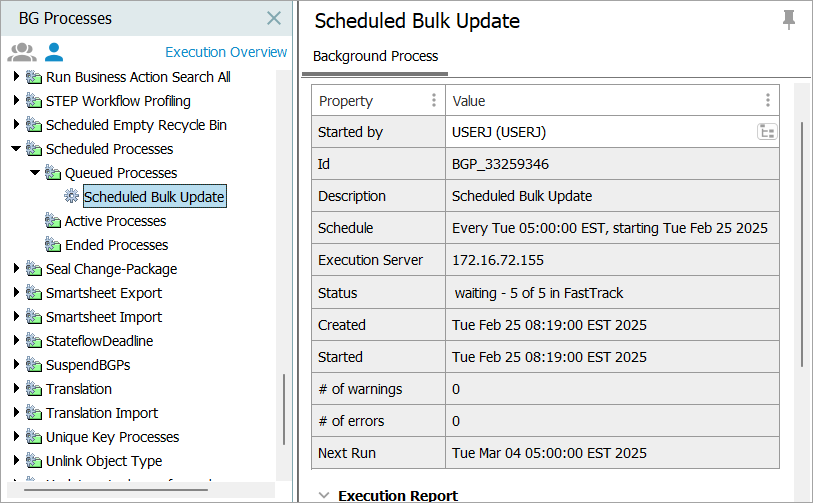
The following information is available on the BG Processes tab:
-
On the left side, under the Scheduled Processes node, a bulk update that is scheduled to run later is displayed under the 'Queued processes' node.
-
On the right side, in the Properties section, the schedule is displayed, and the process shows a Status of 'waiting.'
-
On the BG Processes tab, the Properties section includes the 'Started by' parameter which reflects the user who created the scheduled background process. To change the user for a scheduled or queued BGP, add the 'Manage Background Process Execution' Setup Action privilege to the relevant user group. This privilege enables a selector button on the 'Started by' parameter.
-
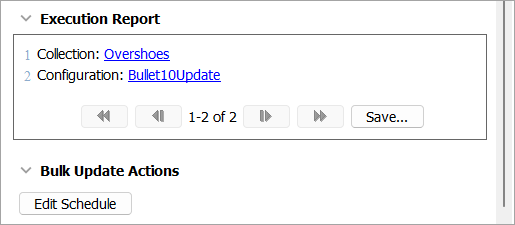
The Execution Report records the progress of the background process.
-
The Bulk Update Actions section allows users to make an adjustment to the scheduled bulk update.
Click the 'Edit Schedule' button to reopen the 'Schedule Bulk Update' wizard on the 'Schedule Process' step. Users can then amend the schedule as needed, and the changes will be applied to the next bulk update run.
For details on the states of a background process, refer to the BGP States and Quarantine Status topic in the System Setup documentation.