This topic describes, step-by-step, how to initiate a structured translation export of STEP content into an Excel or XML file. Users who read and understand this topic should be able to produce a file suitable to send to a third-party translation vendor for translation. Other translation methods supported in STEP are covered in their own topics.
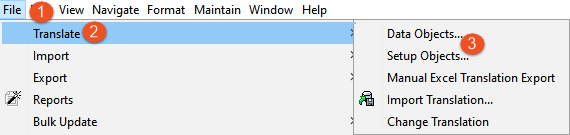
To initiate a structured translation export you must access the Request Translation Wizard. To do so, open the File dropdown from the menu bar, select Translation, and then click Data Objects... (initiating an export for Setup Objects is covered in the Structured Translation for Setup Objects documentation here).
The Request Translation Wizard guides the user through five steps that enable the user to adapt the translation export to their specific requirements.
![]()
The first step in the Request Translation Wizard is Object Selection. In this step, the user selects which objects should be included in the translation export, and from where in STEP the objects should be pulled. There are two sections in this screen, each with a number of options included within.
In the Selection portion of the Object Selection step, the user indicates from where in STEP the content to be translated should be pulled. There are three ways to select that content.
![]()
 button will bring up a screen allowing the user to either Browse the Tree for the object, or Search for the object by typing the sought-for object directly into the search field. button to browse or search your computer's folders for the appropriate file. In the List Contains field, click inside the field to display a dropdown. Select from the listed options whether the data being imported contains Product IDs, Product Names, Classification IDs, Classification Names, Asset IDs, or Asset Names. There is no option to multi-select.
Note: There are no formatting rules for the Excel file you select. If it is a single column of product IDs with no heading and not other content, that is perfectly acceptable. When you select which kind of object type you plan to import, STEP will look for valid IDs for those objects, and will import only those for which it can match to a valid ID.
button and either browse or search for the collection to be translated. If the collection is based on a search and you want to ensure that new or amended values in the collection are captured prior to exporting for translation, click the box beside Refresh Automatically. In the Filter Options section of the Object Selection step, the user can specify object type and the status of the objects that should be included in the translation export being created.
![]()
 button. This brings up a Select Object Types window.
![]()
![]()
In the Select Target Language step, the user is prompted to select the language they would like to translate their content into. Click the language or languages that are applicable and click the Next button. It is also possible to click the Finish button, which will begin the export process immediately, provided there are no errors.
Note: If you select multiple languages, the objects listed in the next step, Feedback, will not be accurate. The data shown on the Feedback screen will be for just one language, not all of the selected languages.
![]()
The Feedback step's primary function is to provide the user with reporting about the objects slated to export so the user can know what precisely will translate before starting the export. On this screen the user will see listed all of the objects that will be included in the translation export. The breakdown of this data is captured in two tables.
The first table is the summary of what will be included in the export. This is the data it presents:
The second table is a list of all of the objects that will be part of the extraction.
 ) indicates that it will be exported. A red X (
  ) indicates that it will not be exported. Below are some of the reasons a green checkmark will appear or a red X might appear: Up to Date: objects will not be exported Not Translated: objects will be exported for translation Not Approved: objects will not be exported (not applicable if the 'Completely Approved Source' requirement is unchecked in the Object Selection screen) Not in Approved workspace: objects will not be exported because they are only in the Main workspace and not the Approved workspace (Regardless of whether the 'Completely Approved Source' requirement is checked, translation only pulls content from the Approved workspace. If the object has no data, then the object will not be included in the export) Re-translation Needed: objects will be exported for translation In Progress: objects will not be exported because they are already being translated Invisible in Target: objects are not visible in target language and will not be extracted for translation No translation to source: objects will not be exported because the source>target translation being requested is invalid. For instance, let us say a translation relation exists for an object from English to French with English set as the Master language. The user then requests a translation be started from French to English. Because English is set as the master language for the object being translated, this object cannot be included in a French to English translation, and the 'No translation to source' status will display for that object. No translatable content: objects will not be exported as there are no values that are language dependent
The second table in the Feedback screen will display up to 1,000 items. If there are more than 1,000 items, a row of text will appear in the second table that reads, 'More than 1,000 objects, only first 1,000 is shown...'. To see all the objects, click the Report button in the upper right corner of the Feedback screen. The objects will then be exported into a single-column CSV file for review.
For each object listed in the CSV file, there is a + sign (will be included in the export) or a - sign (will not be included), followed by the reason for why it is or is not included in the export.
This is an example from the CSV file of an object that will not be extracted for translation. Note the minus sign:
![]()
This is an example from the CSV file of an object that will be extracted for translation. Note the plus sign:
![]()
If the user already knows they want the translation data exported as an XML file, they may click Finish. However, if the user wants an Excel file, or the XML file delivered in a format other than the default (file), they must click the Next button to manually configure the delivery aspects of their export.
![]()
In the Delivery step, the user specifies whether their content should be exported into an XML or Excel file, and the method in which that file should be delivered.
Translation Method - From the dropdown, select either XML or the relevant Excel version
Filter spreadsheet - If either of the Excel versions have been selected from the Translation Method dropdown, the user may select Filter spreadsheet. This ensures that only the attribute values that require translation are included in the export (those objects that received the in the Feedback screen). Objects that do not require translation (those that received the in the Feedback screen) are excluded when this option is selected.
Delivery Method - Choose one of seven options that determine by what method the user will receive the exported translation file. Dependent on how a user's specific STEP system has been configured, some of these options may not be available.
The available export options depend on your system setup. The commonly used delivery methods are:
Check the box for Skip Verification if you are certain that all of the objects listed in the Feedback screen are correct to export. Checking this box prevents suspension of the export process until a user visits the export's background process and confirms the export may proceed.
![]()
In the Schedule Extract step, the user may select one of five scheduling options for when STEP should proceed with the translation export.
Now - Clicking Finish initiates the export immediately.
Later - Brings up two additional fields, Start at (hh:mm) and Start on (yyyy-mm-dd). The user sets the time and date and STEP completes the translation export at the configured time.
![]()
Weekly - Allows the user to create a recurring export to execute once or multiple times a week. The user sets the time and date to start, the date at which the weekly export will end, and then the day (or days) of the week the export should run until the configured interval has elapsed. One or all days of the week can be selected.
![]()
Monthly - Allows users to set a recurring translation export once a month. The user sets the time and date to start, the date at which the weekly export will end, and then a non-date-specific day in the month at which the export (or days) of the week the export should run until the configured interval has elapsed. For example, the monthly export can be scheduled for the first Monday of every month.
![]()
Later and repeat - Allows users to create a recurring export that can be auto-initiated multiple times a day. In addition to the time and date fields, the user can set the number of minutes between auto-exports.
![]()
Use the Later and repeat scheduler with caution as it is possible to set up a recurring export as often as every few minutes. If the intended interval is improperly set, the STEP system can experience negative performance issues. For instance, if the Delivery Method of the export is set to ship to an FTP for a translation vendor to retrieve, and the vendor's tasked with processing all files they retrieve, the user could incur unexpected costs.
When the export schedule has been configured, click Finish, and the translation exports will commence according to the schedule you have set.
When a structured translation export process has been initiated, a few final steps must be taken in that export's background process. If in the Schedule Extract screen you selected Now, a small window will display showing two options: Go to Process and Close.
![]()
Click Go to process to go directly to the export's background process. Click Close if you are not able to progress the translation at that moment. To access the background process directly at a later date, click the BG Processes tab, expand Translation, and then expand Active Processes. Click on the relevant process and view the Result section.
If more than one target language is selected, a background process will be created for each target language, each process creating its own file.

If you click No, the translation export is ended, and the translation status of the selected objects is not changed.

2018, Stibo Systems – Confidential