The prediction functionality can be used in a production setup by calling the business action that retrieves the predictions from a product onboarding workflow. The workflow can then branch based on the prediction confidence, resulting in the product being automatically classified for a prediction with a high confidence, while a creating a user task with the prediction information if no predictions meet the desired confidence threshold.
Given that the prediction service response time can be several seconds, to avoid blocking users, the configuration examples in this topic make use of an event processor (EP). The EP can be configured to use no batch and batch options and sends the prediction request from the event processor instead of sending it from an action executed in the workflow. Options are:
- Using the ‘Execute Business Action’ event processor plugin — a business action will be executed once per queued event and a prediction request is sent for each event.
- Using the 'Execute Business Action for Event Batch' event processor plugin — a business action will be executed via a batch, meaning that data for multiple events will be handled with a single action invocation and a single request.
The full process of implementing the MLAC auto classification functionality in a workflow includes these steps:
- Create an Onboarding Workflow
- Define a Derived Event Type
- Create an Event Processor Filter Condition
- Create a Prediction Business Action
- Create and Configure an MLAC Event Processor
- Create a Workflow Business Action
Create an Onboarding Workflow
While the MLAC auto classification logic could be part of a larger product onboarding flow, states not relevant for auto classification have been left out of this example.
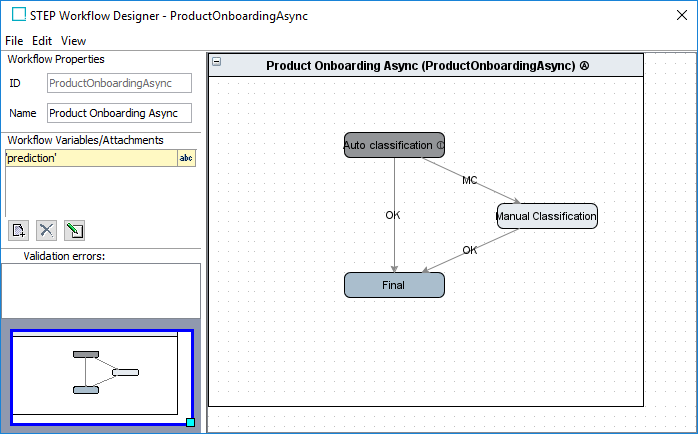
For initial (and simplified) testing, create a workflow based on the image below, including the defined workflow states. After verifying the functionality, these states can be added to your existing onboarding workflow.
For general information, see the Workflows documentation here.
Workflow States
The states for this onboarding / classification workflow are:
- Auto classification is a system state that does not represent a human task. When a product enters this state, an event is placed on the queue for the event processor to make the prediction request and, dependent on the confidence of the best prediction, either classify the product and trigger the 'OK' event or trigger the 'MC' event.
- Manual Classification is a human task to manually classify a product with a low prediction confidence. The predictions returned from the service are made visible to the user via the ‘prediction’ workflow variable to which the prediction response will be written.
- Final is a basic mandatory final state.
The following sections describe the configuration necessary for this setup.
Define a Derived Event Type
The event to be produced from within the workflow and placed on the queue for the event processor should be of a user-defined type, also called a derived event.
To create a derived event:
- In System Setup, click the 'Derived Events node to open the editor.
- Click the Add Derived Event Type link.
- Add an ID for the event type.
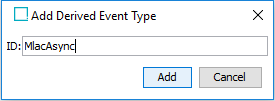
- Click the Add button to save the event type.
For more information, see the Derived Events topic in the System Setup / Super User Guide documentation here.
Create an Event Processor Filter Condition
An event filter is required on the Event Triggering Definitions tab of the event processor to ensure that only events generated from the workflow are allowed on the event processor queue. For more information, event triggering definitions for event processors are the same as for OIEPs as defined in the OIEP - Event-Based - Event Triggering Definitions Tab topic in the Data Exchange documentation here.
This event filter is a JavaScript-based business condition that is valid for all object types.
In the JavaScript editor create a bind with:
- 'Variable name' set to currentEventType
- 'Binds to' set to Current Event Type (in the Event Handling group)
- Add the following to the JavaScript parameter:
var isDerivedEvent = currentEventType instanceof com.stibo.core.domain.eventqueue.DerivedEventType;
var idIsCorrect = currentEventType.getID() == "MlacAsync";

return isDerivedEvent && idIsCorrect;
Create a Prediction Business Action
No Batch Processing
Using the 'Execute Business Action' event processor plugin executes the configured prediction (confidence) business action once for each event in a non-batched manner. This business action has access to the node (product) for which the event was generated via the 'Current Object' bind. This allows the logic described in the Business Action Configuration for MLAC topic (here) to be reused.
Below is a full-script example with bodies of functions described earlier omitted and a TODO for actually classifying the product given a prediction with a sufficient confidence is returned. If not duplicating and extending a business action created earlier based on the information in the Business Action Configuration for MLAC topic, binds should be configured as explained in that section and the action should either be made applicable for the product object type or for all object types.
function getToken() {
	//Omitted. See "Business Action Configuration for MLAC"
}

function getProductJsObject(prod) {
	//Omitted. See "Business Action Configuration for MLAC"
}

function createBody() {
	//Omitted. See "Business Action Configuration for MLAC"
}

function getPredictionsString(tokenResponse, body) {
	//Omitted. See "Business Action Configuration for MLAC"
}

function getResponseJsObject(responseString) {
	//Omitted. See "Business Action Configuration for MLAC"
}

function createPredictionsVariableValue(responseJsObject) {
	var predictions = responseJsObject.predictions[0].hierarchies[0].predictions;
	var predictionsString = "";
	for (var i = 0; i < predictions.length; i++) {
		if (i > 0) {
			predictionsString = predictionsString + ", "
		}
		var prediction = predictions[i];
		predictionsString = predictionsString + prediction.classificationId + ": " + prediction.confidence;
	}
	return predictionsString;
}

var confidenceThreshold = 90;
var wfId = "ProductOnboardingAsync";
var stateId = "Auto-classification";

var instance = product.getWorkflowInstanceByID(wfId);
if (!instance) {
	throw "Product with ID '" + product.getID() + "' is not active in workflow '" + wfId + "'";
}
var task = instance.getTaskByID(stateId);
if (!task) {
	throw "Product with ID '" + product.getID() + "' is not in expected state '" + stateId + "'";
}

var tokenResponse = getToken();
var body = createBody();
var responseString = getPredictionsString(tokenResponse, body);
var responseJsObject = getResponseJsObject(responseString);

var confidence = parseInt(responseJsObject.predictions[0].hierarchies[0].predictions[0].confidence);

if (confidence >= confidenceThreshold) {
	// TODO: Classify the product in classification jsonResp.predictions[0].hierarchies[0].predictions[0].classificationId
	task.triggerByID("OK", "Triggered by script");
} else {
	var predictionsString = createPredictionsVariableValue(responseJsObject);
	instance.setSimpleVariable("prediction", predictionsString);
	task.triggerByID("MC", "Triggered by script");
}
Batch Processing
For improved business action processing, a batch business action allows multiple events to be handled with a single action invocation and a single request.
The batch business action to be used for the batch event processor plugin is similar to the one described above. The main difference is that the batch version does not use 'Current Object' as its input, but instead uses the 'Current Event Processor Event Batch' bind to access a batch of queued events. Additionally, the batch business action composes a single request with data for multiple products and similarly handles the response containing predictions for multiple products.
Use the following steps to create the batch business action:
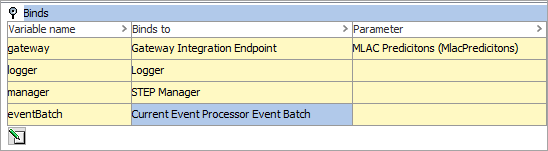
- The business action should have the following binds:
- gateway = Gateway Integration Endpoint (under the Configuration group), with the MLAC IEP selected
- logger = Logger
- manager = STEP Manager
- eventBatch = Current Event Processor Event Batch (under the Event Handling group)
- For the JavaScript parameter, add a script to compose a request and handle the response.
The full JavaScript example is below.
function getToken() {
	var body = {};
	body.username = "myusername";
	body.password = "mypassword";
	var bodyString = JSON.stringify(body);

	var tokenRequest = gateway.post().pathElements("token").acceptContentType("text/plain").body(bodyString);

	var tokenResponse;
	try {
		tokenResponse = tokenRequest.invoke();
	} catch(e) {
		if (e.javaException instanceof com.stibo.gateway.rest.RESTGatewayException) {
			throw "Error getting token: " + e.javaException.getMessage();
		} else {
			throw(e);
		}
	}
	return tokenResponse;
}

function getProductJsObject(prod) {
	var id = prod.getID();
	var vendor = prod.getValue("Vendor").getSimpleValue();
	var description = prod.getValue("ConsumerShortDescription").getSimpleValue();

	var jsObject = {};
	jsObject.id = "" + id;
	if (description) {
		jsObject.description = "" + description;
	}
 	if (vendor) {
		jsObject.sourceId = "" + vendor;
	}
	return jsObject;
}

function createBody(prodsArray) {
	var bodyJsObject = {};
	bodyJsObject.products = prodsArray;
	return JSON.stringify(bodyJsObject);
}

function getPredictionsString(tokenResponse, body) {
	var queryParams = new java.util.HashMap();
	queryParams.put("hierarchyIds", "primaryHierarchy");
	queryParams.put("maxSuggestionsPerHierarchy", "5");

	var request = gateway
		.post()
		.pathElements("predict")
		.header("Authorization", tokenResponse)
		.pathQuery(queryParams)
		.body(body);

	var response;
	try {
		response = request.invoke();
	} catch(e) {
		if (e.javaException instanceof com.stibo.gateway.rest.RESTGatewayException) {
			throw "Error getting prediction: " + e.javaException.getMessage();
		} else {
			throw(e);
		}
	}
	return response;
}

function getResponseJsObject(responseString) {
	var jsResponseString = "" + responseString;
	return JSON.parse(jsResponseString);
}

function createPredictionsVariableValue(predictions) {
	var predictionsString = "";
	for (var i = 0; i < predictions.length; i++) {
		if (i > 0) {
			predictionsString = predictionsString + ", "
		}
		var prediction = predictions[i];
		predictionsString = predictionsString + prediction.classificationId + ": " + prediction.confidence;
	}
	return predictionsString;
}

function getProductsArrayFromBatch() {
	var products = [];

	var batchIterator = eventBatch.getEvents().iterator();

	while (batchIterator.hasNext()) {
		var node = batchIterator.next().getNode();
		if (node instanceof com.stibo.core.domain.Product) {
			var instance = getInstance(node);
			var task = getTask(instance);
			if (task) {
				products.push(getProductJsObject(node));
			} else {
				logger.warning("Product with ID '" + node.getID() +
"' is not in the expected state '" + stateId +
"' in workflow '" + wfId + "'. No predictions will be
				obtained for the product.");
			}
		}
	}
	return products;
}

function getInstance(node) {
	return node.getWorkflowInstanceByID(wfId);
}

function getTask(instance) {
	if (!instance) {
		return null;
	}
	return instance.getTaskByID(stateId);
}

function handlePredictions(predictions) {
	for (var index in predictions) {
		var prediction = predictions[index];
		var id = prediction.id;
		var product = manager.getProductHome().getProductByID(prediction.id);
		if (product) {
			var instance = getInstance(product);
			var task = getTask(instance);
			if (task) {
				var confidence =
parseInt(prediction.hierarchies[0].predictions[0].confidence);
if (confidence >= confidenceThreshold) {
// TODO: Classify the product in classification prediction.hierarchies[0].predictions[0].classificationId
task.triggerByID("OK", "Triggered by script");
} else {
var predictionsString = createPredictionsVariableValue(prediction.hierarchies[0].predictions);
instance.setSimpleVariable("prediction", predictionsString); task.triggerByID("MC", "Triggered by script"); } } } } } var confidenceThreshold = 90; var wfId = "ProductOnboardingAsync"; var stateId = "Auto-classification"; var products = getProductsArrayFromBatch(); var body = createBody(products); var tokenResponse = getToken(); var responseString = getPredictionsString(tokenResponse, body); var responseJsObject = getResponseJsObject(responseString); handlePredictions(responseJsObject.predictions);
Create and Configure an MLAC Event Processor
Use the steps below to create and configure the event processor required for the auto classification setup. For detailed information on event processors, see the Creating an Event Processor topic in the System Setup / Super User Guide documentation here.
No Batch Processing
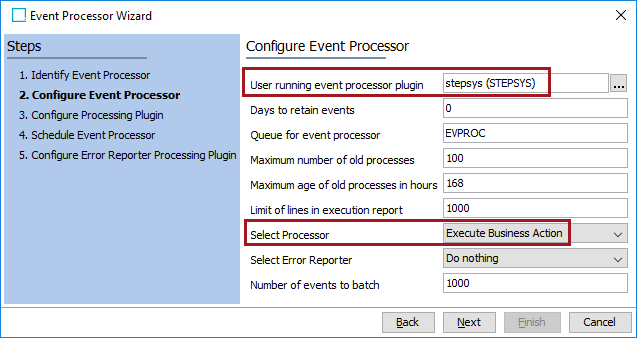
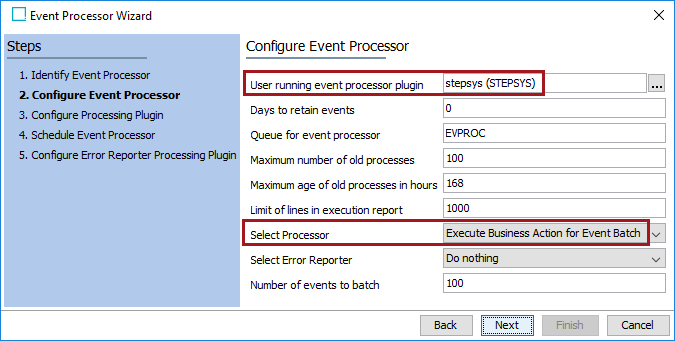
- Create a new event processor and on the 'Configure Event Processor' step:
- For the 'User running event processor plugin' parameter, select a privileged system user.
- For the 'Select Processor' parameter, choose the Execute Business Action processor plugin.
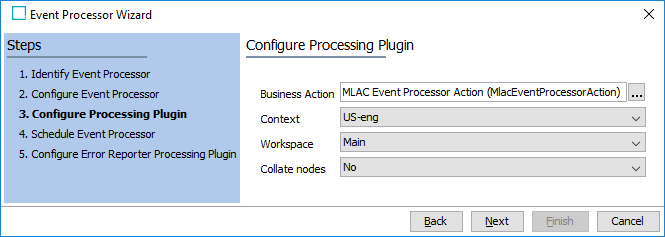
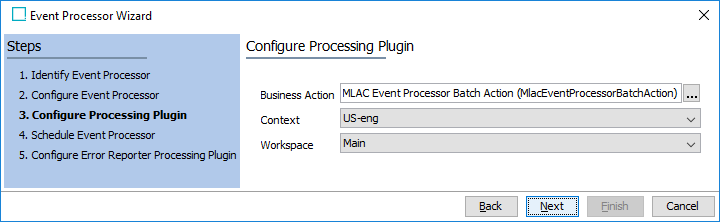
- On the 'Configure Processing Plugin' step:
- For the Business Action parameter, select the previously created business action.
- For the Context parameter, select the context in which the action should be executed. Product data (like the description) will be read from this context.
- For the Workspace parameter, select the workspace in which the action should be executed. Product data (like the description) will be read from this context.
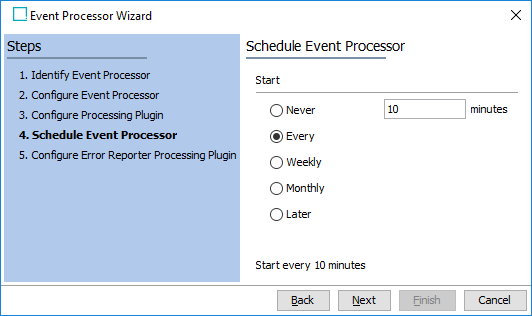
- On the ‘Schedule Event Processor’ step, specify how frequently the event processor should handle events on the queue.
- Click the Next button and the Finish button to close the wizard.
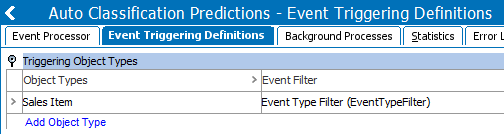
- On the event processor, click the Event Triggering Definitions tab and open the Triggering Object Types flipper.
- Click the Add Object Type link and add your product object type. It displays in the Object Types column.
- Click in the Event Filter column to display an ellipsis (
 ), click the ellipsis button () and add the event filter business condition created previously.
- On the Event Processor tab, set the Queue Status parameter to Read Events.
- Right-click the event processor and select the Enable Event Processor option.
Batch Processing
The event processor used for the batch functionality is configured almost exactly like the non-batched version described in the previous section. The difference is that the batch processor uses the ‘Execute Business Action for Event Batch’ plugin and references the business action that can handle a batch of events.
Use the following steps to create a batch event processor:
- On the Configure Event Processor step:
- For the 'User running event processor plugin' parameter, select a privileged system user.
- For the 'Select Processor' parameter, select the Execute Business Action for Event Batch option.
- On the Configure Processing Plugin step, select the batch business action created previously.
- If a workflow has already been configured using the non-batched event processor, it can be used for the batch process with a single modification. The workflow action that queues events must be modified to queue events for the new event processor.
Create a Workflow Business Action
Create an action to generate the required event type and set it to be executed when a product enters the ‘Auto classification’ system state. The example shown in this section is for the non-batched EP and the batch EP would work similarly using he info in the prior sections.
- Edit the onboarding workflow, select the 'Auto classification' state, right-click and choose the Edit State option.
- Click the 'On Entry' tab click the Add new Business Action link.
- On the Operations tab, click the edit button (
 ) and select Execute JavaScript from the operations dropdown.
 - On the Edit Operation dialog:
- In the Binds flipper, create three (3) binds:
- eq = the event queue
- mlacEvent = the derived event type
- product = the current object
- For the JavaScript parameter, add the following script:
eq.queueDerivedEvent(mlacEvent, product);
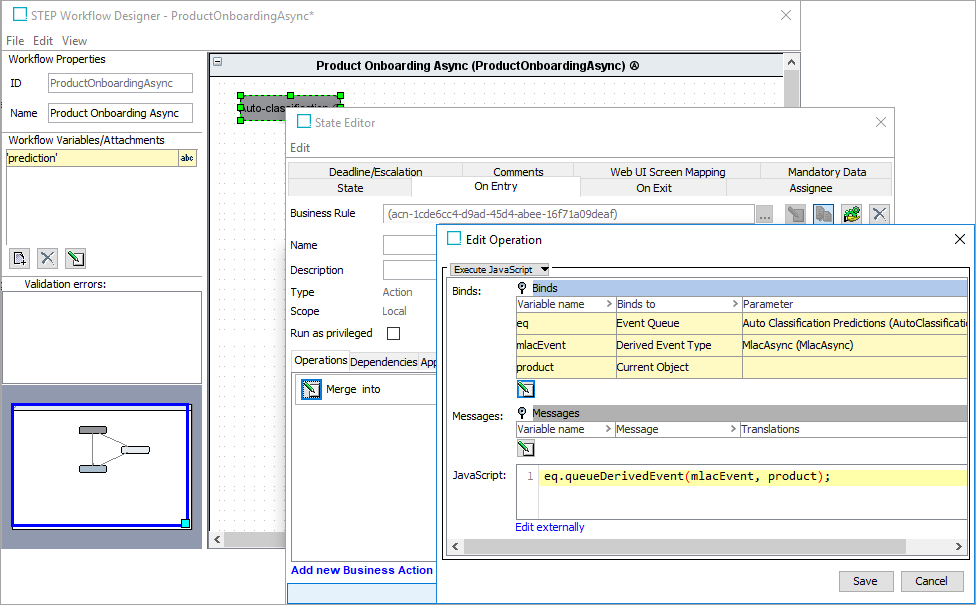
- Click the Save button, and close the State Editor dialog.
- On the STEP Workflow Designer, open the File menu and click the Save and Exit button.