Find Similar in Web UI
To avoid users creating duplicate objects in the STEP system, users can use the 'Find Similar Action' to identify similar objects prior to initiating new ones, when working in Initiate Item screens in Web UI. Also, users can use 'Find Similar' functionality to search for and identify similar objects prior to adding references and creating target objects within a Multi-Reference Editor.
Using Find Similar on an Initiate Item Screen
This example shows how Find Similar is used on an 'Initiate Item' screen, including a 'Store Single Referenced Target' component.
The 'Store Single Referenced Target' component is intended to find a similar record on 'Initiate Item' workflow state. The component can be used to create a single reference target with attributes and create a reference to it from the matched record.
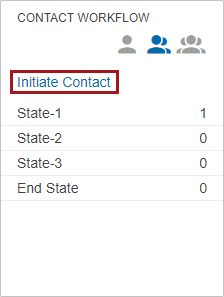
For example, a user creates a Contact object by clicking 'Initiate Contact' on the 'Status Selector Homepage Widget.'
On the Initiate Screen, the user enters data into the direct object search fields and into the referenced object search fields and then clicks the 'Find Similar' button.
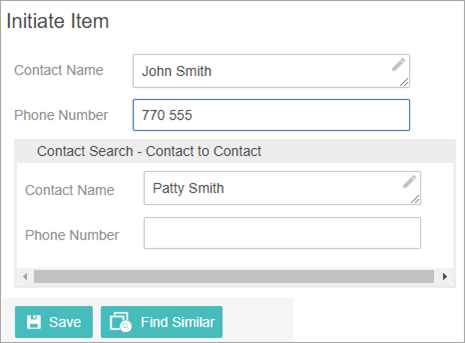
The algorithm runs in the background, and the configured Dialog List Screen displays. Be aware that this is not a standard search, and the results are based on the matching algorithm running in the background.
Important: As stated at the beginning of this topic, the key to Find Similar functionality is the matching setup that the customer creates and uses for duplicate handling. This is important because the attributes being searched must be part of the list of attributes that match codes are generated for; if not, the search will not work as expected.

A maximum of fifty (50) objects are shown at one time on the results list. The user can select one of the objects shown in the results list. After choosing an item, select the OK button. Clicking OK takes the user directly to that object via the appropriate Web UI screens.
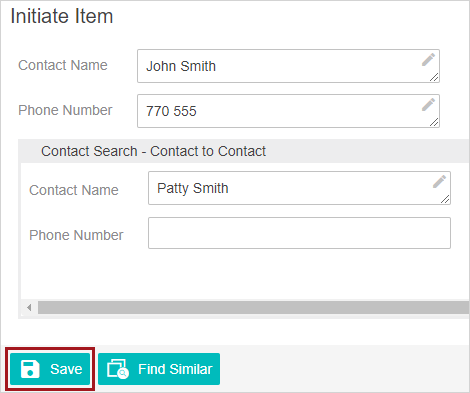
If the user wants to create a new object with the search data entered, the user clicks Cancel to exit the results list. On the Initiate Screen, the user will click Save and be taken directly to the new object. The data entered into the attribute value fields, which are configured in the Store Single ReferencedTarget Properties, is also used to generate the referenced object and the reference between these objects is also created.
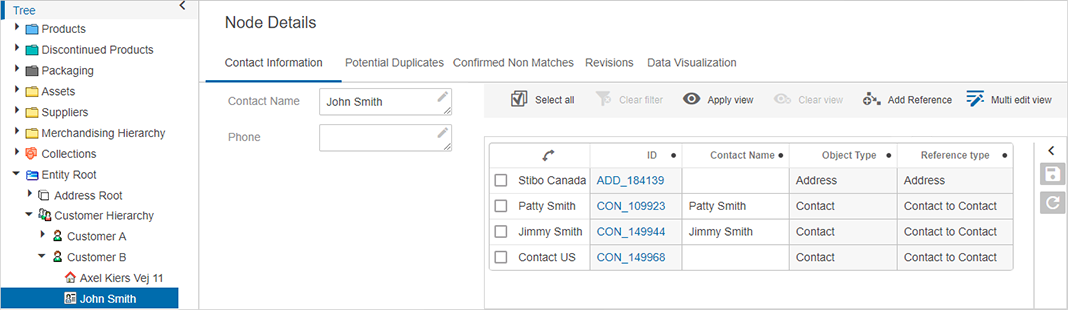
If applicable, the new object will automatically be initiated into a workflow or workflows based on existing workflow rules. For more information about workflows and auto-initiation, see the Auto-Initiation of Tasks in Workflows topic in the Workflows documentation here. It is advisable to also make use of standard STEP tools like business rules and workflows to manage the referenced objects that are created in this manner.
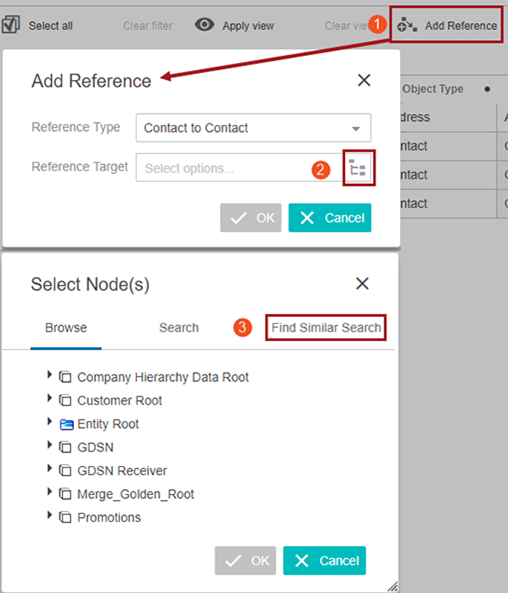
Using Find Similar on an Add Reference Action
The following section details an example of a configured 'Find Similar Search' tab.
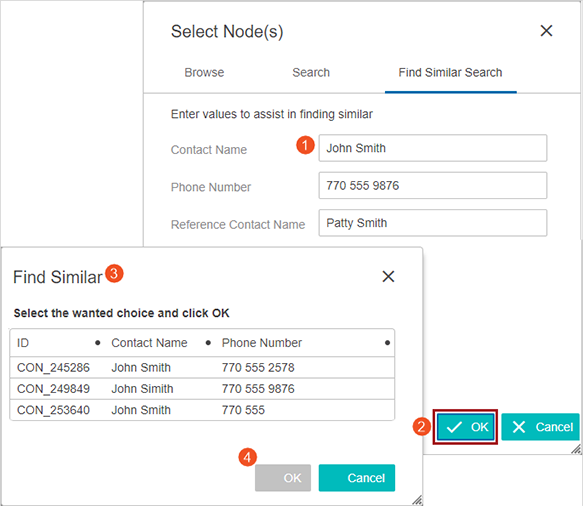
While using a 'Multi-Reference Editor' component, click 'Add Reference,' and then, click the node picker icon on the 'Add reference' dialog that appeared. The Find Similar Search tab is displayed in the 'Select Node(s)' dialog. The end user enters data into the configured attribute fields and clicks OK. The algorithm runs in the background and the configured Dialog List Screen displays. Remember that this is not a standard search and results are based on the matching algorithm running in the background.
Important: As stated previously in this topic, the key to Find Similar functionality is the matching setup that the customer creates and uses for duplicate handling. This is important because the attributes being searched must be part of the list of attributes that match codes are generated for. If not, the search will not work as expected.
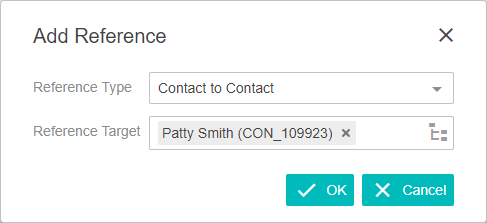
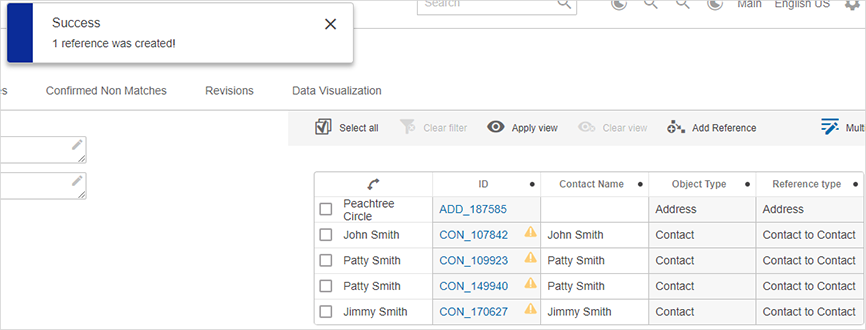
A maximum of fifty (50) objects are shown at one time on the results list. If the end user finds a reference on the results list that they want to use, they click in the row they want. When that selection is made, the OK button will be available. The end users clicks 'OK' and now that reference is saved. If the user does not find a result to use, they can click cancel and create a new reference using the Create or Create from Template functions (both described previously in this topic).
Note: Find Similar functionality is also available when working with company data hierarchies via the Hierarchy Representations component (found in Main (Screen) Properties). For more information on the setup, which is similar to Add Reference, see the Optional Configurations for the Hierarchy Representation Component topic in the Web User Interfaces / Web UI Getting Started documentation here.
Configure Match Codes and Matching Algorithm for Use with Find Similar
When configured to work with getSimilarObject web service, special considerations should be made for the solution's match codes and matching algorithm.
Important: A getSimilarObject request can only return ninety-nine results at a time.
Match Codes
Attribute value binds in the match code definition should be created specifically for getSimilarObject cases.
For example:
if ( node == null ) {//generate matchcodes for getSimilarObject
}
else {//generate matchcodes for existing objects
}
Note: When used for getSimilarObject, it is safe to establish large match code groups without impacting performance.
For more information, see the Match Codes topic of the documentation here.
Matching Algorithm
Matching algorithm global binds should be configured to map the attributes used in the SOAP request. 'Mcevaluate' / 'evaluate' should be used in the match criterion’s STEP function / JavaScript function to retrieve these values when the current object returns null.
Note: It is recommended practice to use the decision table match criteria for this purpose.
When decision tables are used as the match criteria, any configured party data normalizers require that all configured attributes also exist as global binds. This applies to both explicitly configured attributes and for those configured via component models.
So, for example, if the Address Normalizer is used for getSimilarObjects, the country, region, city, postcode, and street attributes must have corresponding global binds.
Important: For customer data normalizers, the name of the global bind must match the ID of the corresponding attribute.
Customer data normalizers are compatible with getSimilarObject so long as global binds are set on the matching algorithm. For more information on global binds and match criteria, see the Configuring Matching Algorithms topic of the documentation here.
Configuring Find Similar on an Initiate Item Screen
Prerequisites
All the steps provided in this topic assume the Web UI designer is in design mode and on the applicable Properties screen prior to starting the configuration process. It is also assumed that all users have the proper privilege to work with these features. For more information about privileges and user setup, see the Users and Groups topic (here) and Adding User Privileges for a Group topic (here) of the System Setup / Super User Guide documentation.
- Create a new 'Initiate Item' screen or use an existing one.
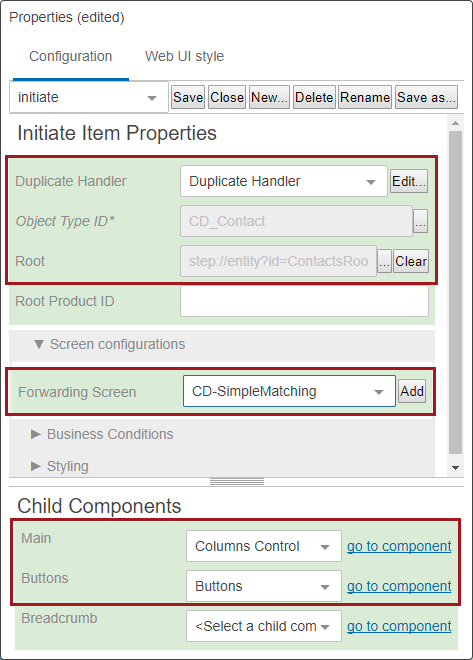
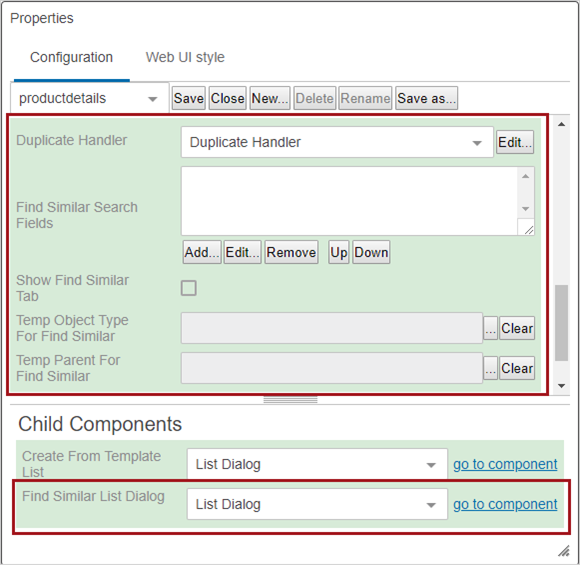
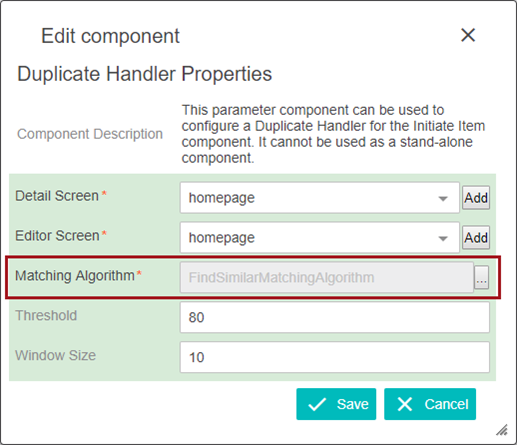
- In 'Initiate Item Properties,' select 'Duplicate Handler' in the dropdown for the 'Duplicate Handler' parameter.
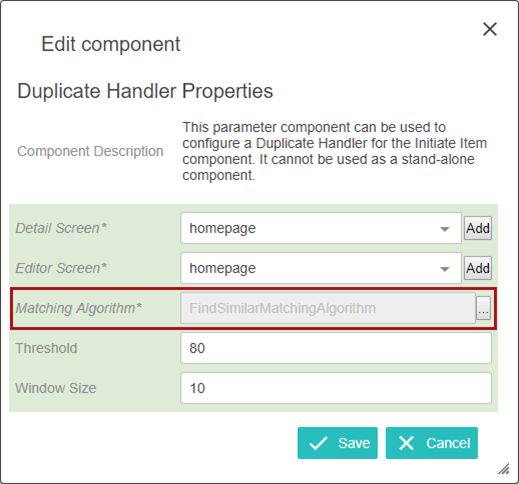
The Duplicate Handler Properties screen will display. The only required setting is the matching algorithm parameter.
- Click the ellipsis button (
 ) to the right of the value field and select a matching algorithm. Click Save.
- On the Initiate Item properties dialog, if the default Object Type ID is not the correct option, click the ellipsis button () to the right of the Object Type ID parameter to select the object type of the objects that will be initiated into the system.
- Click the ellipsis button () to select a Root directory. New items will be created below the designated root folder. A default value will be populated.
- Select a 'Forwarding Screen' option. This screen is what is shown once an object is created.
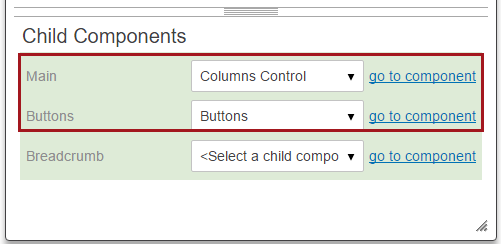
- For the 'Main' child components option, choose 'Columns Control' from the dropdown. Click on 'go to component' to configure this option. Select 'Node Editor' in the Columns Control Properties.
- Double click the Node Editor component to go to the Node Editor Properties dialog. On this dialog, the search attributes need to be configured within the Child Components > Rows value field using the add and remove buttons. These search attributes are for searching direct objects.
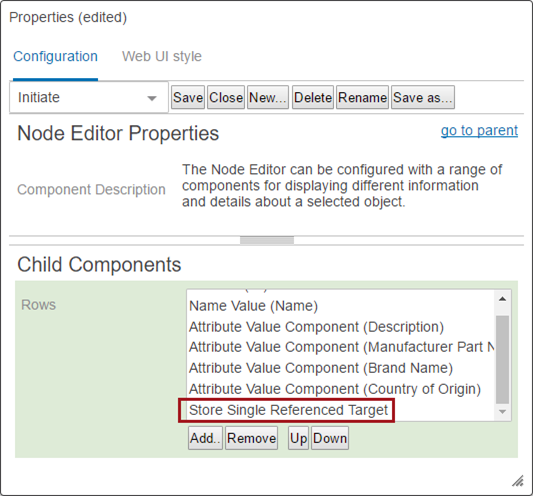
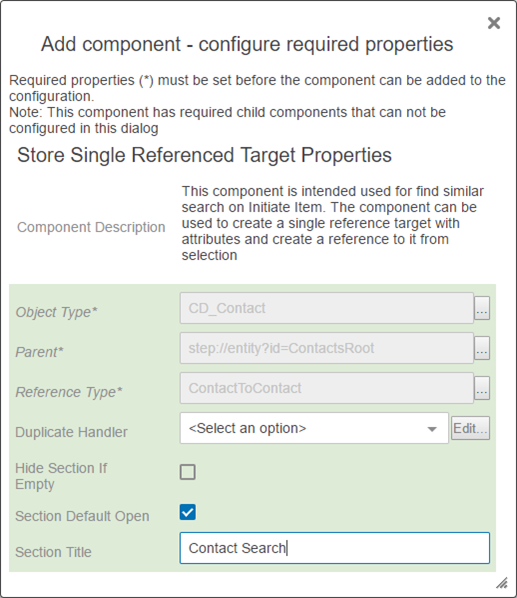
- If the use case requires searching on referenced objects in addition to direct objects, users must add the 'Store Single Referenced Target' component. Double click on 'Store Single Referenced Target' to configure the component. The 'Object Type,' 'Parent,' 'Reference Type,' and 'Child Component > Rows' are required parameters / components. Go through each parameter one-by-one to complete the configuration.
- On the parent screen's 'Initiate Item Properties' screen, go to 'Child Component > Buttons' and click on 'go to component.' In the 'Actions' value field, select 'Add' and select 'Find Similar Action.'
- Double click on the 'Find Similar Action' title and open the 'Find Similar Action Properties' dialog.
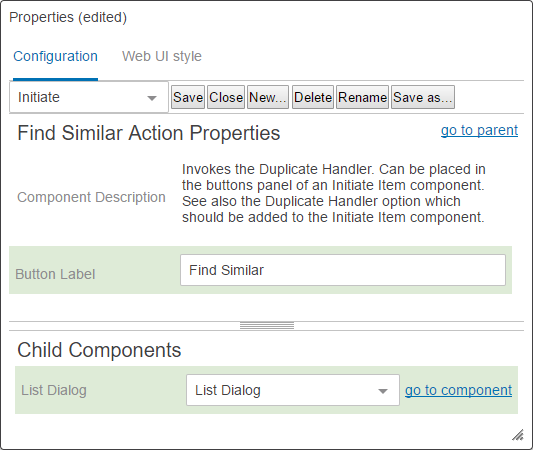
- Edit the Button Label, if desired. Under Child Components > List Dialog, select 'List Dialog' from the dropdown menu.
- On 'List Dialog' Properties, select a Dialog List screen. If a Dialog List screen does not exist, follow the next two steps to create one.
- Click Add to the right of the Dialog List screen value field.
- Create a new screen by selecting Dialog List screen from the list of available screen types / components. Enter a screen ID, and then, click Add. The screen ID will automatically populate in the Dialog List Screen value field.
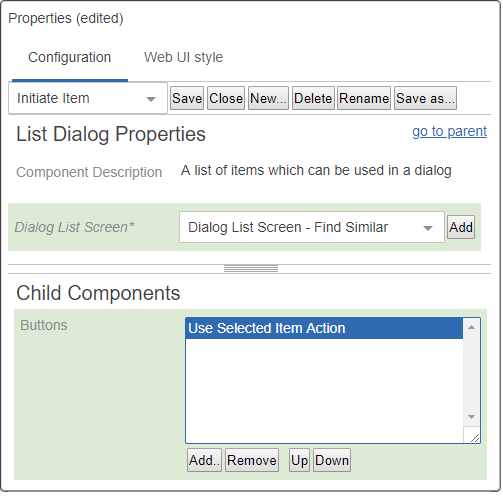
- On the List Dialog Properties screen, in the Child Components > Buttons field, click Add and select Use Selected Item Action. Click Add, and then click Save in the designer window.
- Before exiting design mode, select the Dialog List Screen ID of the screen you just created from the dropdown menu. In the example above, the screen ID is 'Dialog List Screen - Find Similar.'
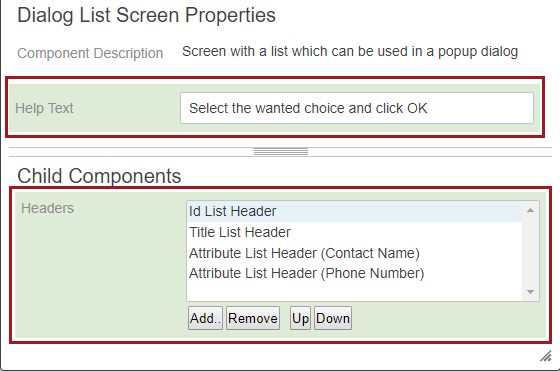
- Configure the Child Components > Headers section of the Dialog List Screen Properties. Click Add under the value field to set up the attributes that will display in the Find Similar Search tab for the results list. The Help Text is editable and will display at the top of the results list.
- Click Save and Close design mode to return to normal Web UI mode.
Configuring Find Similar on an Add Reference Action
This setup information is also available in the Add Reference Action topic of the Web User Interfaces / Using a Web UI documentation here.
- Edit the properties for an existing Add Reference Action configured for a Multi-Reference Editor, or add an Add Reference Action and complete the configuration.
- In the Add Reference Action Properties, select Duplicate Handler in the dropdown for the Duplicate Handler parameter.
- The Duplicate Handler Properties screen will display. The only required setting is the Matching Algorithm parameter. Click the ellipsis button () to the right of the value field and select a matching algorithm. Click Save.
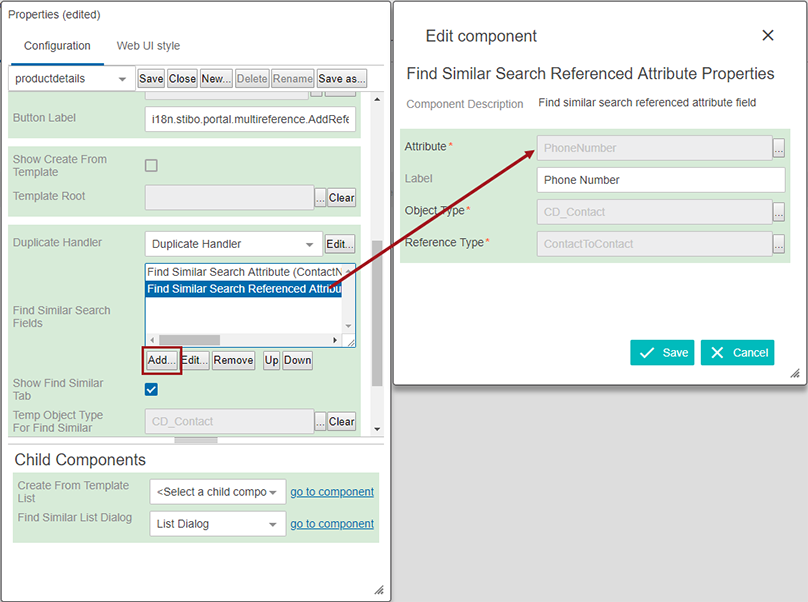
- On the 'Add Reference Action Properties' again, click Add under the Find Similar Search Fields value box. Add, remove, and re-order Attribute and Referenced Attributes as desired. Remember that these search fields will need to be incorporated into the matching algorithm configured in the Duplicate Handler parameter.
- It is important to fill in the Label fields during the Find Similar Search Fields configuration. These labels will appear on the Find Similar Search tab. If adding a Find Similar Search Referenced Attribute, fill in the Attribute, Label, Object Type, and Reference Type values. Save all changes.
- Enable the Show Find Similar Tab setting back on the Add Reference Action Properties.
- Click the ellipsis button () to make a selection for the Temp Object Type For Find Similar parameter and the Temp Parent For Find Similar parameter. (When the matching algorithm is run, it creates temporary objects based on the input in the search fields. These objects are then used in the algorithm to compare and find similar objects. The temporary objects need a parent and object type to be created. After the user finishes the operation, the temporary objects are deleted by the system. These parameters have to be configured for the functionality to work. The object types of both the direct objects and the referenced objects need to be made valid under the location used for the Temp Parent For Find Similar parameter.)
Important: The node selected for Temp Parent For Find Similar in the configuration, must also be included in the category specified in the match code definition if a category is specified. If this is not done, the match codes will not generate properly, and the match results will be incorrect.
- Under Child Components > Find Similar List Dialog, select List Dialog from the dropdown menu.
- On List Dialog Properties, click Add to the right of the Dialog List Screen value field.
- Create a new screen by selecting Dialog List Screen from the list of available screen types / components. Enter an easily identifiable Screen ID, click Add. The screen ID will automatically populate in the Dialog List Screen value field.
- If a Dialog List Screen already exists, skip the previous two steps, and on the List Dialog Properties, select the Dialog List Screen using the dropdown.
- On the List Dialog Properties screen, in the Child Components > Buttons field, click Add and select Use Selected Item Action. Click Add, and then click Save in the designer window.

- Before exiting design mode, select the Dialog List Screen ID of the screen you just created from the dropdown menu. In the example above, the screen ID is Dialog List Screen - Find Similar.
- Configure the Child Components > Headers section of the Dialog List Screen Properties. Click Add under the value field to set up the attributes that will display in the Find Similar Search tab for the results list. The Help Text is editable and will display at the top of the results list.
- Click Save and Close design mode to return to normal Web UI mode.
Find Similar Webservice (getSimilarObjects)
To avoid users creating duplicate objects in source systems, integrators can make use of the getSimilarObject SOAP web service.
The following section discusses how the getSimilarObjects web service sends a call when performing a Search Before Create operation. The getSimilarObjects web service is a part of the SOAP API.
The getSimilarObjects request defines the criteria for the match and the information to be returned. The following should be supplied in the call.
- Access Context - This parameter contains the username and password for the user accessing the system. It may optionally contain the context and workspace as well.
- Values - The values supplied are used by the matching engine for comparison. The property URL points to the URL of the attribute ID in the system that the value should be associated with for comparison.
- Object Type URL - This parameter is the URL of the object type in the system which will be used as a base for comparison.
- Matching Algorithm URL - The URL of the matching algorithm in the system to perform the comparison.
- Export Configuration XML - This optional section defines the information in XML format of the potential duplicates to be returned in the response. If excluded from the request, the STEP ID, STEP URL, Title, Super Type, Object Type URL, and Score will be returned. The records will be returned in order of highest score to lowest score.
- Search Threshold - The score threshold of potential duplicates to be returned. If the search threshold is 70, only records that match the supplied values with a score of 70 or above will be returned in the response. The Clerical Review Threshold and the Auto Threshold defined in the matching algorithm are ignored.
- Max Count - The maximum number of potential duplicates to return. If the matching algorithm identifies 100 records that score above the Search Threshold and the Max Count is set to 10, only the top 10 scoring records will be returned in the response.
Complete documentation for Web Services functionality related to getSimilarObjects can be found in the SOAP API documentation at [system]/sdk or by clicking the STEP API Documentation button on the Start Page. This topic provides some basic information and an example of a simple SOAP request but should not be considered comprehensive.
Note: getSimilarObjects rely on the match algorithm to search, and so match codes must exist and be up-to-date on the records, and match criteria must be set up in the system for the 'getSimilarObjects' call to work.
Node Binds and the getSimilarObjects Web Service
When a getSimilarObjects call is made, a node–a permanent STEP object–is not created in the system. This non-permanent state means that the match code cannot get a hold of the 'Current Object,' and the match algorithm cannot get a hold of the first() node via the 'Match Expression Context.' For results to be returned, the matching engine needs a way to compare the values in the call to the values on the existing system nodes. This issue is solved through binds.
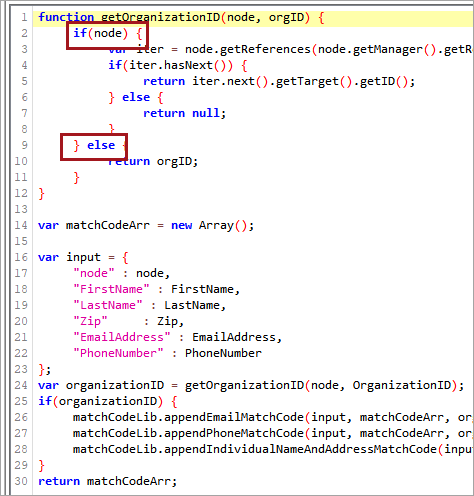
Binds associate incoming values to attributes in the system allowing the matching engine to make the appropriate comparisons. All values used in the match code should be defined under the binds flipper. Match codes should make use of the if(node){}else{} function for values not on the current object such as the reference being used in the code below.
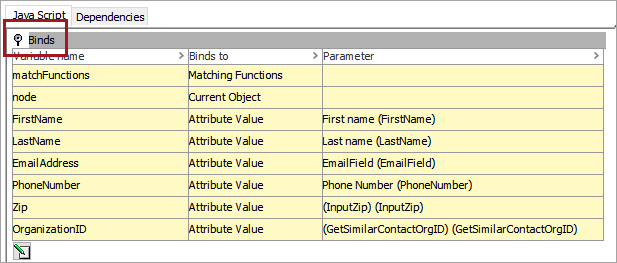
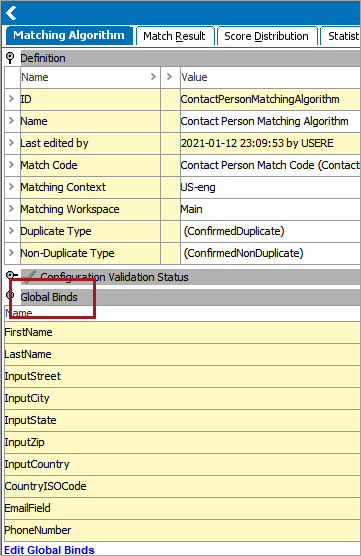
All values used in the match algorithm should be defined under the 'Global Binds' flipper. This expectation applies to both explicitly configured attributes and for those configured via component models. If customer data normalizers are used, the name of the global bind must match the ID of the corresponding attribute.
Note: If using the 'Address Normalizer' in the match algorithm, the following attributes defined in the Address component model should be bound to the match algorithm:
- Input Street
- Input City
- Input State
- Input Zip
- Input Country
- Country ISO Code
Matching using binds is not optimized for the In-Memory Database Component.
For more documentation for Web Services functionality related to GetSimilarObjects, click the STEP API Documentation button on the STEP Start Page and see the SOAP API section. For information on JavaScript binds, see the JavaScript Binds topic in the Resource Materials documentation here.