Match Codes
The purpose of match criteria is to determine if the record at hand matches another record in the database. The database can contain an incredible amount of data, so we need a fast and efficient way to find the records that potentially are matches. That is the purpose of match code. Through match codes, algorithms can compare created results and process records quickly.
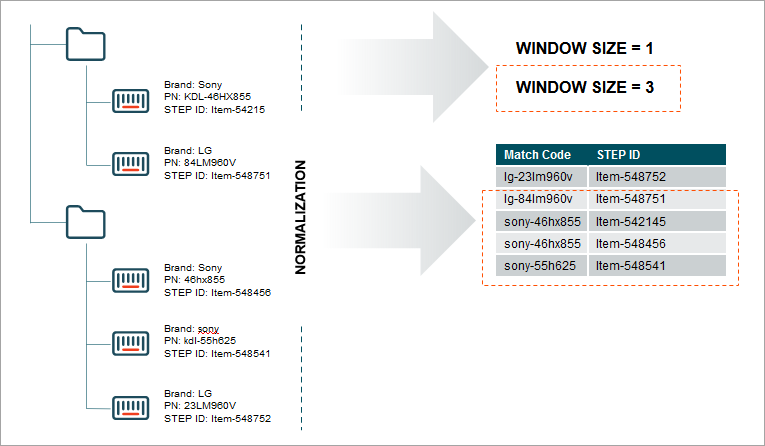
A match code is essentially a string (i.e., a text) representing an object. Once generated, these match codes populate an alphabetically sorted table in the system. Rather than comparing every object with every other object in the dataset, only objects with at least one equal match codes will be compared.
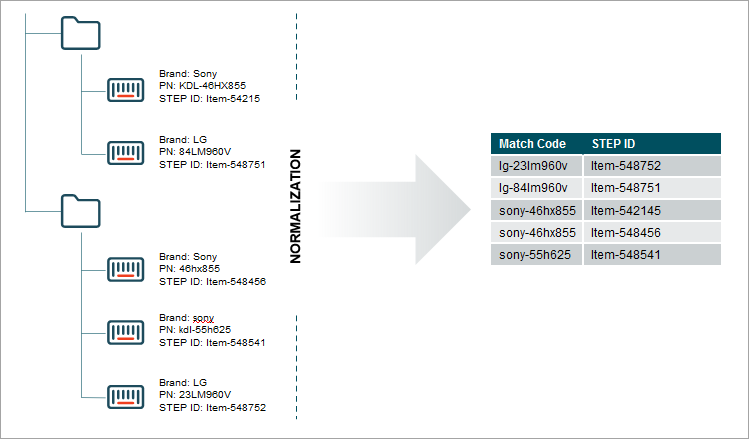
In the example above, the product with STEP ID Item-548456 is the record-at-hand. By the match code table, we can see that one other object has an identical match code.
It is usually necessary to use several different match codes to ensure matching records are actually compared. Determining which and how many match codes to use is a balance. It is important that matching records share at least one match code. It is undesirable that non-matching records share match codes, as running the full match criteria comparisons on those records will waste system resources.
Match Code Values
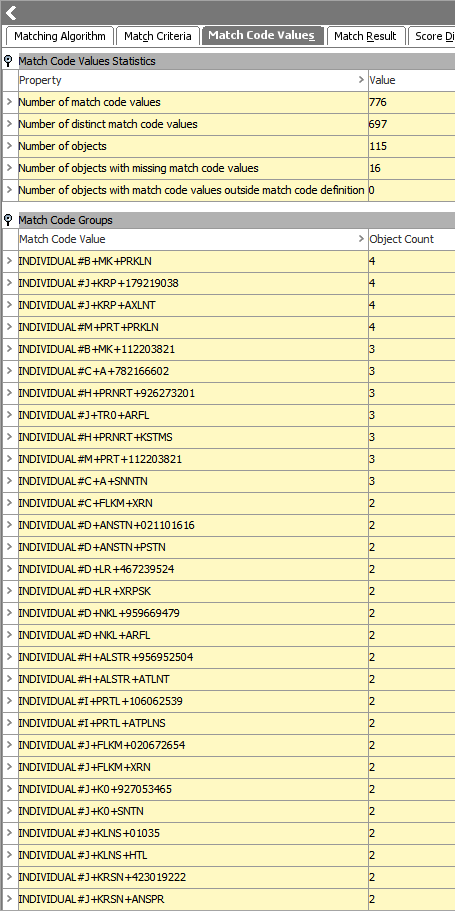
On a running system, match code values can be examined in workbench using the match code values tab. It is important that match codes are relatively unique. A group of equal match codes is referred to as a match code group. It is important to ensure that match code groups are small. A match code group exceeding an object count of 10 should be considered a problem.
- Closely examine the data before configuring a match code. The data profiling tool can provide a lot of valuable information, and if you are planning to use a specific attribute in the match code, always check to which degree the attribute is populated – if values are missing on a lot of objects, the attribute is likely not a good candidate, or at least should not be used alone. Objects with 'empty' value for a match codes will not be compared based on that match code.
- If an attribute is sufficiently unique, like an EAN number, the match code can be based on just that single piece of data.
- If an attribute is less unique, like a name, it would have to be used in combination with other values in order to make good match codes. An example could be the Person Name and Address match code generator available for Customer Data.
- When working with match codes combining several pieces of data, always put the most significant data first. For instance, if deduplicating address objects, put the ZIP code before street and street number, as ZIP codes are geographic, standardized, and mutually exclusive – which most effectively separates your addresses into discrete objects.
- Be sure to normalize the data used in match codes. If, for instance, a manufacturer name is often abbreviated, your match code definition should handle this so that the name is represented the same way in the match codes, regardless of whether it is abbreviated on the source object or not.
- Several match codes can be generated per source object, even by the same match code generator. STEP functions can resolve to a list of multiple match codes, and in JavaScript, an array can be returned. In these cases, each element will be a separate match code. Consider, for example, a customer having several email addresses. Each email address should result in a separate email match code.
- Sometimes an otherwise great identifier has exception cases that should be filtered out. Phone numbers are often very good match code candidates, but a number of contacts at a customer may have provided the reception main number, resulting in a single match code group with hundreds of records. In this case, a match code filter may be applied to the phone match code to remove this exceptional case. For more information, see the Match Code Filter section of this topic.
Configuring a Match Code Generator
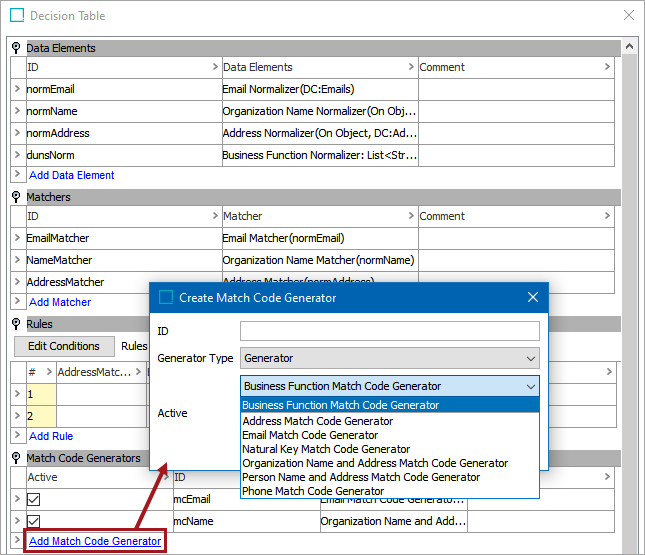
Match codes are created by match code generators in the Match Criteria tab in the matching algorithm. The following picture shows the match criteria in edit mode.

To create a match code generator, select Add Match Code Generator.
- Once created, the match code generator requires configuration. Within the match criteria, click the ellipsis button (
 ) to specify the various details of the match code generator.
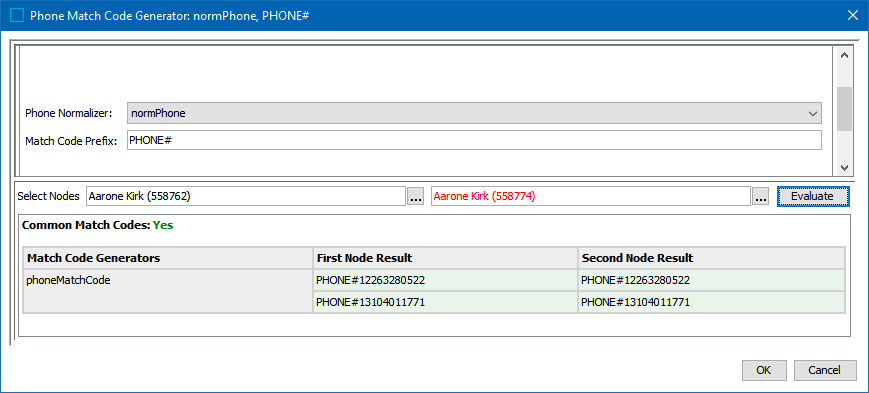
 - Once configured, test the match code generators with a variety of records to ensure that everything is properly configured. To test the match code generator, some codes need to be created. The following example shows several matched records on the previously detailed match code generator. For example purposes, all of these records share the same email. For more information, see the Configuring Matching Algorithms topic in this documentation.
All of the match code generators described below require that users map one or more normalizers to generate codes. For more information, see the Match Criteria Data Elements topic in this documentation here.
Business Function Match Code Generator
A Business Function match code generator uses a business function to produce match codes.
Address Match Code Generator
The Address match code generator must be mapped to an address normalizer.

Email Match Code Generator
The Email match code generator must be mapped to an email normalizer.

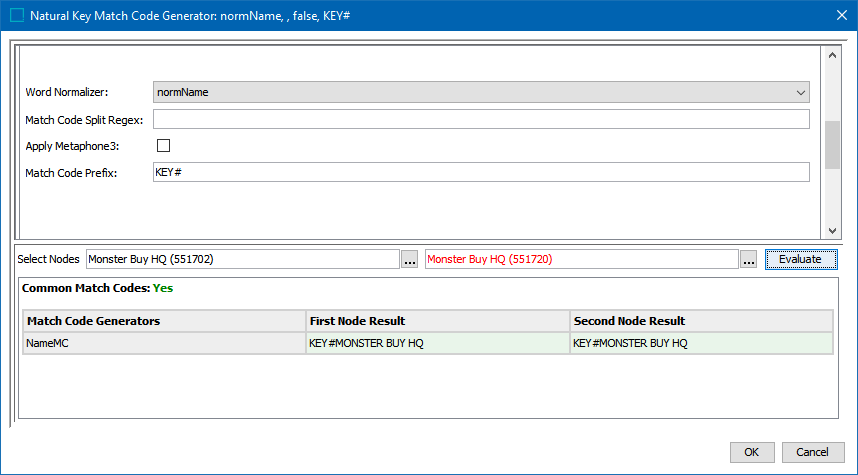
Natural Key Match Code Generator
The Natural Key code generator must be mapped to a words normalizer.
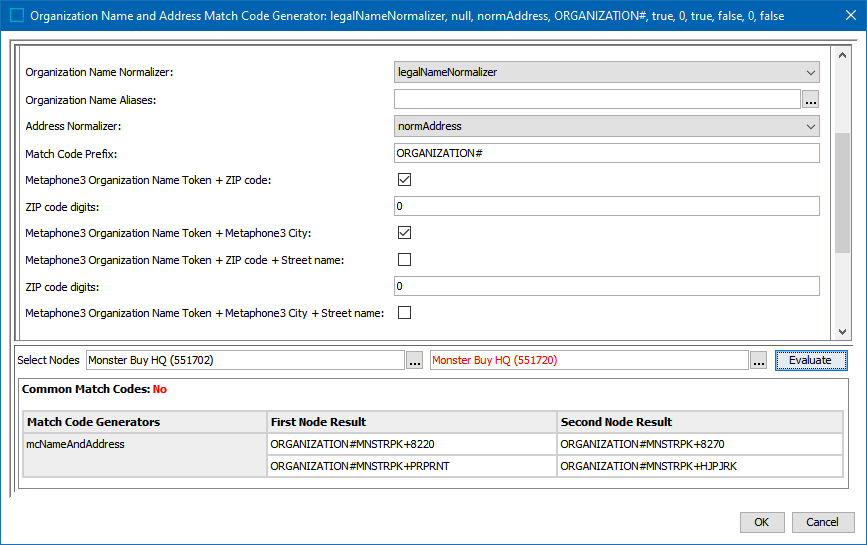
Organization Name and Address Match Code Generator
It is often useful to match on organization names, but they are often not sufficiently unique. Some supermarket chains would use the same organization name on each of their sites, so it needs to be combined with something more. The combination of organization name and address usually constitutes a good match code.
The organization name and address match code generator must be mapped to an Organization Name normalizer and an Address normalizer.
Organization names are often abbreviated and appended with terms like 'Inc.' that may, at times, be omitted in some systems. For that reason, the organization name should often be followed by a transformation lookup table with aliases.
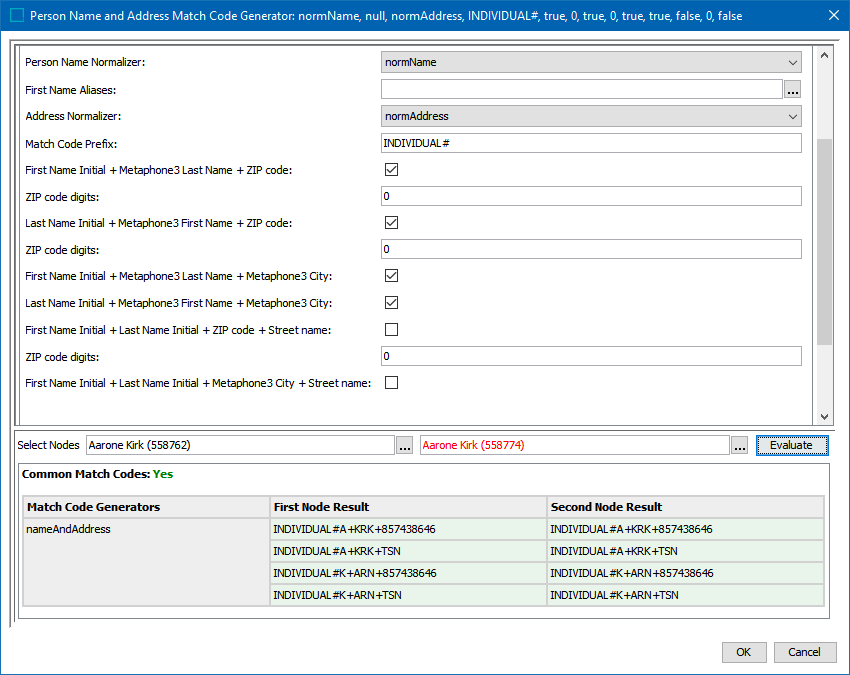
Person Name and Address Match Code Generator
It is often useful to match on person names, but they are often not sufficiently unique, so it needs to be combined with something more. The combination of person name and address usually constitutes a good match code.
The person name and address match code generator must be mapped to a Person Name normalizer and an Address normalizer.
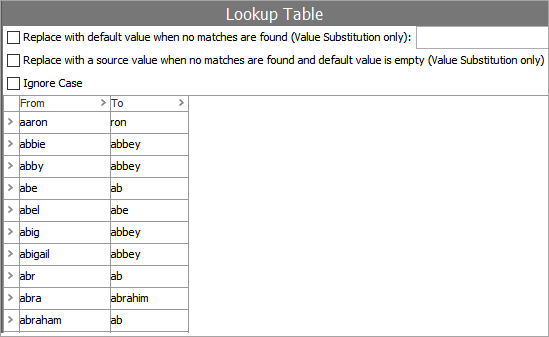
Person names are sometimes abbreviated or exchanged for call names. For that reason, the person names should often be followed by a transformation lookup table with aliases.
Phone Match Code Generator
The phone match code generator must be mapped to a phone normalizer.
Configuring a Match Code Filter
Sometimes exceptions in data create match codes that should really not result in comparing all records in the group. Overly large match code groups can often be found using the Match Code Values tab in the matching algorithm object.
Match code filters can only be used for matching algorithms that have been created with the Embed Match Code checkbox selected.
A match code filter is based on a table of specific match codes that should be filtered out. Create a new transformation lookup table and enter all the match codes to exclude in the ‘from’ column. Leave the ‘to’ column empty.

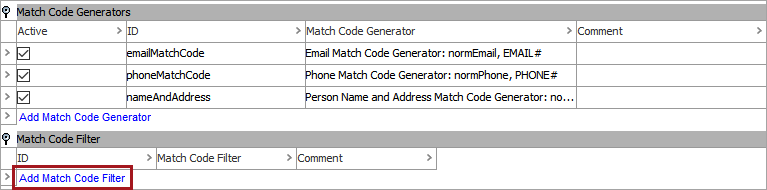
In System Setup, find the matching algorithm for which you want to apply the match code filter. On the Match Criteria tab click 'Edit Match Criteria' link that will open the Decision Table dialog. Find the Match Code Filter section and select 'Add Match Code Filter' link.
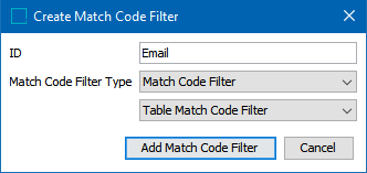
The Create a Match Code Filter dialog will display. Provide an ID for the filter. The Type dropdown menus have only one option for each. When complete, press the Add Match Code Filter link.
Once created, select the field for the table match code filter, and click the ellipsis button () to edit the filter.

The Table Match Code Filter dialog will display. On this dialog, select the configured transformation table for the filter table.
Add a prefix such as 'EMAIL#' that will be prepended to all match codes. This field can and should be left blank if all the match codes in the transformation lookup table already have this prefix.
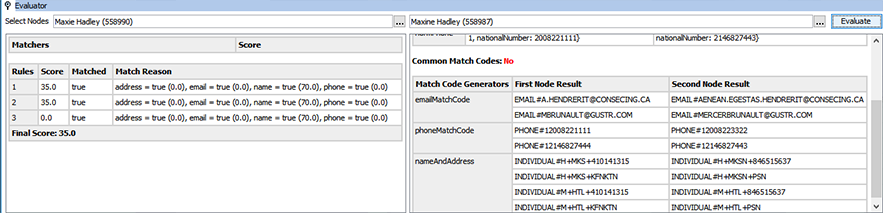
The Evaluate button allows users to test if the match codes can be found on the selected nodes.
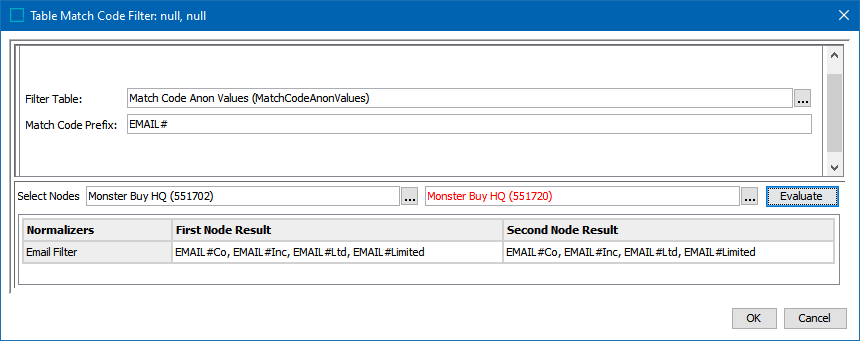
Select the OK button to close out the Table Match Code Filter dialog. On the Decision Table dialog, the match code filter can be tested on specific nodes in the Evaluator section. In this example, two organization nodes are selected, the user clicks the Evaluate button, and then the filtered results are shown.
When satisfied with the filtering tests, select the Save button to store your changes.
Configuring an External Match Code
Match codes defined outside the matching algorithm are considered legacy functionality, but are still supported.
The following is the process for manually creating a match code for matching that can only be used for matching algorithms that have been created without the Embed Match Code checkbox selected. It is recommended to use the process described in the Configuring Matching Algorithms topic in this documentation here.
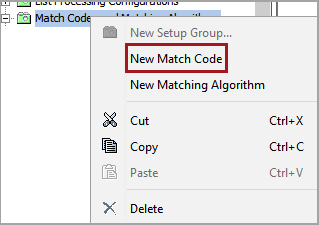
- In System Setup, right-click the node configured to house match codes and select New Match Code.
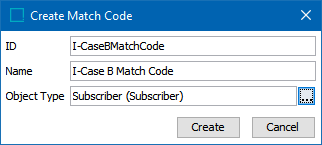
- In the Create Match Code dialog, define an ID and name for the match code, specify an object type for which this match code applies, and click Create. Additional object types can be identified in the Match Code editor after creation.
- On the new match code editor, navigate to the Match Code tab and click the ellipsis button () in the Category field. In the selector that appears, select a node to indicate which objects will have match codes generated.
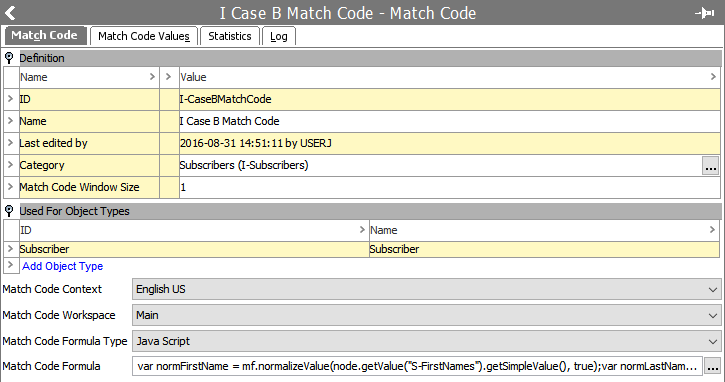
- In the Match Code Window Size field, specify the window size to be used by the matching algorithm.
- If additional object types are required, in the Used For Object Types section, use the Add Object Type link and selector to identify more object types for the match code.
- In the Match Code Context field, specify in which context to run the match code formula. This is only required if the data is dimension dependent. By default, the current context will be selected.
- In the Match Code Workspace field, specify in which workspace to run the match code formula. By default, Main workspace will be selected.
- In the Match Code Formula Type field, specify JavaScript or Calculated as the format
- In the Match Code Formula field, click the ellipsis button () to open up the formula editor and add your match code formula.
Binds for Match Code Formulas
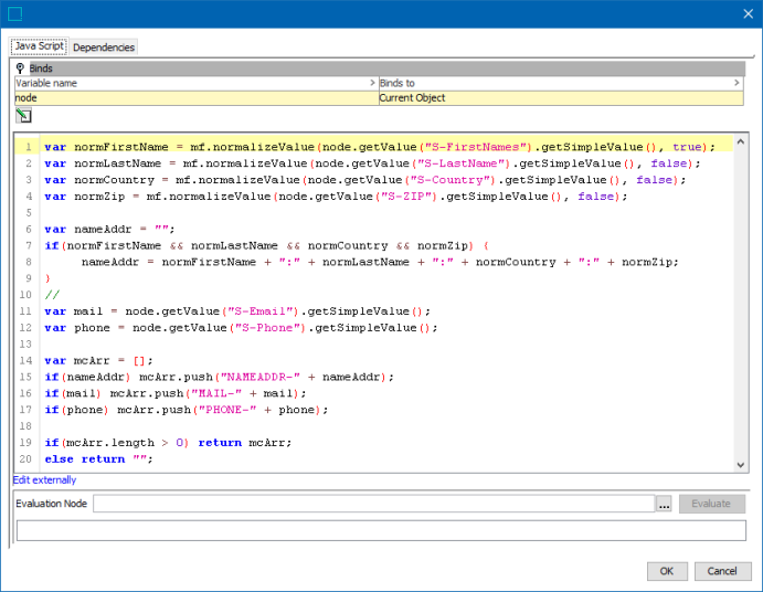
It is also possible to make use of attributes and values that are created offline by binding them in the match code formula. This is used in cases of offline matching or matching records on import. Once inside the match code formula editor, open the Binds flipper, and click the Edit Binds button. You can declare variables and bind them to a variety of STEP elements / objects, as determined by the selected formula type.
JavaScript Match Code Formula
When using JavaScript, the current object should be bound to a variable. The ultimate goal should be to return the match code value of an object from the JavaScript. If a string is returned, it will be used as a match code value. If a JavaScript array is returned, all values in the array will be used as match code values for that object. Additional utility functions for match codes can be accessed by binding Matching Functions to, for example, the context variable in JavaScript or by binding 'Lookup Table Home' to, for example, 'lth.' For more information, see the Text Functions topic in the Resource Materials documentation here.
|
Method |
Description |
|---|---|
|
context.soundex('Stibo') |
Returns the Soundex. |
|
context.metaphone3('Stibo') |
Returns the primary value for the Metaphone 3. |
|
context.metaphone3alternate('Stibo') |
Returns the alternate value for the Metaphone 3. |
|
lth.getLookupTableValue('<asset-id>', 'LookupValue') |
For more information, see the Transformation Lookup Tables topic in the Resource Materials documentation here. |
Calculated Attribute Match Code Formula
When defining the formula via the calculated attribute language, all functions are available. An object's match code value can be a single string derived from the value of the formula, or it can be a list where all the values in the list are used as match code values for that object.
Below is an example of a simple STEP Function:
The match code value for each object will be a concatenation of the value for a Manufacturer attribute, the string ':' and the value for a ManufacturerPartNumber attribute. The Manufacturer value is normalized via a transformation lookup table with ID 'ManufacturerNormalization.'
concatenate(
replacevaluebylookup("ManufacturerNormalization", value("Manufacturer")),":",
value("ManufacturerPartNumber"))
If instead you wanted to return two match code values for each object, one for the Manufacturer and one for Manufacturer Part Number, each prefixed with either 'MAN-' or 'MPN-' could be done as follows (this example is without any normalization):
listconcatenate(
concatenate("MAN-", value("Manufacturer")),concatenate("MPN-", value("ManufacturerPartNumber")))
The reason for adding a prefix is to, when at all possible, avoid comparing objects with match code values from completely different domains.
Notice that in the examples above only rudimentary normalization is applied, and nothing is done to handle cases where values are missing. Since we would typically not want match code values only consisting of the hardcoded prefixes, below shows how checks for empty values could be added to the last example:
{man:= value("Manufacturer"),mpn:= value("ManufacturerPartNumber")}
listconcatenate(
if(len(man)!=0, concatenate("MAN-", man), ""),if(len(mpn)!=0, concatenate("MPN-", mpn), ""))
Window Size
A legacy option on external match codes allows configuring match codes to include near-matches, using what is called a window. With a window size of '3,' Item-548456 would be compared to the object with the match code immediately prior to / following it in the list.
Evaluator
The evaluator is a tool for diagnosing unexpected results that may be encountered. In the evaluator, select two objects that you want to compare. It reports the results and provides detailed information about how the result was obtained. If additional details are required, the evaluators of the sub components can be used.