Once configured, the Simple Importer Widget can be used to quickly and easily create or update products, entities, or classifications; and their attribute values, reference types, and object type.
This topic is an overview of the steps involved when using a Simple Importer Widget.
- Initiate an Import
- Choose to Update or Create Objects
- Preview an Import File and Map Data to STEP
- Start an Import
Initiate an Import
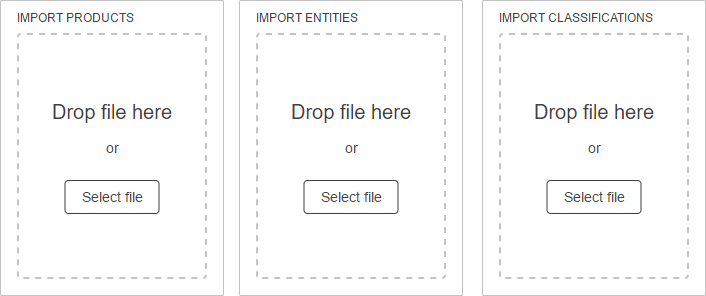
To initiate an import from the Web UI Homepage, drag and drop a valid CSV or Excel file onto the Simple Importer Widget or use the 'Select file' button to find and select the valid file.
For this example, a Simple Importer Widget with basic configurations for each of the three import node types (Products, Entities, and Classifications) has been configured to display on the Homepage.
Choose to Update or Create Objects
Once an import file has been selected (or drag and dropped onto a Simple Importer Widget), a dialog specific to the widget configuration will display, prompting the user to choose to update existing objects or create new ones.
Below are examples of the respective dialog that displays when each of the three import node types is initiated and a default title is used.
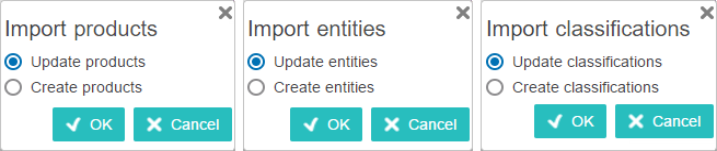
If an import file includes objects to be updated and objects to be created, the same import file can be used for both the update and create functions. However, each function will need to be completed separately (e.g., the file will need to be imported twice, once using the update option, and once using the create option).
For more information on the update functionality, refer to the Update Objects Using Simple Importer Widget topic.
For more information on the create functionality, refer to the Create Objects Using Simple Importer Widget topic.
Preview an Import File and Map Data to STEP
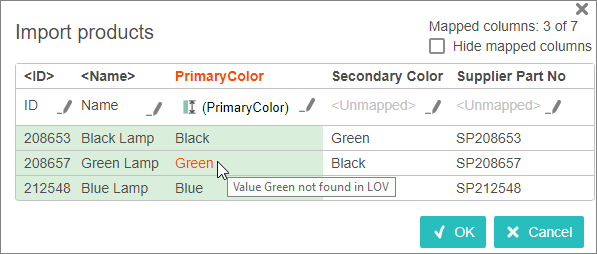
After an import has been initiated using the Simple Importer Widget, the import preview will display. The purpose of the import preview is to display a representation of less than 100 rows of information from the import file and the STEP system in one view. This allows users to approve automatically mapped data, edit mappings, manually map data, and confirm attribute value validity before actually starting the import, or cancel the import.
Note: The only mappable objects in the Simple Importer Widget are ID, name, object types, attributes, or reference types.
Important: The import preview displays differently depending upon the system settings configuration of a STEP Unique Key. For more information, refer to the Unique Keys and the Simple Importer Widget topic.
For the example shown above:
- 3 of 7 columns are mapped, and all columns are displayed.
- The import file column '<ID>' is automatically mapped to the STEP ID, and the OK button is enabled. Mapping the ID (or Unique Key) is the only requirement to enabling the OK button.
- The ID, Name, and PrimaryColor columns are automatically mapped because the import file column headers match the Auto Map requirements for case-sensitive header text, and STEP attribute ID and/or name. (Optionally, an import configuration could be used to map headers according to the import configuration. For more information, refer to the Configuring Simple Importer Widget topic.)
- The import file column 'Secondary Color' and 'Supplier Part No' are unmapped, and display with the '<Unmapped>' light gray text.
- The import file column 'PrimaryColor' displays using orange text because the STEP Primary Color attribute uses an LOV that does not include Green as an option.
For more information, refer to the Import Preview and Mapping topic.
Important: If any unique keys are active in STEP, the import will fail for objects with ID values that already exist within unique key values. Even when the 'Unique key - mapped by Attribute' option is not selected, an error will occur when the ID value from an import conflicts with the unique key configuration. For more information, refer to the Unique Keys and the Simple Importer Widget topic.
Start an Import
Once mapping is complete, from the import preview click the OK button to start the import. The import preview will close, and a process message indicating an import background process has initiated will display with a link to the Background Process Node Details.
In the example below, the default process description is used.

If configured, the user can track the progress of the import by clicking and opening the 'Recent background processes' panel in the upper right corner of Web UI, or via the Background Process List Screens. For more information, refer to the Background Process List Screen topic.
Important: If an object is being created with an object type that is not valid for the existing parent, then the background process will report 'The object type with ID (ID of import file object type) is not valid under object type with ID (ID of parent / category).' The object will be skipped.