In STEP, historical versions of objects are stored as revisions. A revision thus represents a historical 'snapshot' of an object. STEP automatically preserves all versions of a revisable object. Each time a change is made by a different user, a numbered revision is created and logged. Revisions allow for users to revert back to a previous version of a revisable object, identify who has made changes to an object (including what changed and when), and support overall auditing functionality within any system.
The object types STEP maintains revisions for are business rules, workflows, integration endpoints, products, entities, classifications, assets, standard stand-alone event queues, and Web UI configurations. While each of these objects have their own unique features, the overall functionality of creating and maintaining revisions is universal across objects.
It is important to note the difference between revisions and approvals. The two concepts are related, but should not be confused. Objects that are workspace revisable are subject to approvals, and approving an object automatically generates a revision of it. However, objects that are globally revisable, such as System Setup objects like workflows or business rules, are not subject to approval. This means that they can have revisions made, but only via the processes described below. For more information on approving objects, see the Approval of Objects section of the Getting Started / User Guide
Important: It is critical that revision handling be considered for each system and that appropriate processes be put in place to clean up old revisions and ensure that the number of revisions does not exceed the expected capacity of the system and introduce performance issues.
A revision can be created in one of five ways:
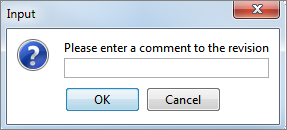
Manually created revisions allow for the user to enter a comment.
Note: The manual creation of revisions is used when the data looks absolutely perfect, however there may be future changes that could be unexpected, and you need to revert back to when the data was perfect. Manual creation of revisions are not possible in Bulk, and should be done for each node at a time.
Note that a new revision is not created for every change to an object, thus STEP does not have traceability on the field level. This means that not all historical values on an object are stored as they may have differed between revisions, and the values are only stored at revisions. As stated above, this means that if the same user is making continuous edits to an object, these are not captured as a revision until the object is approved, the automatic revision threshold expires, or another user makes changes to the object.
By default, the system creates revisions on objects if a user makes a change to the object and the timing threshold (number of hours) is exceeded from when the object was first touched after the last revision was made. This is particularly useful in cases where an object is primarily maintained by a single user and would not otherwise have revisions made without that user choosing to do so manually. The threshold functionality ensures that changes are recorded, without creating an excessive number of revisions.
The global default number of hours set for all revisable objects is 168, or one week, before a revision is created. If any user acts on the object during the timeframe specified by the threshold parameter, a revision is made when the time is exceeded. If no one acts on the object during that time, no revision is made.
This number can be changed by first selecting the System Setup tab, navigating to the Users and Groups node, and finding the Revisability Settings flipper. The interval can be changed by editing the value in the Threshold parameter.
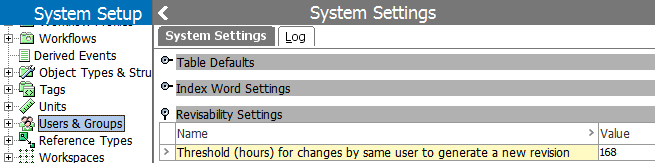
Important: The minimum allowable number of hours is 24, though there is no maximum. The parameter defaults to 168 (one week) and it is recommended to set the parameter at or above this number to prevent an excessive number of revisions from being created.
If the threshold parameter is left blank, the functionality for creating auto-revisions is considered disabled, and all revisions must be made manually or due to different users touching the revisable object.
When an object does have a revision made to it due to reaching the timing specified in the threshold parameter, it is noted in the Comment column on the Status tab for that object.

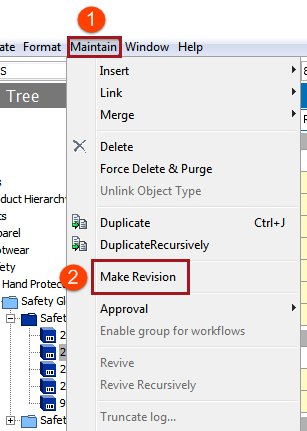
Should a user want to create a revision before the set number of hours expires, they can still do so manually via the Maintain menu, as described earlier in this topic.
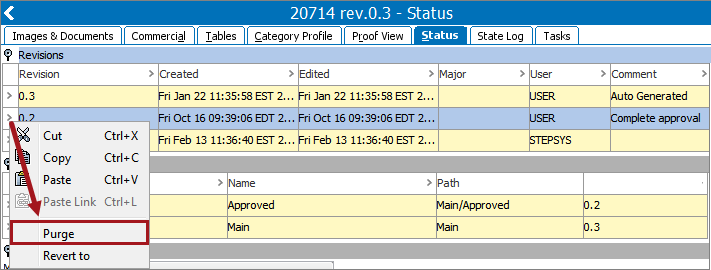
If a user wishes to revert to a past revision, they can do so by clicking on the arrow next to the desired revision and selecting Revert to. Reverting to a revision actually generates a new revision that matches the one reverted to. It does not discard any intermediate revisions, nor is any audit trail lost.
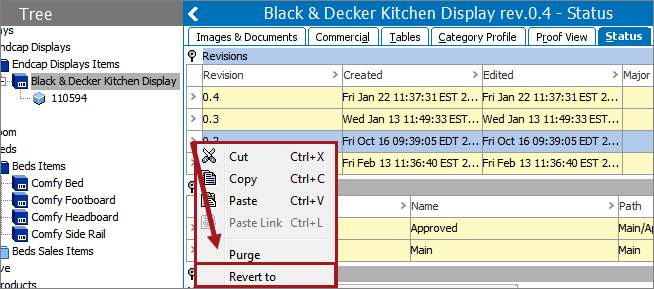
When a version is reverted to, an automatic comment stating which revision that object has been reverted to will generate. This is intended to aid the user in tracking the history of a given object.

Important: In order to revert back to an old revision successfully, all configurations applied to the object must still be in place. For example, when reverting to a previous version of an integration endpoint, all related objects (e.g. attributes, references, business rules) must still be in place, else the endpoint may not work as intended when revived.
Any revision can be purged, but once a revision is purged it cannot be recovered.
To purge a revision, click on the arrow next to the desired revision and select Purge.
Planning for maintenance and cleanup of revisions is a critical step for all implementations and is best to be carried out early on in the setup of any system.
The Revision Management event processor can be used to aid in cleanup and it is recommended that this be set up on all systems. More information on this event processor can be found in the Event Processors section of the System Setup / Super User documentation
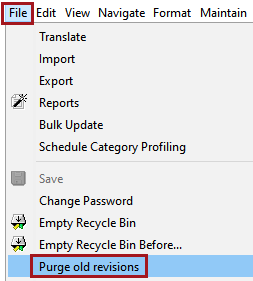
A manual revision cleanup option is also available via the File menu. It is strongly recommended that this be used for ad-hoc cleanup only and that additional automatic revision cleanup processes be in place.
The Purge dialog allows users to specify parameters for the revisions to be purged.
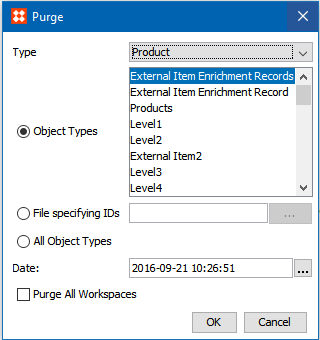
Type: Select the type of object for which revisions should be purged. Depending on what is selected, will determine what object type is purged no matter which of the three radio button options is selected.
The available selections for 'Type' are self-explanatory: Product, Classification, Asset, DTP Documents, and System Configuration. Selecting any type filters the subsequent Object Types selection accordingly.
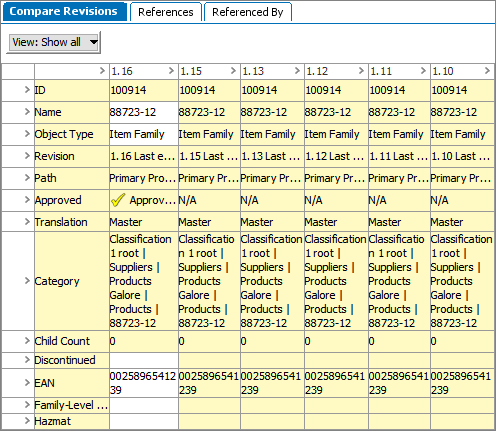
Users may compare revisions on an object within the Revision view. For instance, if a user needs to see how an attribute on a object has changed over the course of five revisions, the five relevant product revisions can be viewed at once on the same screen.
To enable revision comparing:


Note: Target will not be a selectable option unless the object is being viewed in the appropriate mode.
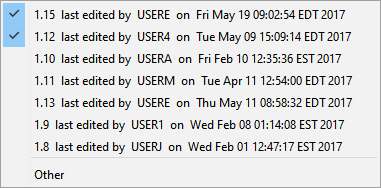
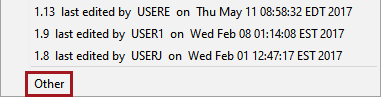
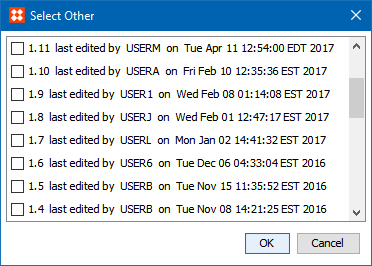
When 'Other' is selected, a window displays listing all revisions for that object. To include any of these revisions in the STEP window's comparison view, click a revision listed in the 'Select Other' window (shown below). Multiple revisions can be added simultaneously using this method.
When all relevant revisions have been selected, they display together for a comparison view.
2018, Stibo Systems