Attribute transformations are frequently used in STEP'n'design product templates to change the value of an attribute on a mounted InDesign page into another value, typically into another word or an image. Attribute transformations used with STEP'n'design are created in STEP in the same way as those used for other purposes. The difference for print is that these transformations must also be applied to attribute tags on the product template.
This topic does not describe, in depth, how to create attribute transformations in the STEP Workbench. It focuses on attribute transformations intended for InDesign pages. For more information on attribute transformations in general, see the Attribute Transformations topic in the System Setup / Super User Guide documentation here.
A common application for attribute transformations in InDesign is to transform a value of 'Yes' into another word. For example, an attribute could indicate whether a product is new or exclusive by having a value of either Yes or No. If the product is new, the value of 'Yes' is mounted on the page, then transformed into the word 'New!'.
The following steps explain how to change an attribute value of 'Yes' into the word 'New!' on an InDesign page using an attribute transformation. The attribute used in this example is named 'Is New?'. This attribute has a validation base type of LOV and uses a Yes/No LOV. If the value is 'No,' then the value will be replaced with nothing, and the text frame will be automatically removed from the page. The removal will occur because the 'Delete no Content' parameter is applied to the text frame on the product template that contains the transformed attribute.
![]()
![]()
![]()
![]()
![]()
![]()
![]()
If you have an LOV with a large number of values that need to be transformed, best practice is to replace all the values using a lookup table instead of creating a separate transformation for each value. For more information, see the Transformation Lookup Tables topic in the System Setup / Super User Guide here.
The next step in getting the transformation to work on the mounted InDesign page is to apply the transformation to the relevant attribute tag on the product template. The following steps assume that you have already created a product template and that the STEP Template Content palette is open.
![]()
![]()
To ensure that the transformation is working, mount a product using the product template to which you just applied the transformation. If the transformation has not been applied to the attribute correctly, either in STEP or on the product template, the untransformed value will display (in this example, either 'Yes' or 'No').
![]()
![]()
![]()
Another common application for attribute transformations in STEP'n'design is changing a value into an image. For example, an attribute with a Yes/No value could indicate whether a product meets certain criteria that would require an icon to display beside the product.
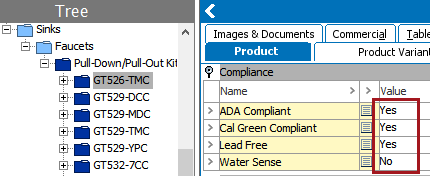
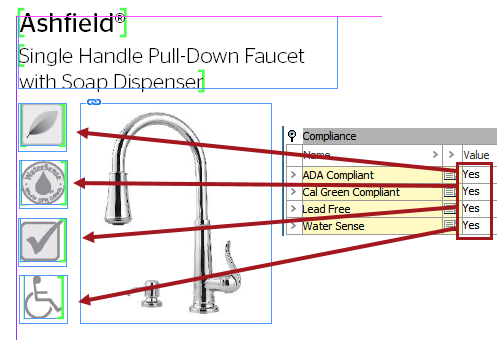
For this example, the fictional company Acme Faucets sells products that are expected to comply with certain industry and/or government certification standards. Icons appear on the page next to the products that meet these standards. Attributes with Yes/No values are used to control whether or not these icons display. The icons indicate whether the faucets meet the following compliance standards: ADA, Cal Green, NSF Lead-Free, and EPA WaterSense.

Instead of using image reference types to mount these icons onto the page, an attribute transformation changes the value of 'Yes' into the corresponding icon.
The method for transforming an attribute value of 'Yes' into an image on an InDesign page is nearly identical to that used to transform one value into another.
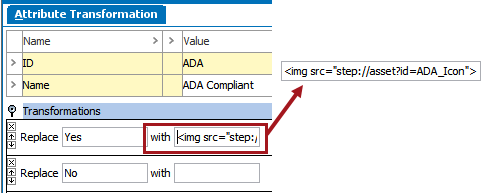
ADA_Icon is the ID of the image used in this example:
![]()
![]()
![]()
Often, images used in a transformation may be larger than the frames into which the image will display. However, since these images appear in text frames instead of image frames, the scaling parameters available for image frames on the STEP Template Frame palette (e.g. 'Scale Asset to Frame') are unavailable.
![]()
Though best practice is for the original image to be loaded into STEP at the actual size that is needed, actual-size images are not always available. If the image available in STEP is too large for the frame, the image can be resized within the transformation by adding a dimension value of either width or height to the end of the 'img src' transformation tag. The applied dimension is in points. For example:
<img src="step://asset?id=CalGreen_Icon_Large&width=17">
or <img src="step://asset?id=CalGreen_Icon_Large&height=17">
Note: The transformation tag will accept a value of width or height but not both. However, the image will be sized proportionately regardless of whether width or height is used.
Determine the width / height that you need by changing your measurements in InDesign to points, then selecting the frame.
![]()
In this example, the transformation makes the image 17 points wide to give it 1 point of padding inside the frame.
![]()
Once the attribute value is transformed, the image is 17 points wide and aligns with the frame identically to how the text was originally placed in the frame. I.e., if the text was centered and top-aligned, the image is as well.
![]()
2018, Stibo Systems