Configure the PDX OIEP with the following settings:
-
Context Mode: To ensure that the OIEP always sends cross context formatted Advanced STEPXML to PDX, set the 'Context Mode' to 'Cross Context Format' as highlighted below:

-
Number of Events to Batch: In the Event Queue Configuration flipper, set the 'Number of Events to Batch' parameter to a maximum of 500 for optimal performance of the integration.

-
Output Templates: Set the format for the PDX integration to Advanced STEPXML and the ensure template contains the following tags:
-
ContextList
-
CrossReferenceTypes
-
UnitList
-
AttributeList
-
DataContainerTypes
The following is an example template:
Copy<?xml version="1.0" encoding="UTF-8"?>
<STEP-ProductInformation ResolveInlineRefs="true" FollowOverrideSubProducts="true">
<ContextList ExportSize="Minimum" />
<UnitList ExportSize="Minimum" />
<AttributeList ExportSize="Minimum" />
<CrossReferenceTypes ExportSize="Minimum" />
<Assets ExportSize="Referenced" />
<DataContainerTypes ExportSize="Minimum" />
<Products ExportSize="Minimum" FlattenHierarchy="false">
<Product>
<Name />
<Values IncludeInherited="true" />
<DataContainers />
<ProductCrossReference>
<MetaData />
<Product Referenced="true" Embedded="true">
<Name />
<Values />
</Product>
</ProductCrossReference>
<AssetCrossReference>
<MetaData />
<Asset Referenced="true" Embedded="true">
<Name />
<Values />
</Asset>
</AssetCrossReference>
<EntityCrossReference>
<MetaData />
</EntityCrossReference>
<ClassificationReference>
<MetaData />
</ClassificationReference>
</Product>
</Products>
</STEP-ProductInformation>
-
-
Pre-processor: In the Output Templates section for the PDX OIEP, set the pre-processor option to 'PDX pre-processor.'
This pre-processor adds packaging hierarchy node(s) to the event batch before the nodes in the batch are exported to PDX.

For the Only Changes parameter:
-
No - means packaging hierarchy node(s) will be sent for all products in the event queue.
-
Yes - means packaging hierarchy node(s) will be sent only for products with a changed revision.
-
-
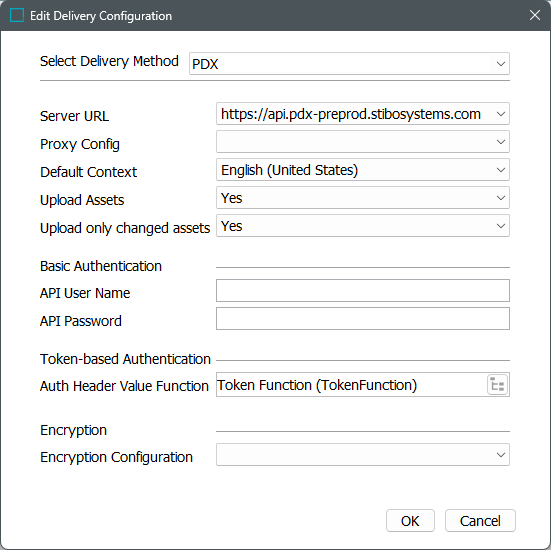
Delivery Method: In the Delivery Method flipper for the PDX OIEP, choose 'PDX .' Refer to the PDX Delivery Method topic for details on configuring the required properties to populate the dropdown parameters.
-
Review additional set up and configuration implementation based on your product record information as defined in the Setting Up the PDX OIEP topic.
Token-based Authentication Function Example
Use the steps below to create an example business function for token-based authentication with or without using a proxy. (Proxy functionality is intended for facilitating internet access, which is always available from SaaS environments. If a proxy is necessary for your scenario, contact Stibo Systems Support.)
-
In PDX, go to Manage team / User management / API keys and generate a key. Refer to PDX Help Center / Documentation for more information.
Important: Existing PDX integrations moving to OAuth must not enter a source system ID when creating keys (which causes duplication of attribution created in the previous integration setup).
-
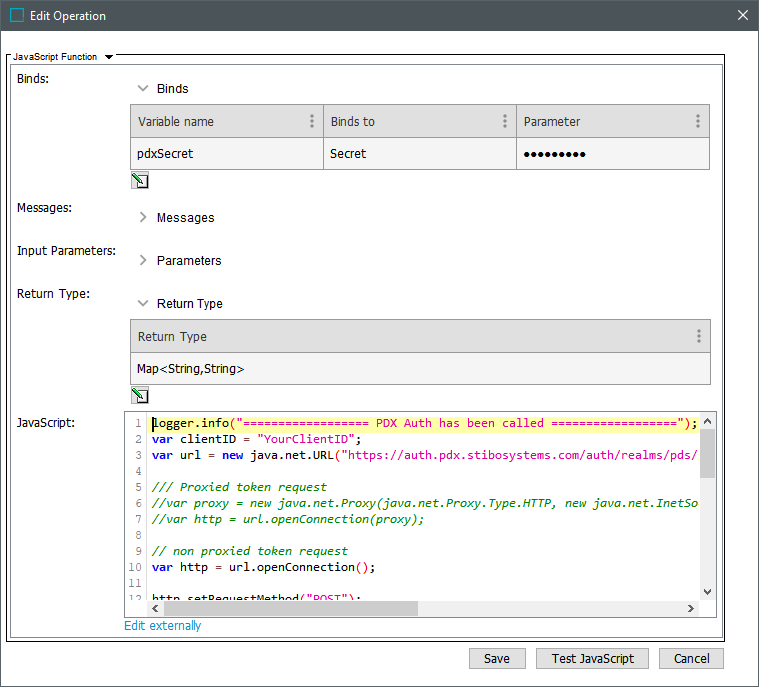
In STEP, create a JavaScript Function with:
-
Bind for secret (add variable name; Binds to = Secret; Parameter = ClientSecret (generated via PDX 'API keys' option)
-
Return Type = 'Map<String,String>'
-
JavaScript = example code below
-
-
Make necessary updates in the JavaScript for your system:
-
YourClientID = 'ID' of the generated API key
-
Verify the URL variable is aligned with the appropriate PDX environment (QA or PROD)
Use these URLs as examples that can be copied and pasted into the configuration:
Preprod - https://auth.pdx-preprod.stibosystems.com/auth/realms/pds/protocol/openid-connect/token
Prod - https://auth.pdx.stibosystems.com/auth/realms/pds/protocol/openid-connect/token
-
Proxy functionality is intended for facilitating internet access, which is always available from SaaS environments. If a proxy is necessary for your scenario, contact Stibo Systems Support. To use a proxy, uncomment the 'Proxied token request' section and modify as required.
-
Add your secret Bind variable (pdxSecret is used in this example)
Because of a process added to the solution with the 2026.2 release, some users may observe the authentication business function has been auto-generated in their system. To enable auto-generated business functions, edit the function and update the ClientID, URL, and secret. -
-
Test your integration.
logger.info("================== PDX Auth has been called ==================");
var clientID = "ENTER_YOUR_CLIENT_ID";
var url = new java.net.URL("ENTER_YOUR_AUTHENTICATION_URL");
var http = url.openConnection();
http.setRequestMethod("POST");
http.setDoOutput(true);
http.setRequestProperty("Content-Type", "application/x-www-form-urlencoded; charset=UTF-8");
http.connect();
var os = http.getOutputStream();
try {
os.write(new java.lang.String("grant_type=client_credentials&client_id="+clientID+"&client_secret="+pdxSecret).getBytes());
} finally {
os.close();
}
var input = http.getInputStream();
var reader = new java.io.BufferedReader(new java.io.InputStreamReader(input));
try {
var string = "";
while (reader.ready()) {
string = string + reader.readLine();
}
var json = JSON.parse(string);
var map = new java.util.HashMap();
map.put("Authorization", json.token_type + " " + json.access_token);
logger.info("Authorization " + json.token_type + " " + json.access_token);
return map;
} finally {
reader.close();
}