Note: If the Easy Setup actions for the ECLASS Advanced Component model have been completed, then the configurations explained within this topic have been set up automatically. The purpose of this topic is to detail those settings to assist admins in adjusting their solution where necessary.
An inbound integration endpoint (IIEP) can be configured in the workbench to help the process of importing Data (BMEcat 2005.1) files into STEP. Once an IIEP is configured for ECLASS Advanced Data imports, Data files can be imported after they are uploaded either to a configured hotfolder, or to a File Loading Widget on a Web UI Homepage. For more information, refer to ECLASS Advanced Data Importer topic.
This section describes how to configure an IIEP that can allow for the automated processing of Data files. Each screenshot example within this section provides recommended values for the parameters in ECLASS Advanced Data Importer.
Prerequisites
This topic aims to acquaint users with the IIEP specifically designated for the import of BMEcat 2005.1 data files. It does not cover general IIEP functionalities. It is assumed that individuals configuring an IIEP for ECLASS Advanced Data Import are well-versed in configuring and processing standard inbound integration endpoints. For a comprehensive understanding of the standard functionalities provided in inbound integration endpoints, refer to Inbound Integration Endpoints topic within the Data Exchange documentation.
Configuration Steps
-
In the workbench, go to System Setup, select and right-click the Inbound Integrations Endpoints setup group, and click Create Inbound Integration Endpoint.
-
Once the Inbound Integration Endpoint Wizard displays, the parameters are to be populated as recommended and shown below.

For more information about the parameters available within the Identify Endpoint step, refer to IIEP - Identify Endpoint topic within the Data Exchange documentation.
-
Click the Next button, and the Choose Receiver parameters will display. The parameters are to be populated as recommended and shown below. The mandatory parameter Hotfolder must be populated with a hotfolder name before the Next button will enable. In the screenshot below, the Hotfolder parameter is populated with the value 'EclassAdvDataImporter.'
Note: The value within this hotfolder parameter will be used to create the new hotfolder, once the IIEP Wizard is complete.

For more information about the parameters, refer to IIEP - Choose Receiver topic within the Data Exchange documentation.
-
Click the Next button, and the Configure Endpoint parameters will display. The parameters are to pre-populated with the recommended values as shown below.
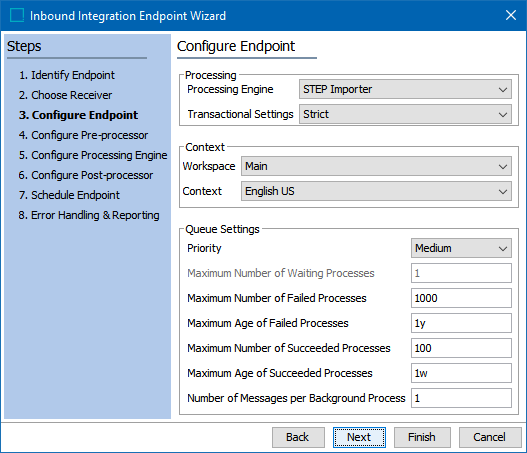
For more information about the parameters, refer to IIEP - Configure Endpoint topic within the Data Exchange documentation.
-
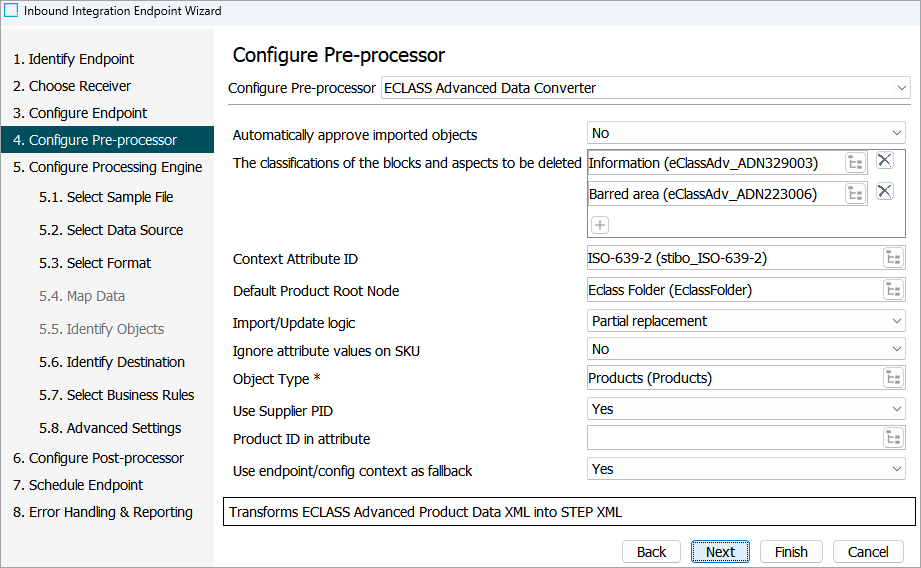
Click the Next button, and the Configure Pre-processor parameter will display. The selection of the pre-processor within this step makes the IIEP unique for importing BMEcat 2005.1 data files. The parameters are to be populated as recommended and shown below:
-
Configure Pre-processor: This parameter has to be populated with ECLASS Advanced Dictionary Converter option. This is an exclusive pre-processor for importing Dictionary files. For more information about the parameter, refer to IIEP - Configure Pre-processor topic within the Data Exchange documentation.
-
Automatically approve imported objects: This parameter is for the automated approval of SKUs / Products, Product Blocks, and Aspects. When configured as 'No' (default), no approval process is initiated. However, selecting 'Yes' results in the automatic approval of all imported elements, including Product Blocks, Aspects, SKU / Product, ECLASS ADVANCED attributes, and their corresponding product root nodes.
-
Classifications of Blocks and Aspects to be Deleted: This parameter supports a partial update deletion policy, allowing you to selectively update parts of product data from specific sources during the import process. This parameter enables you to specify exactly which classifications, blocks, or aspects should be removed or replaced, without requiring a full data deletion. By defining specific classification IDs within this parameter, you gain precise control over data being imported.
-
Context Attribute ID: This parameter is to be populated with the attribute ISO-639-2 (ID = stibo_ISO-639-2). This attribute is created by the Easy Setup action and holds the language mappings. For more information about language mappings, refer to Prepare the Language Dimension Mapping topic within this guide.
-
Default Product Root Node: Providing an existing product root node enables the creation of new products during the import process. These products are established beneath the specified product root node. Upon selecting a node, it's imperative to designate the corresponding object type. Leaving the field empty, however, restricts the creation of new products, permitting solely the update of existing ones.
-
Import/Update logic: This parameter provides the following options:
-
Full replacement: Selecting this option leads to the prior-to-import removal of all Product Blocks and Aspects, along with the associated link to the Application Class. The actual Product / SKU remains unaltered.
-
Reject updates on import: If the Application Class for the same Product / SKU ID in the import file matches the Application Class referenced in STEP, the data import for the corresponding SKU is skipped. If the Application Class for the same Product / SKU in the import file does not match the Application Class referenced in STEP, the import is also skipped.
-
Allow updates - for same Application class: By selecting this option, the data import for the relevant SKU is updated if the Application Class in the import file matches the Application Class referenced in STEP. Conversely, if the Application Class in the import file does not correspond to the referenced Application Class in STEP, the data import for the relevant SKU is skipped.
-
Allow updates - replace when different Application Class: If the Application Class in the import file does not match the Application Class referenced in STEP, a full replacement of the Product / SKU takes place.
-
Allow updates: for same Application Class with full replacement: If the Application Class in the import file match the Application Class referenced in STEP, a full replacement of the Product / SKU takes place.
-
-
Ignore attribute values on SKU: Setting this option to 'Yes' will result in the import not updating attributes directly maintained on the SKU. Conversely, when set to 'No,' the import will update attributes directly maintained on the SKU.
-
Object Type: This mandatory parameter has to be defined with the main SKU / Product Object Type. The specified object type must be from the one for which the ECLASS Advanced attributes were deemed valid. Meaning, this is the same object type configured during the execution of the Easy Setup action. For information about the SKU / Product Object type, refer to the Run Easy Setup of ECLASS Advanced Industry Standard topic.
Note: This parameter is not automatically populated by the Easy Setup action, given that the solution may encompass multiple SKU / Product object types that are defined during the Easy Setup process.
-
Use Supplier PID: When identifying the SKU through the 'SUPPLIER_PID,' opt for Yes (default). Alternatively, when using the 'MANUFACTURER_PID' for SKU identification, select 'No.'
-
Product ID in attribute: This parameter facilitates the updating of existing SKUs in the system. If the SKU ID is specified within an attribute, then that attribute can be defined within this parameter. The uniqueness of the ID has to be taken into account while defining such attributes. In the event this field remains blank, the identifier will be automatically set to the Step ID.
-
Use endpoint/config context as fallback: The option selected within this parameter (Yes or No) reacts based on a combination of factors including:
-
Language declaration as part of the BMEcat 2005.1 header
-
The language tag provided or not provided as part of the actual translatable free text value
-
The STEP Context configured in the Inbound Integration Endpoint (IIEP)
-
The actual language mapping metadata attribute ISO-639-2 (ID = stibo_ISO-639-2) to the Language Dimension Points
If for some reason free text value translations cannot be identified or are missing in the import file, by setting the value to 'Yes' will make sure that the relevant values are imported into the STEP Context configured in the IIEP (fallback context).
Setting the parameter to 'No' will require correctly placed language tags.
-
-
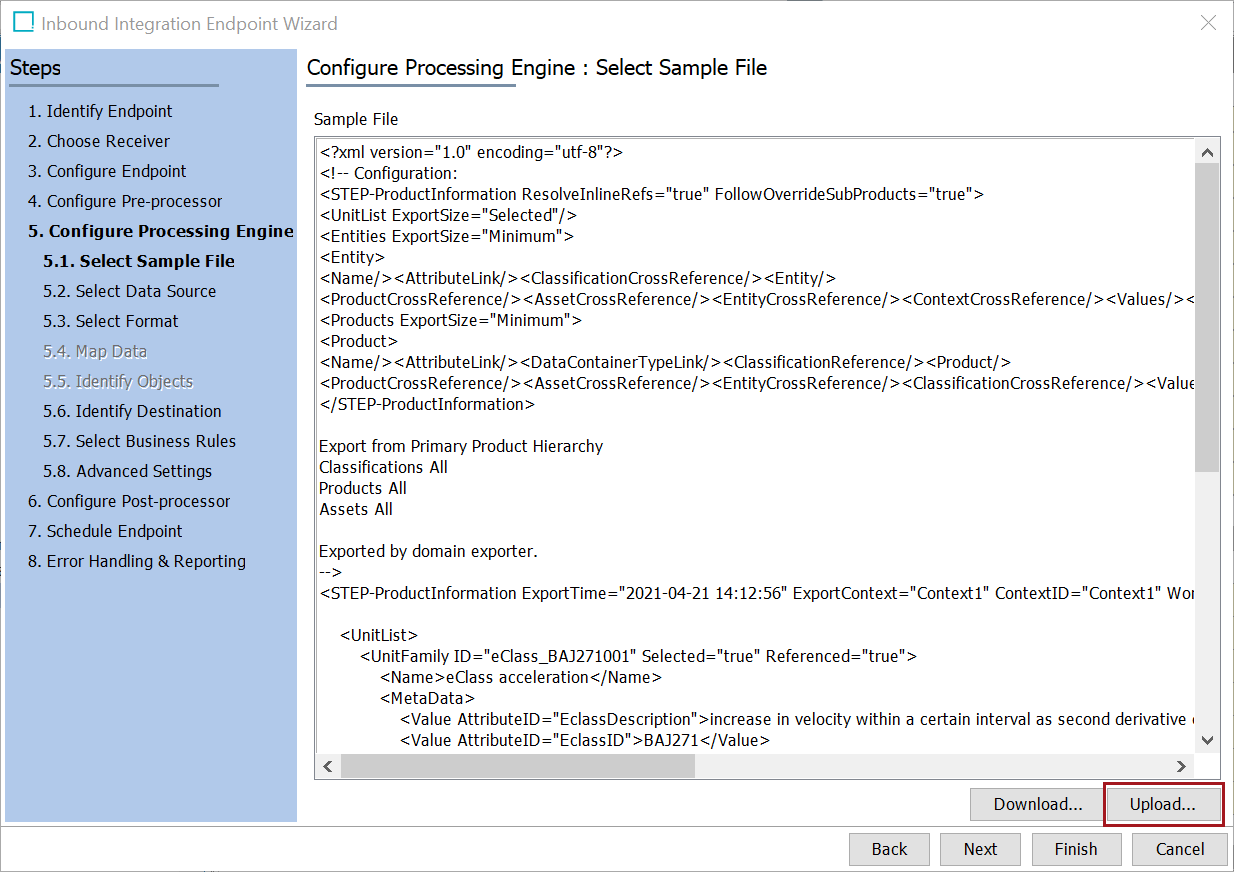
Click the Next button, and the 'Configure Processing Engine: Select Sample File' field for the STEP Importer processing engine will display.
-
In 5.1 Select Sample File step, click the Upload button to upload a sample STEPXML file. For information about how to upload a sample file, refer to IIEP - Configure STEP Importer Processing Engine topic within the Data Exchange documentation.
The basic data structure of a sample Data file is provided below:
<?xml version="1.0" encoding="utf-8"?> <!-- Configuration: <STEP-ProductInformation ResolveInlineRefs="true" FollowOverrideSubProducts="true"> <UnitList ExportSize="Selected"/> <Entities ExportSize="Minimum"> <Entity> <Name/><AttributeLink/><ClassificationCrossReference/><Entity/> <ProductCrossReference/><AssetCrossReference/><EntityCrossReference/><ContextCrossReference/><Values/></Entity></Entities> <Products ExportSize="Minimum"> <Product> <Name/><AttributeLink/><DataContainerTypeLink/><ClassificationReference/><Product/> <ProductCrossReference/><AssetCrossReference/><EntityCrossReference/><ClassificationCrossReference/><Values/><OverrideSubProduct/></Product></Products> </STEP-ProductInformation> Export from Primary Product Hierarchy Classifications All Products All Assets All Exported by domain exporter. --> <STEP-ProductInformation ExportTime="2021-04-21 14:12:56" ExportContext="Context1" ContextID="Context1" WorkspaceID="Main" UseContextLocale="false"> <UnitList> <UnitFamily ID="eClass_BAJ271001" Selected="true" Referenced="true"> <Name>eClass acceleration</Name> <MetaData> <Value AttributeID="EclassDescription">increase in velocity within a certain interval as second derivative of the distance per time</Value> <Value AttributeID="EclassID">BAJ271</Value> <Value AttributeID="EclassPrimaryKey">BAJ271001</Value> </MetaData> <Unit ID="eClass_AAA225002" Selected="true" Referenced="true"> <Name>ft/s²</Name> <MetaData> <Value AttributeID="EclassDescription">unit foot according to the Anglo-American and the Imperial system of units divided by the power of the SI base unit second with the exponent 2 with the relation according to NIST: 1 ft/s² = 0,304 8 m/s²</Value> <Value AttributeID="EclassImportVersion">10.1</Value> <Value AttributeID="EclassID">AAA225</Value> <Value AttributeID="EclassPrimaryKey">AAA225002</Value> </MetaData> </Unit> <Unit ID="eClass_AAA597002" Selected="true" Referenced="true"> <Name>m/s²</Name> <MetaData> <Value AttributeID="EclassDescription">SI base unit metre divided by the power of the SI base unit second and the exponent 2</Value> <Value AttributeID="EclassImportVersion">10.1</Value> <Value AttributeID="EclassID">AAA597</Value> <Value AttributeID="EclassPrimaryKey">AAA597002</Value> </MetaData> </Unit> </UnitFamily> </UnitList> </STEP-ProductInformation> -
Further potential sub-steps underneath the Configure Processing Engine are optional. For more information about these steps, refer to IIEP - Configure STEP Importer Processing Engine topic within the Data Exchange documentation.
-
-
Click the Next button to display the Schedule Endpoint parameters (bypass the Configure Post-processor parameters). Update the values to those shown below.
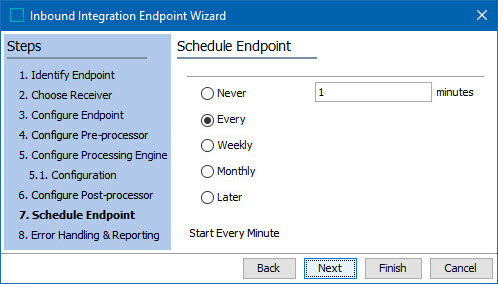
For information about the parameters available within this step, refer to IIEP - Schedule Endpoint topic within the Data Exchange documentation.
-
Click the Next button, and the Error Handling & Reporting step will display. The parameters are to be populated as recommended and shown below:
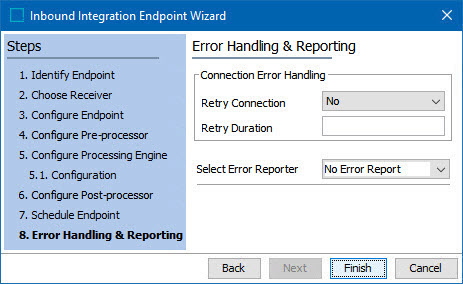
For more information about the parameters available within this step, refer to IIEP - Error Handling & Reporting topic within the Data Exchange documentation.
- Click the Finish button, the Inbound Integration Endpoint Wizard will close, and the newly created endpoint will display within the workbench.
Important: An endpoint must be enabled before it can start processing data. For more information, refer to the Running an Inbound Integration Endpoint topic within the Data Exchange documentation.
If users need to access the IIEP via a Web UI, then the IIEP must be configured within a File Loading Widget. For more information, refer to the Configuring a File Loading Widget for ECLASS Advanced Data Imports topic.