The Localization tab provides a tool to support the translation of static text strings in the STEP user interfaces (workbench and Web UI), such as titles, labels, and dialog text. The tool enables administrators to generate a translation file that contains the texts that need translation. Translation files are in XML format and are intended to be sent to an outside agency for translation of the text strings in the file. Once the file is returned from the translation agency, it can be converted into system resource files that can be applied to the system so that users may view the STEP interfaces in the translated language(s).
This document is not intended to act as a standalone set of instructions for implementation of UI localization. Instead, it is strictly a guide to some basic localization concepts and instructions for using the localization tool.
Localization Frameworks
STEP has both a key-based and an annotation-based framework for localization.
Key-based framework for Web UI
This section describes the legacy way of localizing static text strings in the Web UI. The framework for this is based on using localization keys as opposed to the annotation-based framework.
A localization key (sometimes referred to as 'i18n' keys) is basically a value-pair. The key ID always starts with 'i18n' and the value is the actual text string that will be presented in the Web UI (Portal).
For example, i18n.stibo.portal.server.components.value.ApproveActionServerComponent.default.button.Label = Save & Approve
In the above example, the localization key ID is 'i18n.stibo.portal.server.components.value.ApproveActionServerComponent.default.button.Label' and the value 'Save & Approve' is the text string that the end user will see in the Web UI.
The localization keys are stored in resource files that can either be part of the Web UI code or be placed on the file system on the application server. On a given STEP system, you will be able to see the list of localization keys via this URL: [system name]/webui/docs
For example, http://mysystem.acme.corp/webui/docs
This will provide a webpage with descriptions of the portal components available on the given system as well as a list of localization keys and values shown at the bottom.
In the Web UI designer tool you will be able to see the localization key used for a specific text.
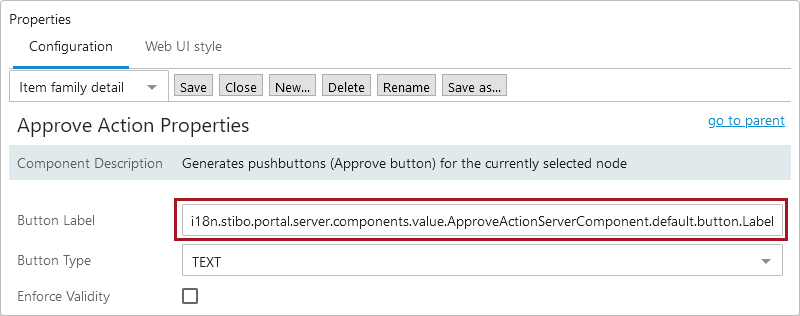
The above example shows the Approve Action properties in the Web UI designer. The label on the button is defined by the localization key 'i18n.stibo.portal.server.components.value.ApproveActionServerComponent.default.button.Label.' The default English value for that localization key is 'Save & Approve' and the button will be rendered like this for the English locale:

In some cases you may want to overwrite the standard value for a localization key, thus changing the default text. This requires that you add the given translation key with the new value to a 'portalmessages' property file and place that file on the application server. The file can be placed on the file system in any directory as long as the directory is pointed out in the sharedconfig.properties file using the 'Portal.Localizer.Folder' property.
For example, Portal.Localizer.Folder = [STEPHOME]/PortalLocales (e.g., opt/stibo/step/PortalLocales)
Note: The naming convention for the 'portalmessages' file is: portalmessages_[ISO country code].properties. Example: portalmessages_en.properties. Also, region codes can be added as a postfix to the country code. Example: portalmessages_en_US.properties
For instance if you want to change the English default text on the SaveApproveButton to 'Verified', the following will have to be in place:
- A directory on the application server has been appointed to house the 'portalmessages' property files.
- The 'Portal.Localizer.Folder' property in the sharedconfig.properties file points out the above mentioned directory.
- A 'portalmessages' property file for English is placed in the directory. The file must be named 'portalmessages_en.properties.'
- The 'portalmessages_en.properties' file must include the translation key for the SaveApproveButton and it must specify the new English text: i18n.stibo.portal.server.components.value.ApproveActionServerComponent.default.button.Label = Verified
Key-based framework for STEP Workbench
Localization of texts in STEP Workbench is based on a 'GUI bundle' system. A GUI bundle is a java .properties file which maps localization keys to text strings to be used in the UI. The developer provides a default English text in a file called 'something.properties.' Translations to other languages exist as files called 'something_language.properties.' The code retrieves the texts based on the keys and the framework takes care of first looking up the translated text in the 'something_language.properties' file and then in the 'something.properties' file. All the properties files involved are included in the jar files that make up the application and cannot be changed by the users.
Annotation-based localization framework
The localization framework offers a bundle-based approach to localization of STEP code. Basically it means that user facing static text strings must be annotated as localizable in the code and a default (English) text is provided. This is valid for both STEP Workbench and Web UI.
A class annotated with @Localizable represents a string that can be localized with a Localizer. The annotated class makes up the ID of the string. The annotation contains the default source translation (in English).
The bundle translations can be overridden by custom translations placed as properties files on the STEP server. The STEP server is configured to look for localizable artifacts by setting the configuration property ‘Install.ExternalLocalizationDir’ to point to the folder where the files are stored.
Localization Tool
The Localization tool supports system administrators in the process localization, using either the annotation-based localization, or key-based annotation in Web UI.
Important: The localization tool does not support key-based localization in STEP Workbench.
The localization tool assists administrators in translating static text strings in the UI, such as titles, labels, and dialog text as it generates a translation file that contains the texts that need translation. These generated files are in XML format and are intended to be sent to an outside agency for translation of the text strings in the file. Once the file is returned from the translation agency, it can be converted into system resource files that can be applied to the system so that users may view the STEP interfaces in the translated language(s).
The Localization tool is intended to be used by system administrators only, and the involvement of a Stibo Systems developer or partner may be required as part of the initial implementation of the functionality.
Overview of the tool
The Localization tab is split into two functional areas: file generation and file conversion.

Generate Translation File
The Localization tool is able to extract both the localization keys (often referred to as 'i18n keys') used by Web UIs, as well as the text strings in the code base that are annotated as localizable. The latter is used by both Web UIs and STEP Workbench. In order to generate the translation file, the system administrator must first select the data to be included.

Target language
The target language the file should be generated for must be specified. The selected target language is added to the XML translation file so that the language indicator is available to the system when the translated file is returned.
Country
For some languages it is possible to specify a country version of the language. Country should only be specified if the translation is specific to a particular regional dialect.
Translation Status
Translation status selections may be made to reduce the size of the translation XML file, if desired. This is especially useful on previously translated systems where only untranslated and/or changed (delta) content in the selected language should be submitted for translation.
- Translated: All text that has been previously translated into the target language by the Localization tool
- Not translated: All text that has never been translated into the selected target language by the Localization tool
- Changed: All text that has already been translated into the selected target language by the Localization tool, but has since had the default English texts updated
Once the administrator has made the appropriate filtering selections, they must click Search to generate the list of bundles and translation status.
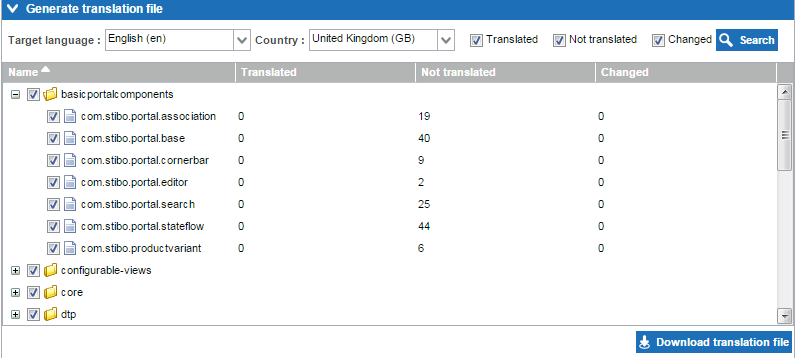
The data to be extracted can be further refined by selection / deselection of the particular component bundles to be included. Administrators may select all (as is defaulted) or may select only a subset for extraction. In the latter case, a Stibo Systems developer should be consulted to ensure that the correct bundles are extracted to meet the translation requirements. One example could be that only the texts related to matching should be translated, thus only the bundle related to matching needs to be selected.
Once all file generation selections have been made, the administrator clicks Download translation file. The file can then be submitted to a translation agency.
Convert Translation File
When a generated file has been translated, the conversion functionality in the localization tool must be used to convert the XML file into a system resource file.
First, the administrator must select the translated XML file from their local machine using the Choose File button.
The Merge with existing translations from STEP option may be checked if the resource files are intended to replace only a small subset of existing translations on the system.
The Convert to one Portal message file per bundle selection applies to Web UIs only. Check this option if the generated resource files will be placed on the STEP application server. This option should be left unchecked if the resource files should be placed within the code.
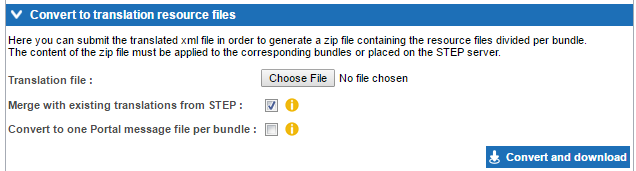
When the translation file and any additional options have been selected, the Convert and download button should be clicked to generate the resource files.
Deploying the resource files
The resource files are delivered in a zipped file which contains a number of folders that are structured and named in a way that the STEP installation will be able to recognize. The entire file structure that is included in the zipped file must be added to the STEP installation.
Converted files may be delivered to STEP via addition to the code base or via placement on the application server.
Addition to the code base requires a Stibo Systems developer and is typically used when the translations are to be used as part of the standard STEP distribution.
Placement of the files on the STEP application server can be done by any STEP administrator with access to the application server and the sharedconfig.properties file. This option is typically used when the core translations of texts must be overwritten using the newly generated resource file content. Note that this option requires population of the 'Install.ExternalLocalizationDir' property in the sharedconfig.properties file with the path of the folder on the application server in which the localization files are stored. One file per locale per bundle may be stored in this location.
Properties to be set
For the workbench and the Web UI, the following parameters must be set in the sharedconfig.properties:
For the workbench: Install.ExternalLocalizationDir=/workarea/localization
For the Web UI: Portal.Localizer.Folder= [STEPHOME]/PortalLocales
The system administrator must also verify the Webstart.Locales property in the sharedconfig.properties file. This property is populated with locales and their Start Page translations in the following format: [locale1]:[start page text];[locale2]:[start page text]
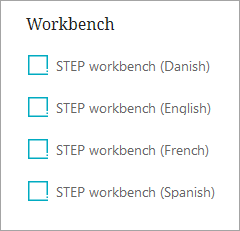
For example: Webstart.Locales=da: STEP workbench (Danish) provides the following option on the Start Page.

Assuming that corresponding Danish (da) resource files are available, users logging in via this link will view a Danish-translated workbench.
Stibo Systems can provide translations of STEP Workbench and Web UI for the following languages:
- Portuguese
- Spanish
- Chinese (simplified)
- Danish
- English
- Finnish
- French
- German
- Italian
- Japanese
- Korean
- Norwegian
- Swedish
Note: The STEP server must be restarted to clear the cache and allows the translations to become active.
Limitations
- The localization tool can only be used to translate text into standard STEP languages (those supported server side, such as French, German, etc.)
- Only text strings that are annotated as localizable or have a translation key (used by Web UIs) can be extracted by the localization tool
- Data content in STEP is not influenced by the localization tool
- STEP Workflow state and Workflow Transition names are not localizable
- Texts that are presented on the basis of Business Rules are not localizable
End User Access of Translated Workbench UIs
Translated workbenches are accessed via the appropriate Start Page links. The available Start Page links are defined by the 'Webstart.Locales' property that can be specified in the sharedconfig.properties file.
Example: Webstart.Locales=da:STEP workbench (Danish);fr:STEP workbench (French);sp:STEP workbench (Spanish);en:STEP workbench (English)
Setup and End User Access of Translated Web UIs
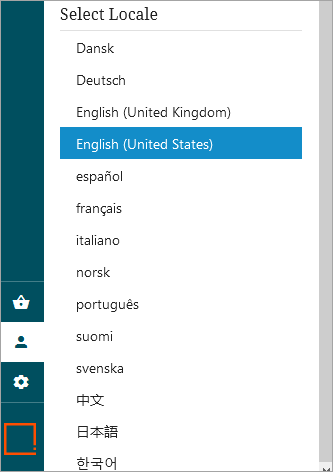
Translated Web UIs can be accessed in one of two ways: via the Locale selector on the login page, or once logged into Web UI, going to the Select Locale section in the User Settings menu on the Global Navigation Panel. There are thirteen locales that come standard with each Web UI: Danish, German, English, Spanish, French, Italian, Norwegian, Portuguese, Finnish, Swedish, Chinese (simplified), Japanese, and Korean. Both locale access options are described in further detail below.
Note: A property can be added to the sharedconfig.properties file to ensure a specific locale displays even if the browser prefers a different language. For example, to force display of the English locale, the property called is WebUI.OverrideBrowserPreferredLocale=en can be set. Setting the locale via the Login Screen's Locale selector or the Global Navigation Panel will overrule this property.
If only a select few locales need to be shown, the Locale Global Representation component can be configured to limit the available locales on the Web UI Login Screen and on the Select Locale section of the User Settings menu on the Global Navigation Panel. To do so, follow the directions outlined below:
- Log into Web UI.
- Open the designer.
- Go to --[MAIN]-- > Global Representation > and add the Locale Global Representation component.
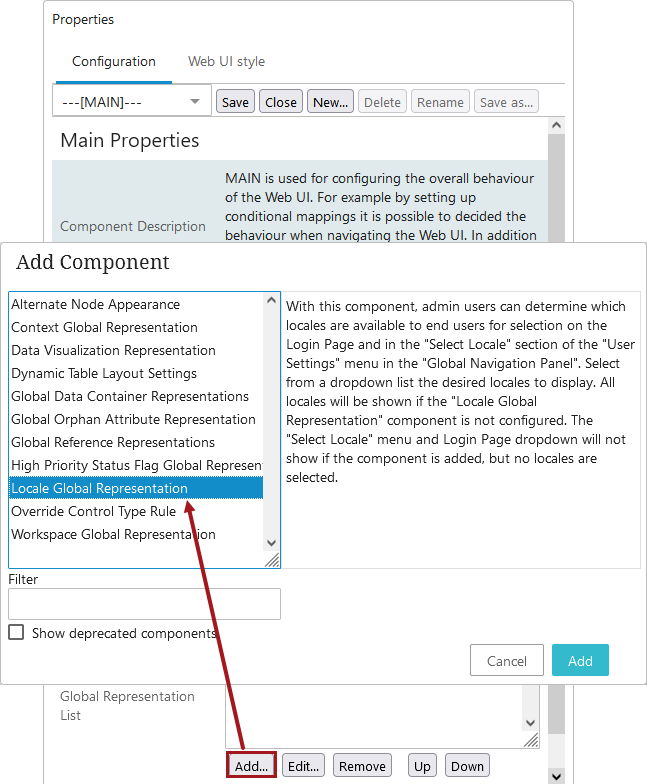
- Once added, double click on Locale Global Representation component to open the Locale Global Representation Properties.
- Add the desired locales from the dropdown list, and click Save.
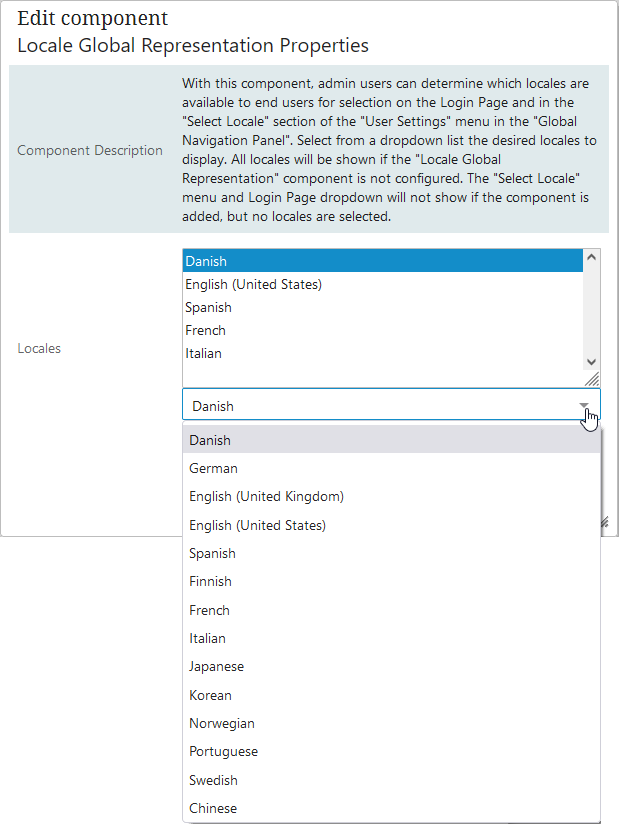
Important: If the Locale Global Representation component is added, but no locales are added to the component, the system will not display the Locale dropdown on the Login Screen, and it will not display any locales on the Select Locale section of the User Settings menu in the Global Navigation Panel. If the Locale Global Representation component is not added, all thirteen locales will display.
Note: For backwards compatibility in older STEP systems, the Locale Selector child component on the Login Screen will remain ONLY if it was configured prior to 10.3, and will behave in the following ways:
-
If the Locale Selector child component and the Locale Global Representation component are BOTH added, the Locale Global Representation component and its behaviors will take precedence.
-
If the Locale Selector child component is added and configured, but the Global Representation component is NOT added, then the Locale dropdown on the login screen will display the configured locales, but the Select Locale section of the User Settings menu in the Global Navigation Panel will display all thirteen locales.
-
If the Locale Selector child component is selected but no locale values have been configured, and the Locale Global Representation is NOT added, then both the Locale dropdown on the login page and the Select Locale section of the User Settings menu in the Global Navigation Panel will display all thirteen locales.

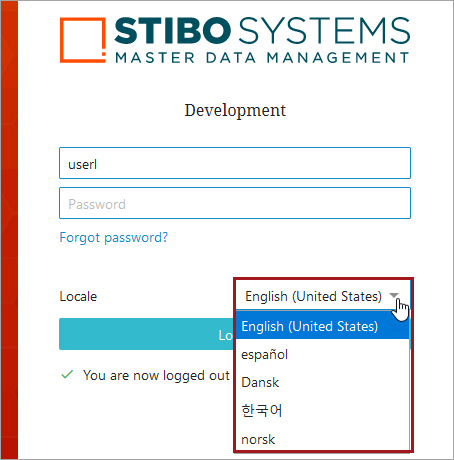
Login Screen Dropdown Locale
To select a particular locale on the Login Screen, select the dropdown menu from the Locale parameter and enter in user login credentials. Click Login.
Select Locale via the Global Navigation Panel
Users are able to select locale through the Global Navigation Panel. This way of selecting locale enables users who normally bypass the Web UI login screen, such as for systems configured with Single Sign On (SSO), to select a locale different from the browser’s preferred language. The selected locale will be highlighted, and each time a new locale is selected, the Web UI will refresh, signaling that the new locale has taken effect.
The locale selection under the Select Locale section of the User Settings menu in the Global Navigation Panel will display all thirteen translations as options, unless otherwise configured in the Web UI designer to only display a select few.
To access the locale selection in the Web UI, follow the directions bellow:
- In Web UI, go to the Global Navigation Panel.
- Click on User Settings.
- Scrolling down to the Select Locale section of the User Settings column and select the desired locale.