This section is used to describe the various options available in the System Setup > Users & Groups > System Settings > Web UI Settings.
Important: Enter the Object Type ID for the values entered in Web UI Settings and not the Name.
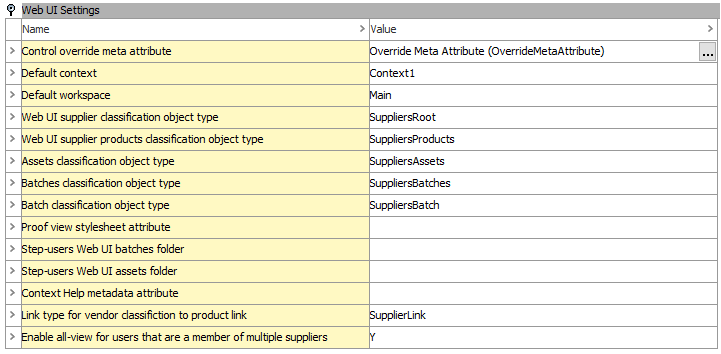
Control override meta attribute
This setting is a way to define the control type for an attribute in the workbench on the attribute itself. This means that an admin user can define the control type without needing to open the Attribute Management screen in the Web UI or setting the override control type on the attribute itself when configured on a screen / list via the Web UI designer. Ultimately, this gives a user workbench control over everything about an attribute's configuration, even how it displays in the Web UI.
With this setting, the control type can be controlled in workbench and Web UI by following these steps:
- Create a description attribute that is made valid / available for the Attribute object type.
- In STEP Workbench, go to Users & Groups (as shown in the above image).
- Under Web UI Settings > Control override meta attribute, populate the parameter with the description attribute created in step 1.
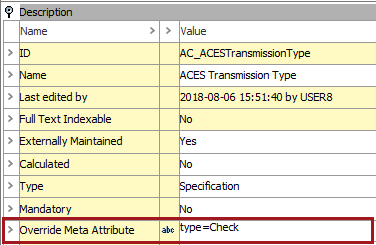
After set up, users can also control the override setting from the description attribute (set up in step 1) for the specific attribute itself. See the example below:
The following is a list of the attribute values that can be used and is dependent on the validation base type.
| Override Control Type | Validation Base Type | Control override meta attribute values for workbench (case sensitive) |
|---|---|---|
| Checkbox | LOV | type=Check |
| Radio | LOV | type=Radio |
| Radio with clear option | LOV | type=Radiowithclearoption |
| Rich Text | Text, Text (exclude tags), Numeric Text, Numeric Text (exclude tags) | type=Richtext |
| Text Area | Text, Text (exclude tags), Numeric Text, Numeric Text (exclude tags) | Type=Textarea |
| Text Box | Text, Text (exclude tags), Numeric Text, Numeric Text (exclude tags) | type=Textbox |
| Typeahead | LOV | type=Typeahead |
For override control in the Web UI, refer to the information in the Override Control Type Rule topic in the Web User Interfaces documentation (here) and read more about (and see examples) of the control type overrides available. Users should also be familiar with the Attribute Value Component (here) and Attribute Value Group Component (here) topics, also.
If override control is set up in Web UI also, when changes are made in workbench, it also changes (where applicable) in Web UI and vice versa. If a user types in an incorrect / invalid control type in workbench, then no changes are made in the Web UI.
Default context
This setting determines the default context that will be displayed when signing into the Web UI by a user for the first time. It does not control how many contexts are available to the user once they are signed into the Web UI. This means that if the setting is set to an English context and a user wants to view an object in French, then the user can change the context to French. It will stay in the French context every time the user signs into Web UI until it is changed by the user.
Default workspace
This setting determines the default workspace that will be displayed when a user signs into the Web UI for the first time. However, after a user signs into the Web UI, they can change the default workspace if desired.
Web UI supplier classification object type
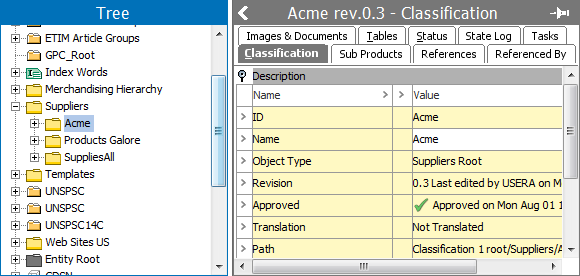
This option determines the Object Type that is 'assigned' to a Web UI user via the Supplier User Group and its associated Classification(s). Filling in this information is only required if you are setting up a Web UI that will include a supplier hierarchy. In the images below, an object type of Suppliers Root has been created. This object type will be the 'root node' for each of the suppliers that are created.
For more information regarding a supplier item Web UI setup, see the Supplier Web UI Setup Guide documentation here.
Note: Enter the ID—not the Name—of the Object Type.

Web UI supplier products classification object type
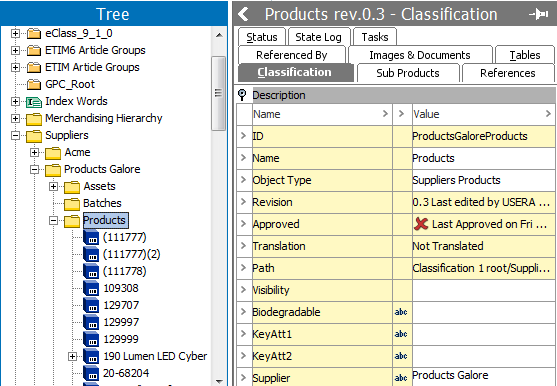
Working in conjunction with the Web UI supplier classification object type, the Web UI supplier products classification type is the root node where the supplier's products reside as shown in the images below.
For more information regarding the setup of a supplier item Web UI, see the Supplier Web UI Setup Guide documentation here.
Note: Enter the ID—not the Name—of the Object Type.

Assets classification object type
This is where the object type that was created for storing the Supplier's assets is configured.
For more information regarding the setup STEP Supplier Web UI, see the Supplier Web UI Setup Guide documentation here.
Note: Enter the ID—not the Name—of the Object Type.
Batches classification object type
The Batches classification object type is the root node where the Batch classification objects reside.
For more information regarding the setup STEP Supplier Web UI, see the Supplier Web UI Setup Guide documentation here.
Note: Enter the ID—not the Name—of the Object Type.
Batch classification object type
The Batch classification object type is the object type for the batch folders that reside under the Batches classification object type.
For more information regarding the setup STEP Supplier Web UI, see the Supplier Web UI Setup Guide documentation here.
Note: Enter the ID—not the Name—of the Object Type.
Supplier privileges entity to classification reference type
For more information regarding the setup STEP Supplier Web UI, see the Supplier Web UI Setup Guide documentation here.
Note: Enter the ID—not the Name—of the Object Type.
Web UI supplier entity classification object type
Working in conjunction with the Web UI supplier classification object type, the Web UI supplier entity classification type is the root node where the supplier's entities reside as shown in the images below.
For more information regarding the setup of a supplier item Web UI, see the Supplier Web UI Setup Guide documentation here.
Note: Enter the ID—not the Name—of the Object Type.

Proof view stylesheet attribute
The REST API proof view uses style sheets that are defined in an XML file. This XML must exist as an Asset in the STEP database.
For a standard product proof view, a default set of style sheets is utilized. If for certain products, there is a need to use a different set of style sheets, loaded as an asset to STEP, the metadata attribute specified in this option is used to point to that asset. Thus, different products may display in different styles depending on the style setups in the different XML files. The population of the metadata must have the ID of the asset and it must exist and must be a valid XML file. Otherwise the 'default' styles are used.
Note: This option refers to the REST API proof view, not the InDesign proof view.
Step-users Web UI batches folder
The value entered is the ID of the classification folder into which an operator on the User Web UI may create batch folders and link products into them as a sort of private 'collection' of products.
Step-users Web UI assets folder
The value entered is the ID of the classification folder into which an operator in the User Web UI may upload into or download from. It is expected that the Assets folder that is used for the uploads is really only a temporary holding area for the assets and that they will subsequently be moved into their 'proper' folder within the assets hierarchy in the STEP system.
Note: The 'Step-user' referred to in this option is one that has logged in to the User Web UI.
Context Help metadata attribute
The Context Help metadata attribute functionality allows a user to select the description attribute that contains the help text for use in Web UI. An example of what the help text does is shown in the image below. After the attribute has been created, the ID of the attribute should be entered. For more information about using the Context Help metadata attribute, see Attribute Help Text in Web UI in the Web User Interfaces documentation

Link type for vendor classification to product link
This setting is where the Reference Type that has been defined to use for products associated to a Web UI users' Supplier Products Folder is added. As shown in the image below, the Reference Type ID is entered and will be made available for use in the Web UI.


Enable all-view for users that are a member of multiple suppliers
If set to 'Y,' this setting enables a supplier user that is a member of multiple supplier groups to have views across all of the groups when looking at tasks. For more information about the multiple views for suppliers, see the All-View Across Multiple Suppliers section of Supplier Web UI Setup Guide