To successfully use an Asset Push Sidecar, an asset storage folder will need to be created.
Creating a directory for pushed assets based on the operating system
For Linux Environments
- To create a directory for pushed assets, open the console / terminal window and navigate to the Asset Push Sidecar created in the Overview of the Asset Push Sidecar Installation topic here. For example, type:
cd /workarea/sidecar/assetpushqueue-DTPConfiguration
- This will change the current directory to the 'asssetpush-DTPConfiguration' directory of the asset push queue. Next, create a directory to store the pushed assets. For this guide, the directory will be called 'images.' For example, type:
mkdir images
Subsequently, this directory can be a separate partition for assets. For example:
/images
For Windows Environments
- To create a directory for pushed assets, open the command prompt window as an Administrator and navigate to the Asset Push Sidecar directory. In this guide, the L: drive is used.
- Go to Asset Push Sidecar directory or L: drive
L: <Enter>
cd L:\sidecar\assetpushqueue-DTPConfiguration
Now, create a directory for the assets using Windows Explorer (Right-click + New > Folder) or from the command line. In this example, the 'images' directory is created with:
mkdir images
Subsequently, this directory can be a separate partition for assets. For example:
N:\images
For Mac Environments
- To create a directory for pushed assets, open the console / terminal window and navigate to the Asset Push Sidecar created in the Overview of the Asset Push Sidecar Installation topic here. For example, type:
cd /workarea/sidecar/assetpushqueue-DTPConfiguration
- This will change the current directory to the 'asssetpush-DTPConfiguration' directory of the asset push queue. Next, create a directory to store the pushed assets. For this guide, the directory will be called 'images.' For example, type:
mkdir images
Subsequently, this directory can be a separate partition for assets. For example:
/images
Creating the Asset Push Sidecar Files
The next step requires executing some commands in the terminal or command line to build the Asset Push Sidecar. This process is uniform across operating systems.
- From the Asset Push Sidecar directory run the following command:
java -jar assetpushqueue-DTPConfiguration.jar --test
- After the files are built, the Asset Push directory will look like the following, if the previously created folder storing assets is called 'images.'
assetpush.properties
assetpushqueue-DTPConfiguration.jar
images/
log.properties
logs/
All Available Java Commands
To get all available syntax for sidecar installation run the following command:
java -jar assetpushqueue-DTPConfiguration.jar --help
The following is a list of all available options with Java.
-h or --help Show this help message
-i or --install Install as a service
-u or --uninstall Uninstall the service
-t or --test Run the payload, exit if it fails
-r or --run Run the payload, restart if it fails
-s or --stop Stop a running payload
-c ... or --config=...Pass configuration variables to the payload
--java=... Explicitly point out the java binary to use for the payload comma separated no spaces
Creating a New User ID / Name in STEP for Asset Push Sidecar
A new user will need to be created in STEP to use in identifying the Asset Push process in logs. In this example, the user 'assetpush' will be used. For more information, see the Users and Groups topic in the System Setup / Super User Guide documentation here.
ID assetpush
Name assetpush
The 'step.x.log' will show the user as follows:
2017/07/08-11:59:56 User:ASSETPUSH
com.stibo.core.domain.impl.documentcontent.cmd.Graphics
MagickCmd execute INFO: GraphicsMagickCmd.execute: size 2017/07/08-11:59:56 User:ASSETPUSH
com.stibo.core.domain.impl.documentcontent.cmd.Graphics
MagickCmd execute INFO: GraphicsMagickCmd.execute: mode 2017/07/08-11:59:56 User:ASSETPUSH
com.stibo.core.domain.impl.documentcontent.cmd.Graphics
MagickCmd execute INFO: GraphicsMagickCmd.execute: save
Modifying the assetpush.properties File
To modify the assetpush.properties file, navigate to the Asset Push Sidecar directory, and edit the assetpush.properties. In the assetpush.properties, edit the 'UserName,' 'Password,' 'ImagesFolder,' and 'Delay' properties. The following is an example.
#Please edit UserName and Password to fit your system, but leave the rest as-is if possible.
#Sat June 08 14:35:31 EST 2017
Password=assetpush
ImagesFolder=/images
UserName=assetpush
Delay=30
Once finished, save the assetpush.properties file. From a command line or terminal, re-run the following command to verify that the property changes are accepted.
java -jar assetpushqueue-DTPConfiguration.jar --test
or
java -jar assetpushqueue-DTPConfiguration.jar -t
Definition of Properties
The following details the function of the elements of the properties file.
- UserName - User Name for file system login. This is set in STEP.
- Password - Password for file system login. This is set in STEP.
- ImageFolder - This option specifies the first part of the path and/or parent directory into which all pushed assets will be placed. Relative Path Template takes effect after this, meaning that all asset push configurations under a single event queue will share a parent folder on the local file system, but each configuration is expected to have a separate directory structure under the common parent.
- Delay - This option is the rate in seconds for the sidecar to ping the file system to ensure connection. The default is set to 30 seconds and should not be changed without consulting with Stibo Systems Technical Services.
Note: The UserID that is used by the asset push side car must have the 'View metadata for asset (property value)' user action. For more information, see the User Actions topic in the System Setup / Super User documentation here.
Completing the Installation of the Asset Push Sidecar
The next step of the installation will actually install the individual files for the Asset Push Sidecar. The process varies per operating system.
For Linux Environments
To complete installation of the actual Asset Push Sidecar, run the following command:
java -jar assetpushqueue-DTPConfiguration.jar --install
or
java -jar assetpushqueue-DTPConfiguration.jar -i
The following response will be returned:
Jun 23, 2017 11:42:25 AM com.stibo.sidecar.StatusReporter getAddressFacing
INFO: Detected public IP facing hostname-internal.stibo.com:80 = 10.232.4.131
To make this sidecar start automatically on boot, please run crontab -e to add this line:
@reboot /workarea/sidecar/assetpushqueue-DTPConfiguration/assetpushqueue-DTPConfiguration
Jun 23, 2017 11:42:25 AM com.stibo.sidecar.StatusReporter getAddressFacing
INFO: Detected public IP facing hostname-internal.stibo.com:80 = 10.232.4.131
For Windows Environments
To complete installation of the actual Asset Push Sidecar, run the following command:
java -jar assetpushqueue-DTPConfiguration.jar --install
or
java -jar assetpushqueue-DTPConfiguration.jar -i
The following response will be returned:
L:\sidecar\assetpushqueue-DTPConfiguration>java -jar assetpushqueue-DTPConfiguration.jar -i
Jul 05, 2017 3:32:42 PM com.stibo.sidecar.StatusReporter getAddressFacing
INFO: Detected public IP facing hostname-dev.com:80 = 10.64.8.170
The service was installed, use sc start assetpushqueue-DTPConfiguration to start the service
Note: There are now references in windows to L:\sidecar\assetpushqueue-DTPConfiguration\sidecar
you must not move these sored files or the service will break.
Jul 05, 2017 3:32:47 PM com.stibo.sidecar.StatusReporter getAddressFacing
INFO: Detected public IP facing hostname-dev.com:80 = 10.64.8.170
For Mac Environments
To complete installation of the actual Asset Push Sidecar, run the following command:
java -jar assetpushqueue-DTPConfiguration.jar --install
or
java -jar assetpushqueue-DTPConfiguration.jar -i
The following response will be returned:
macpro:sidecar stibosw$ java -jar assetpushqueue-DTPConfiguration.jar -i
Jul 05, 2017 12:22:53 PM com.stibo.sidecar.StatusReporter getAddressFacing
INFO: Detected public IP facing hostname-dev.com:80 = 10.64.10.35
Please run these commands:
sudo cp /Users/stibosw/sidecar/com.stibo.sidecar.assetpushqueue-DTPConfiguration.plist
/Library/LaunchDaemons/com.stibo.sidecar.assetpushqueue-DTPConfiguration.plist
sudo launchctl load
/Library/LaunchDaemons/com.stibo.sidecar.assetpushqueue-DTPConfiguration.plist
sudo launchctl start com.stibo.sidecar.assetpushqueue-DTPConfiguration
Jul 05, 2017 12:22:53 PM com.stibo.sidecar.StatusReporter getAddressFacing
INFO: Detected public IP facing hostname-dev.com:80 = 10.64.10.35
Finalizing the Installation of the Asset Push Sidecar
For Linux Environments
After the Asset Push Sidecar has been installed, the next step is to set it to run. From the sidecar directory, run the following command:
assetpushqueue-DTPConfiguration start
Stibo AssetPushQueue (DTPConfiguration) has been started see log files in /workarea/sidecar/assetpushqueue-DTPConfiguration/logs
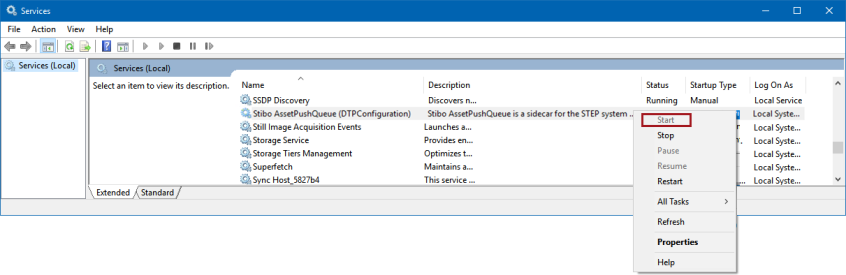
For Windows Environments
To start the Asset Push Sidecar, go to the Windows Services component. In the Services window, locate the Stibo AssetPushQueue (assetpushqueue-DTPConfiguration). On the entry, right-click and select 'Start.'
For Mac Environments
After the Asset Push Sidecar has been installed, the next step is to set it to run. From the sidecar directory, run the following command:
sudo launchctl load
/Library/LaunchDaemons/com.stibo.sidecar.assetpushqueue-DTPConfiguration.plist
Testing Asset Push Sidecar
After the Asset Push Sidecar has been configured to run and the configurations have been set up, in the STEP Workbench, 'Push' or 'Force Push' a few assets to test that the configuration and ensure that the sidecar are working properly.
For more information on maintaining the Asset Push Sidecar, see the Additional Asset Push Sidecar Information topic here, and for instructions to remove this Asset Push Sidecar, see the Uninstalling an Asset Push Sidecar topic here.