Importing FAB-DIS data from the ETIM and Media tabs of an Excel file is available in an IIEP via the FAB-DIS Importer processing engine. For more information, see the FAB-DIS Import Format topic here.
Important: The workbench configuration covered in this topic is required for FAB-DIS data imports from the workbench or Web UI. After completing this configuration, to import FAB-DIS using the Web UI, see the FAB-DIS Import Web UI Configuration topic here.
In order to import data from both the ETIM and Media tabs of a FAB-DIS file, both an Asset Importer configuration and an IIEP configuration are required. The Asset Importer must be configured first as it must subsequently be selected within the IIEP configuration.
Below, details are provided for how to configure both importers for use with the FAB-DIS format. General configuration information for Asset Importer and IIEPs is covered within the dedicated documentation sections for those importers and only information specific to the FAB-DIS configuration is covered in this topic.
Prerequisites
On the application server, set the case-sensitive AssetImporter.ObjectTypeChange property to 'true' in the sharedconfig.properties file. This property allows the asset importer to change the object type of the assets, such as when asset placeholder is updated with content. If set to 'false' or set at all, FAB-DIS imports will not work. For example:
AssetImporter.ObjectTypeChange=true
Note: If an asset's object type has been set manually, the object type is not updated during import, regardless of this setting.
Asset Importer Configuration
Asset Importer functionality is used to handle assets from the FAB-DIS Media tab. Media tab data triggers an asset importer background process and therefore, an asset importer configuration is required.
Note: This configuration is not necessary to import data from the ETIM tab only.
Follow the steps below to configure the asset importer, using the additional Asset Importer topics in the Digital Assets documentation here.
- Create an Asset Importer Configuration as defined in the Asset Importer Configuration topic here.
- For the Importer Validator, this option is not required and works best when the 'Allow asset with no content' option in the IIEP is left unchecked. Setting validations can adversely affect the use of the 'Allow asset with no content' option since assets without content will fail any specified validation. For more information, see the IIEP Configuration section below.
- For the Hierarchy Builder, set the parameters based on your data model, as defined in the Hierarchy Builder topic here.
- For the Asset Matcher, set the parameters based on your data mode, as defined in the Asset Matcher topic here:
- Specifically, for the 'Match on' parameter, from the dropdown select 'Asset Name' to ensure that assets are updated, and not duplicated.
- For the Content Importer, set the parameters based on your data model, as defined in the Content Importer topic here.
- For the Metadata Importer, if metadata is required, set the following parameters as defined in the Metadata Importer topic here. For more information on metadata mapping and handling CODVAL entries, see the FAB-DIS Import Mapping topic here.
- For the 'Metadata Importer' dropdown, select Asset and Reference Metadata Importer to map data to the asset or to the reference between the asset and the product. When the mapped attribute is valid on the reference, the metadata is written on the reference. If the attribute is only valid on the asset, the metadata is written to the asset. If the attribute is valid on both the reference and the asset, the metadata is only written to the reference.

When multiple products with different metadata reference the same asset, the import writes the same metadata to each reference.
- Click the 'Add Field Mapping' link to display the Mappings dialog. Add the necessary mappings between the Field parameter (indicating the name of the column in the FAB-DIS file) and the STEP Attribute parameter. In the table, click the ellipsis button (
 ) to display the dialog for editing the mapped selections.
- For the Product Linker, set the following parameters as defined in the Product Linker topic here:
- For 'Match Metadata Field' parameter, type 'ID'. While 'ID' is not a column in the import file, it is used to determine the correct product for the asset by carrying forward the ID mapping (including any transformations) specified for the ETIM tab in the IIEP configuration.
- For 'Match On' parameter, select ID from the dropdown, unless the Excel file includes a name or key.
- For 'Match Below Product Root' parameter, click the ellipsis button () to select a location in Tree to search for existing products.
- For the 'Reference Type Field' and 'Default Reference Type' parameters, determine the necessary option based on your data model:
- To match the value provided in the TYPM column of the import file to the ID of a reference type in STEP, add TYPM to the 'Reference Type Field' parameter. Additionally, supply a reference ID in the 'Default Reference Type' parameter to indicate the required default reference type when the value in the TYPM column does not match a STEP reference ID.
- To set the same reference type for all assets in the import file, leave the 'Reference Type Field' parameter blank, and set the 'Default Reference Type' parameter as the required reference type.
- Set other parameters on the Asset Importer Configuration Type tab as required and as defined in the Asset Importer Configuration section of the Digital Assets documentation here.
IIEP Configuration
The following specific Inbound Integration Endpoint (IIEP) settings are required to import a FAB-DIS file. Additional topics can be found in the Inbound Integration Endpoints documentation here.
- Create a FAB-DIS IIEP. For details, see the Creating an Inbound Integration Endpoint topic here.
- On the Choose Receiver step, the Receiver parameter must be set to Hotfolder Receiver for importing assets or importing via the Web UI File Loading widget. Otherwise, select any receiver. If imports will be performed in Web UI and will also be performed using different receiver methods, create an IIEP for each receiver. For more information, see the IIEP - Choose Receiver topic here.
- On the Configure Endpoint step, select FAB-DIS Importer as the Processing Engine. This gives access to the FAB-DIS Configuration step below.
- On the FAB-DIS Configuration step, select the data that will be imported:

Note: To enable the Finish button, at least one checkbox must be checked on the FAB-DIS Configuration step, and one Source field must be mapped on the Map Data step.
- Check the ETIM checkbox if data from the FAB-DIS ETIM tab should be processed.
- Check the MEDIA checkbox if data from the FAB-DIS Media tab should be processed. New products identified on the Media tab only, based on the REFCIALE column, are created in order to connect them to the imported assets, but they will only include the data mapped to the MARQUE and REFCIALE columns.
This selection displays the 'Media tab import configuration' group. For the Asset Importer Configuration parameter, click the ellipsis button () to display the Select Asset Importer Configuration dialog. Choose a configuration and click the 'Select' button. The configuration is displayed in the IIEP wizard.
Note: When the MEDIA checkbox is checked, an 'Asset Importer Configuration' must be selected to enable the Next button.
Check the Allow asset without content checkbox to create an asset placeholder when asset content is not available for import. These placeholder assets are created with the file name found in the Excel file as the STEP asset name, and include a link to the product identified in the Excel file, as well as any mapped metadata. As shown in the images below, a placeholder Object Type is set, and the asset thumbnail shows 'no content' in the 'Description' flipper. The System Properties flipper 'Extension' parameter is set with the default '.txt' extension. If the asset importer is configured to match on Asset Name, when an asset with content and the same name is imported, the object type and extension parameters are updated to reflect the actual asset information.


Considerations
For the following scenarios, it is advised to use only one of these options, not both:
- Checking the 'Allow asset without content' checkbox while the asset importer Asset Matcher is configured to match on Asset Name can result in the following behavior: if the an asset with content exists in STEP, and then an asset with the same name but without content is imported, the existing asset content is removed.
- Checking the 'Allow asset without content' checkbox while the asset importer Import Validator has restrictions will case the import to return an execution error when no content is found.
- On the Map Data step, complete the manual mapping instructions as needed based on the FAB-DIS Import Mapping topic here. Complete mapping of FAB-DIS includes manual IIEP mapping, automatic ETIM attribute value mapping, and Media mapping via the asset importer configuration.
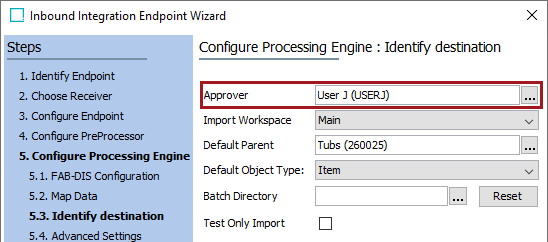
- On the Identify Destination step, set any of the parameters needed. For more information, see the IIEP - Identify Endpoint topic here.
- On the Default Parent parameter, set the Tree location where imported products belong. This information is not available in the FAB-DIS file.
- On the Default Object Type parameter, set the object type for new products. This information is not available in the FAB-DIS file.
- On the Approver parameter, select a user if inbound objects should be approved upon successful import. The selected user must have privileges to approve new and modified objects.
- On the Advanced Settings step, check the 'Approve Import Changes' checkbox. If this checkbox is not checked, objects are not approved upon import, even if an approver is selected. These are the same options that are available in Import Manager. For more information, see the Import Manager - Advanced Settings topic here.

- Change parameters on other steps as required, as defined in the Creating an Inbound Integration Endpoint topic here.
- Once a FAB-DIS import file is available in the IIEP receiver location, and the IIEP is invoked (on schedule or manually), FAB-DIS products and assets are created or updated in STEP. For more information, see the Running an Inbound Integration Endpoint topic here.