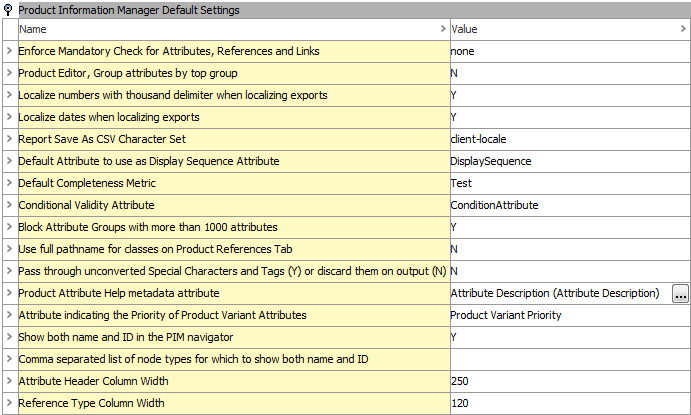
This section describes the options available in System Setup > Users & Groups > Product Information Manager Default Settings.
Enforce Mandatory Check for Attributes, References and Links
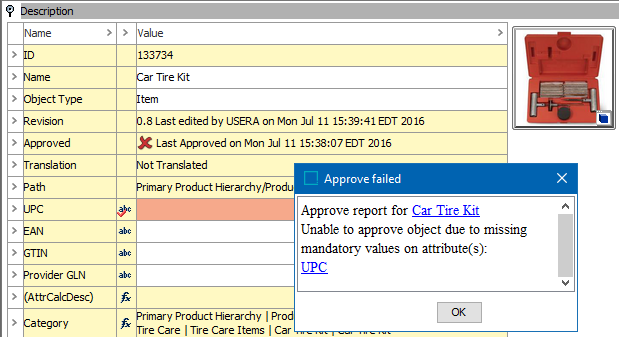
This is the setting that controls whether or not objects can be 'Approved' if they are missing information that has been declared as mandatory.
In the image below, the attribute 'Brand Owner' has been set up as mandatory.
-
If the setting is 'none', the object can still be approved, but the missing attribute value shows a visual indication of the missing data with a background of red.
-
If the setting is 'Y', the object cannot be approved.
Note: This is a System-wide setting, thus it cannot be turned on and off at different places in the Tree hierarchy.
Product Editor, Group Attributes by Top Group
There are cases where a user may create an attribute group that has multiple attribute sub-groups containing the same attributes. This can be the case when setting up User Rights and Privileges where a user can change an attribute value in one sub-group, but does not have the privilege to change the attribute value for the same attribute in the other sub-groups. This setting will control how these attributes are viewed in the workbench.
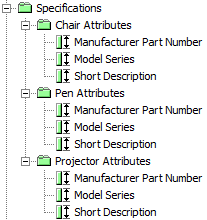
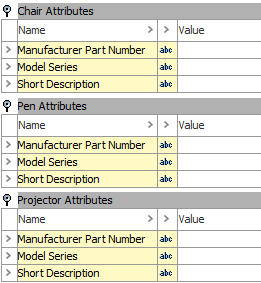
For example, you might have an attribute group called 'Specifications' as in the example below. Within that group, you may have several sub-groups containing the same attributes. The use case would be that a user is responsible for the 'Chair Attributes', but is not granted privileges to change the same attributes within the 'Pen Attributes' sub-group or the 'Projector Attributes' sub-group.
-
If the setting value is 'N', the attribute sub-groups show up in the workbench as in the following image. In this example, the user only has privileges to change 'Chair Attributes' but 'Pen Attributes' and 'Projector Attributes' still display.
-
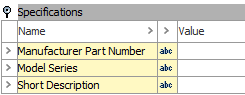
If the setting value is 'Y', the attributes display in the top group. The user still has privileges to update 'Chair Attributes' but 'Pen Attributes' and 'Projector Attributes' do not appear.
Localize Numbers with Thousand Delimiter when Localizing Exports
This setting affects the way numeric values are shown for a selected context. For data exports, this setting causes the system to apply the appropriate thousand delimiter to attributes that have the validation of Number, Integer, Fraction, or Embedded Number. Attributes with the validation of 'Numeric Texts' will not be localized with this setting as they are actually text attributes.
-
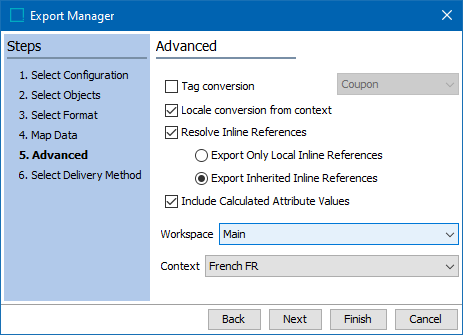
If the setting is 'Y', when exporting data, the currently selected context is always used. If a locale has been assigned to that context, then that locale will be suggested in the Export Manager's Advanced screen as in the image below.
This setting will also affect Flatplanner and the STEP function localizenumber() in calculated attributes.
Important: Common setup for print applications is to keep this setting at 'N' and use Export Manager to control the localization of exports.This setting affects the values presented in the table preview for print applications. It also adversely affects any calculated attribute in the table that accesses attributes with Numeric, ISO Date, or ISO Date and Time validations.
Localize Dates when Localizing Exports
Set the Localize dates when localizing exports to Y, if you want number validated values (with base type Date, ISO Date and ISO Date and Time) to be converted into locale values (e.g., YY-MM-DD replaced by DD-MM-YYYY). Values are localized in Flatplanner (considering note below) and optionally in the STEP Export Manager Advanced screen as shown in the 'Localize numbers with thousand delimiter when localizing exports' section above.
Important: This setting affects the values presented in the table preview for print applications. It also adversely affects any calculated attribute in the table that accesses attributes with Numeric, ISO Date, or ISO Date and Time validations. Common setup for print applications is to keep this setting at 'N' and use Export Manager to control the localization of exports.
Report Save as CSV Character Set
Reports can be saved in various character formats. In this dropdown you can choose the character format to be used when saving reports as CSV. The available choices are: Client-locale, Windows-1252, ISO-8859-1, UTF-8, UTF-8-BOM, UTF-16.

Default Attribute to Use as Display Sequence Attribute
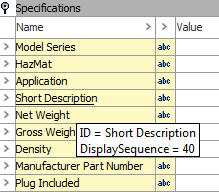
By default, attributes in attribute groups are shown in alphabetical order when viewed in the workbench or Web UI as shown in the example below. This setting allows the user to select the metadata attribute to use when displaying the attributes in the Product Editor to sequence the order of the attributes.

To use this feature, create a metadata attribute to control attribute sequencing. In this example, a metadata attribute with the ID 'Display Sequence' was created and selected as the default attribute.

This option allows for the user to re-order how any or all of the attributes are shown within that attribute group. This can be done either in a single attribute or in the Multi Editor (by selecting multiple attributes) as shown in the image below.

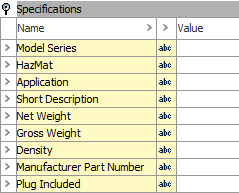
As a result, the attributes show in the order in which they were sequenced.
Note: If some attributes have a Display Sequence and others do not, the system displays the ones that have a sequence number first, and then reverts to displaying the remainder in alphabetic order. For more information about Attribute Display Sequence, refer to the Display Sequence Attribute topic.
Default Completeness Metric
STEP allows the use of multiple metrics. This setting allows for the selection of a default metric. When a metric is set as the default metric, the completeness meter shown on the product and entity editor tabs in the workbench display the value from the default metric. For more information about Metrics, refer to the Metrics section.
Conditional Validity Attribute
Use this setting to activate a conditional attribute. For more information about conditional attributes, refer to Conditional Attribute Display topic.
Block Attribute Groups with More than 1000 Attributes
For performance reasons, it may be necessary to prevent the opening of attribute groups with more than a 1,000 entries for that group. The attributes are still accessible using the Search function in the workbench or linking to them from the Edit Panel in single-product mode.
Use Full Pathname for Classes on Product References Tab
This setting affects how the system displays the information for a Product-to-Classification link.
-
A setting of 'Y' displays the full path name of the Product-to Classification link.

-
A setting of 'N' displays only the Classification folder name.

Pass Through Unconverted Special Characters and Tags (Y) or Discard Them on Output (N)
This setting determines if unconverted Tags and Style Tags should be output when there is not an actual conversion for that particular Tag. Refer to the Tags topic.
-
If this setting is 'Y', any tag that does not have a conversion in a certain media the actual 'internal' STEP tag will be output as-is. This would normally result in a web application ignoring the tag because it is not HTML, and in InDesign, the incorrect command will cause an error when the information is mounted to a page.
-
If this setting is 'N', when there is no output conversion for a Tag or Style Tag, the internal STEP tag should be suppressed on output.
Product Attribute Help Metadata Attribute
In the workbench, it can be useful to display informational text about an attribute. For example, to instruct the user on the type of information that is expected for the attribute value.
Use this option to select the metadata attribute created to provide this information.

Once selected, attributes containing a value for the metadata attribute will display that information when hovering over an attribute. The following image depicts what a user would typically have without the help metadata attribute.
Once a metadata attribute is created and selected in this option, the user can have additional information about the attribute. In this example, when the user hovers over the attribute 'Base Unit of Measure', the Attribute Help Text value is displayed.

Attribute Indicating the Priority of Product Variant Attributes
This setting is used to select the attribute that is to be used as a variant priority attribute. For more information regarding prioritizing product variant attributes, refer to the 'Create a Product Variant Priority Attribute' section of Setting Up Product Variants.
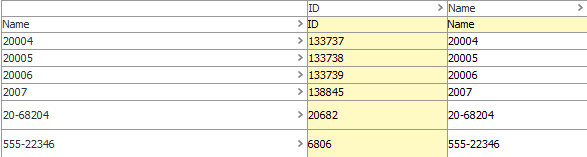
Show Both Name and ID in the PIM Navigator
This setting works in conjunction with the Comma separated list of node types for which to show both name and ID setting (defined in the next section), and it determines what displays in the STEP Workbench navigator panel.
Note: When this setting is changed, the user must log out of the workbench to apply the changes. Also, no IDs will display if no key values are populated in the Comma separated list of node types for which to show both name and ID setting, or if there are key values but the Show both name and ID in the PIM navigator setting is 'N'.
-
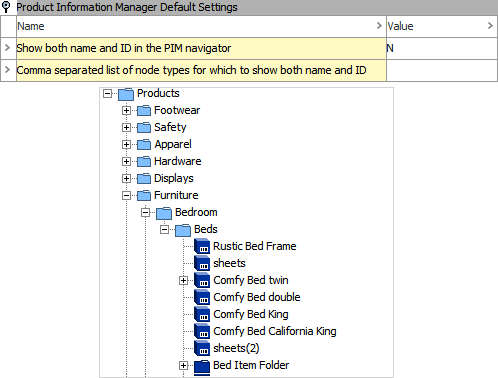
If the setting is 'N' , which is the default, only object names are displayed.
-
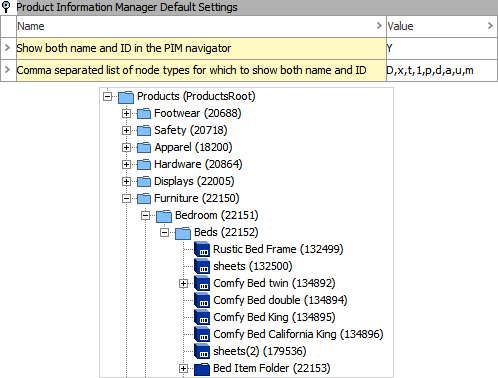
If the setting is 'Y,' the Comma separated list of node types for which to show both name and ID setting determines which objects display both name and ID. Refer to the next section for the valid node type key variables.
Comma Separated List of Node Types for Which to Show Both Name and ID
This setting determines which node types will show both Name and ID in the navigator panel. Node types are not object types; node types are used to identify elements within the STEP database. The following table lists the valid key values and corresponding node types for this setting.
Note: Values in this setting are only effective when 'Y' is set for the Show both name and ID in the PIM navigator option.
When selecting multiple node types, use a comma to separate the key values.
|
Key |
Node Type |
|---|---|
|
D |
Collections |
|
x |
Reference Types |
|
t |
Object Types |
|
1 |
Classifications |
|
p |
Products |
|
d |
LOVs |
|
a |
Attributes |
|
u |
Units |
|
m |
Assets |
Note: These node type keys only relate to showing the associated IDs in the Tree hierarchy. This does not determine if the associated object types are shown in STEP.
Attribute Header Column Width
For products only, this setting affects the width of the header column when using the Multi Editor mode (by selecting multiple products) regardless of the rotation of the table. The header column is the left most column in white.
Note: When this setting is changed, the user must log out of the workbench to apply the changes.
-
In this image, the header column width is 100.
-
In this image, the header column width is 300.
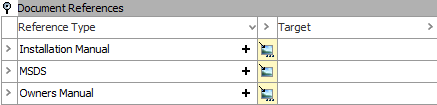
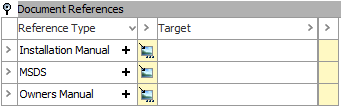
Reference Type Column Width
This setting affects width of the header column when viewing references or links. The header column is the left most column.
Note: When this setting is changed, the user must log out of the workbench to apply the changes.
-
In this image, the header column width is 200.
-
In this image, the header column width is 400.