A series of configuration steps must be taken to enable an integration between STEP and the DemoUp Cliplister external DAM. Those steps are listed and described below.
To set up the integration between STEP and the Cliplister DAM, users must complete the following setup tasks:
-
Add the components that will enable the integration on your system
-
Apply and set the configuration properties
-
Configure the component model in STEP
-
Create an asset import configuration
-
Create an inbound integration endpoint (IIEP)
Adding the components
To use the DemoUp Cliplister DAM functionality in the Web UI, the functionality must be enabled for your STEP system by adding the 'external-dam-adapter-v2' and 'demoup-cliplister' components.
Applying the configuration properties
Note: The following functionality is managed by configuration properties that are not available in the Self-Service UI. Contact Stibo Systems Support for assistance.
What follows is a list of properties required to enable the integration with the DemoUp Cliplister DAM, along with a description of what information needs to be added to each property to configure it.
-
ExternalDAMAdapter.ClassificationID=[classification ID] -- This configuration property directs the system to the classification folder in STEP wherein the Cliplister DAM images will be stored, or placeholders for those images if the images themselves continue to reside in the DemoUp Cliplister DAM. Set this property as equal to the ID of the classification folder where Cliplister DAM assets will be stored in STEP.
-
ExternalDAMAdapter.WebUI.Enabled=true -- When set to "true", this configuration property enables the Cliplister DAM to be accessed via the Web UI.
-
ExternalDAMAdapter.Connector=DemoUpCliplisterConnector -- In tandem with the other properties, this configuration property establishes a connection with Cliplister. The property must always be set to 'DemoUpCliplisterConnection'.
-
ExternalDAMAdapter.DemoUp.PublicAssetPath=/isa/[number]/c3/ -- Establishes the path from Cliplister to STEP. The number to include in the configuration property value must be obtained from Cliplister.
-
ExternalDAMAdapter.DemoUp.PublicServerURL=https://ia2.mycliplister.com -- Required to enable the connection to Cliplister. The https://ia2.mycliplister.com URL must be set as the value for this configuration property.
-
ExternalDAMAdapter.DemoUp.APIServerURL=https://api-rs.mycliplister.com -- Required to enable the connection to Cliplister. The https://api-rs.mycliplister.com URL must be set as the value for this configuration property.
-
ExternalDAMAdapter.DemoUp.ClientID=[clientID] -- Required to enable the connection to Cliplister. The [clientID] value is provided by DemoUp Cliplister.
-
ExternalDAMAdapter.DemoUp.ClientSecret= [Client Secret] -- Required to enable the connection to Cliplister. The [Client Secret] value is provided by DemoUp Cliplister.
Note: If the ExternalDAMAdapter.WebUI.Enabled configuration property is not set, the Node Picker window will not be enabled to review DAM assets, which means users will not have direct access to the assets from DemoUp Cliplister. However, those assets will still be loaded into the Web UI from DemoUp Cliplister. Additionally, the Node Picker window will still be available to select from STEP-based assets.
Configuring the component model
These steps must be taken in the STEP Workbench to complete enablement of the DemoUp Cliplister DAM integration on the STEP side.
-
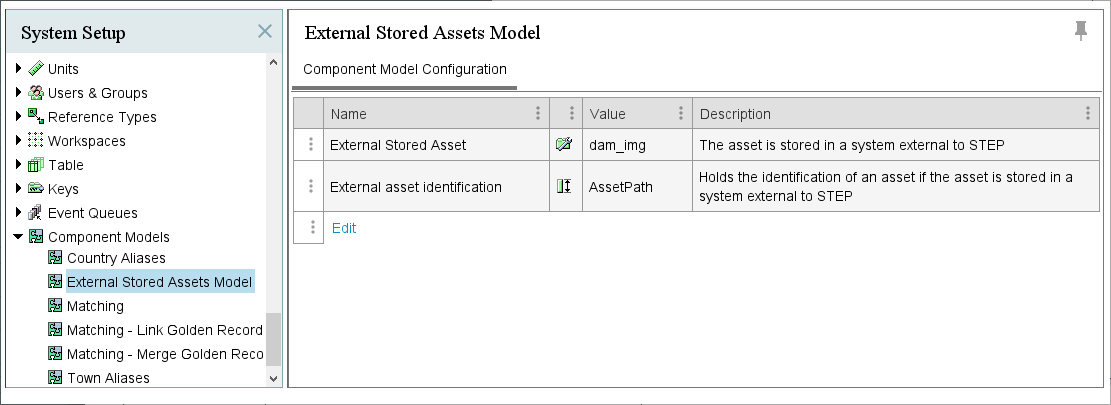
In the workbench, in the System Setup tab, expand the 'Component Models' node. Locate the component model called 'External Stored Assets Model'.
-
This component model features the component model elements (shown below):
-
External Stored Asset -- In this field, assign the object type for all assets incoming from DemoUp Cliplister DAM that will be linked to objects in STEP. For instance, a user might create an object type called 'DemoUp Cliplister DAM Assets' and assign it to 'External Stored Asset.' In that case, all assets chosen from the DemoUp Cliplister DAM via the Web UI and referenced by products and other objects in STEP would flow into STEP as a 'DemoUp Cliplister DAM Asset' object type.
-
External asset identification -- In this field, assign the attribute to be linked to all assets incoming from the DemoUp Cliplister DAM. The selected attribute is populated with a unique identification value provided by the DemoUp Cliplister DAM. For this component model element, create an attribute, make it valid for the object type assigned to the 'External Stored Asset' element, and populate this field with that attribute.
These are the necessary steps required on the STEP side of the STEP / DemoUp Cliplister DAM integration to make the functionality work as intended. Additional setup is required on the DemoUp Cliplister DAM side to complete the configuration and is defined in the DemoUp Cliplister documentation.
Establishing a connection to DemoUp Cliplister
To connect STEP to the DemoUp Cliplister external DAM, users must create an asset import configuration and an inbound integration endpoint (IIEP). The steps to accomplish this part of the setup process are described below.
Creating the Asset Import configuration
The asset import configuration for the external DAM is required when setting up the IIEP in the Inbound Integration Endpoint wizard. In step 5.1 of the IIEP wizard, the user is prompted to provide the desired asset import configuration. You can select an existing configuration if appropriate for the requirements or create a new asset import configuration.
For detailed instructions on creating an asset import configuration, refer to the Asset Importer Configuration topic.
Note: Because assets are not technically being imported into STEP, the second step in the Asset Import Configuration wizard, Import Validator, cannot be applied to the asset import process as described in this topic.
Note: Note: Though the Asset Import functionality disallows import of more than one reference type per configuration, by connecting the external DAM to STEP via an IIEP, the IIEP can override this limitation and enable the use of multiple reference types.
Creating the Inbound Integration Endpoint (IIEP)
A dedicated IIEP is needed to establish a connection to the external DAM.
Create an IIEP by following the instructions described in the IIEP topics in the Inbound Integration Endpoints in the Data Exchange documentation.
When creating an IIEP to enable a connection to the external DAM, implement the following instructions when configuring the IIEP to ensure proper operation of the STEP integration with the external DAM:
-
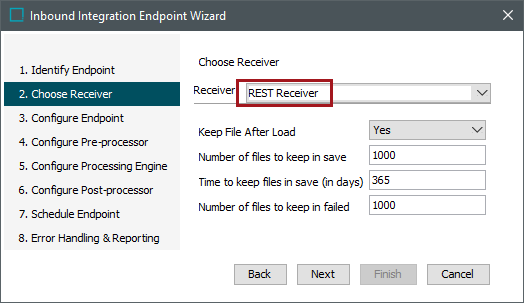
On the 'Choose Receiver' step in the 'Inbound Integration Endpoint' wizard, select the 'Rest Receiver' option for the 'Receiver' parameter.
-
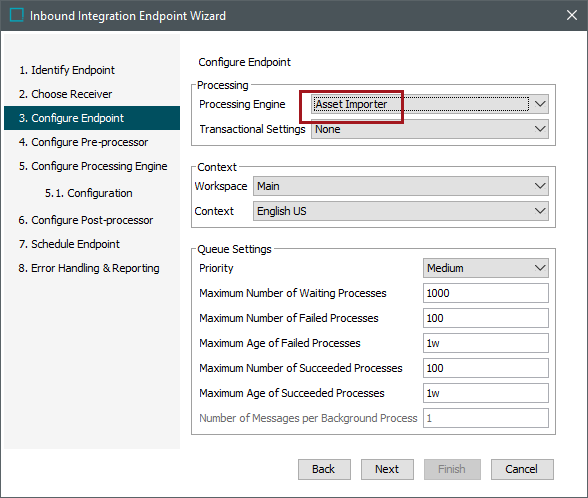
On the 'Configure Endpoint' step in the 'Inbound Integration Endpoint' wizard, select the 'Asset Importer' option from the 'Processing Engine' dropdown menu.
-
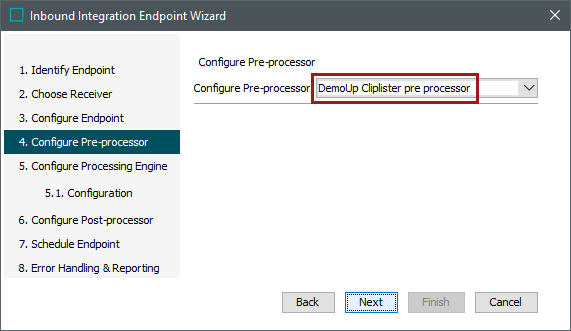
On the 'Configure Pre-processor' step in the 'Inbound Integration Endpoint' wizard, select 'DemoUp Cliplister pre-processor' from the 'Configure Pre-processor' dropdown menu.
-
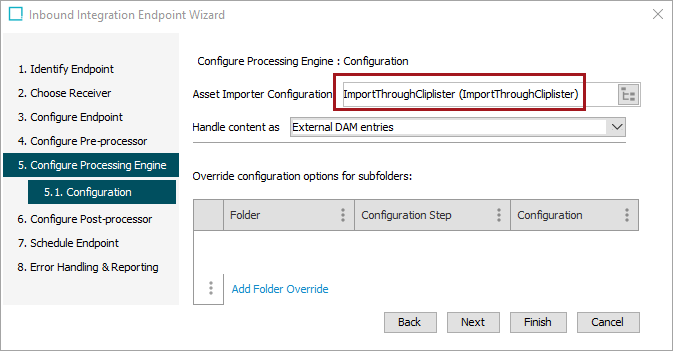
On the 'Configure Processing Engine' step, select the asset import configuration created in an earlier step for the 'Asset Importer Configuration' parameter.
For additional information on how to use the DemoUp Cliplister external DAM beyond what is covered in the STEP Online Help, refer to the documentation provided by DemoUp Cliplister.
Note: Note: The Asset Import functionality does not support deletion of assets. Once assets are uploaded to DemoUp Cliplister, corresponding asset objects are automatically created in STEP and can only be deleted manually by deleting the object in STEP and in the external DAM.
Explore further by clicking the video below. If it does not play as expected, it is also available in the Customer / Partner Communities and may also be accessible within Stibo Systems Service Portal.