 ) next to the Action Set field and choose the Action Set you just created (Action Sets > Setup Actions > Web UI Designer). Then, click Select.
All tasks related to configuring a Web UI, besides the initial setup in STEP Workbench, are carried out using the Web UI Designer.
The STEP Web UI designer enables users to modify any STEP Web UI to better suit business needs. Web UI components can be added, configured / reconfigured, and unused components can be deleted from showing on screen, allowing users to focus on the tasks at hand. Furthermore, the Web UI designer allows for basic look-and-feel changes, such as company logo, colors, and screen font size.
The Web UI Designer is a licensed component and thus to open it, the required license must be in place. The user or users accessing designer must have user privileges to make Web UI configuration changes.
First, an 'Update Web UI configuration' action will need to be created if it does not already exist as a standalone item or as part of an existing Action Set. This privilege enables users to run a Web UI in design mode.
Note: Users without this privilege will not see the Designer button in the Web UI.
) next to the Action Set field and choose the Action Set you just created (Action Sets > Setup Actions > Web UI Designer). Then, click Select.Note: Adding the 'Update Web UI configuration' action allows a user to see the design mode icon once they log in to a Web UI. At a minimum, the actions 'View context' and 'View setup group' must also be added to the user group privileges before a user is able to log in to a STEP Web UI. Read more in the Accessing a Web UI section of the Web User Interfaces / Web UI Getting Started documentation
For more information about privileges and user setup, see the Users and Groups section (here) and Adding User Privileges for a Group (here) section of the System Setup / Super User Guide documentation.
Web UI configurations will, by default, not be user / user group specific. That is, apart from the fact that the standard privilege setup can influence what a user sees / is able to do, the Web UI will be the same for all users logging in.
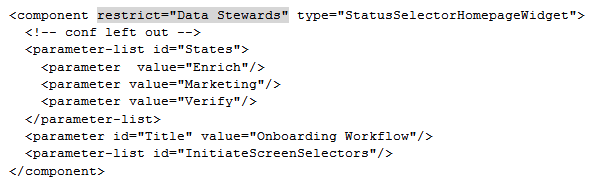
By editing the XML, It is possible to apply restrictions to specific components or parameters so that they can only be seen by specific user groups. In the example below, the Status Selector Homepage Widget will only be visible to users in the 'Data Stewards' user group due to the presence of the 'restrict="Data Stewards"' attribute.
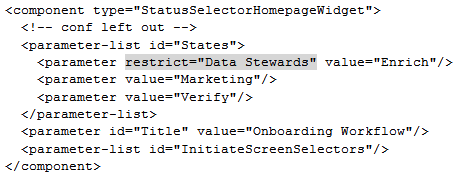
In a similar way, a single state could be restricted:
Entering design mode can only be done by privileged users. These users can enter design mode by clicking on a launch button within Web UI or by entering a specific design mode URL into a web browser. Both methods are explained below.

If for some reason you do not see the design mode launch button, you can configure it as follows:

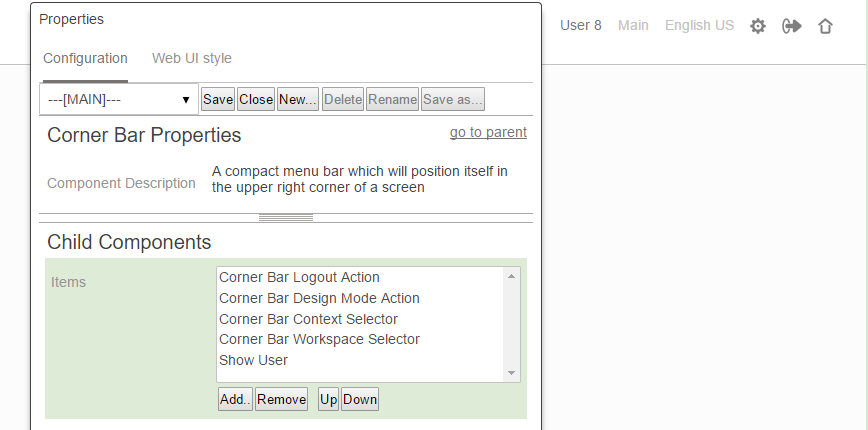
When you navigate to the various screens within Web UI, you will now see the design mode icon in the upper right corner of the screen. Corner Bar Items are shown from right to left, meaning that the first 'Item' on the list is shown on the right and each 'Item' added displays to the left (see image below). The Corner Bar can be configured as needed by adding, removing, and moving 'Items' up and down.
If a launch button is not already configured, or just as an alternative method, a user may access design mode by appending the Web UI URL to include #designmode=true at the end. If the Web UI URL already includes the '#' character, it needs to be appended with the string &designmode=true instead. Users will be automatically entered into design mode after entering their username and password on the standard Web UI login screen.
As a basic example, this is what the URL will look like in both cases for a Web UI configuration where the system name is 'your-system' and the Web UI configuration ID is 'ANewWebUI':
http://your-system/webui/ANewWebUI#designmode=truehttp://your-system/webui/ANewWebUI#contextID=Context1&workspaceID=Main&screen=Import&designMode=true
2019, Stibo Systems – Confidential