
This topic describes how to create a basic workflow, which requires the following steps:
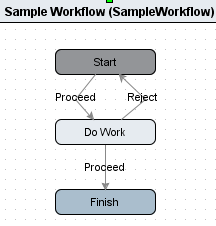
Each of the steps is described in detail below, guiding users through the creation of a simple workflow, as shown below.
In addition, a new workflow can be created via duplication of an existing workflow, so that topic is also covered in this section.
In order to create a workflow, the system must first have a place established to house the workflow. This setup only needs to be completed once on any system, and is likely to have already been completed. However, if the System Setup tab does not have a folder that allows workflow children (as shown in the Step 1: Create a New Workflow section below), then this initial configuration needs to be completed before any workflows can be created. The steps for the configuration are detailed in the Initial Setup for Workflows topic
Steps 1 - 3, and step 5, of workflow creation must all be completed in a single session in order to save the workflow configuration. Therefore, care should be taken during initial configuration to ensure that the steps can be completed and work is not lost.
Each of the below must be true in order to save a workflow configuration:


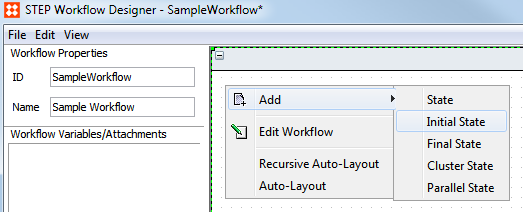
At this point, a 'container' has been created, to which states and transitions must be added to build the actual workflow.
A state represents an assignment to be completed, whether by a human or a system. When a new workflow is created, it must have a single initial state at the outermost level, which is where any task entering the workflow will begin. In addition, a single final state must be present at the outermost level to indicate completion of the workflow. The indication of 'initial' or 'final' for a state is considered a characteristic of the state. States can also have 'parallel' or 'cluster' characteristics, which are required when workflows have parallel states and/or when a set of states should be grouped together within a workflow (comparable to a mini-workflow within the overall flow).
For this example, we will create a basic workflow using three states: an initial state, a standard state, and a final state. However, further descriptions of state characteristics, including more complex examples using parallel and cluster states can be found in the State Characteristics in Workflows topic of the Advanced Workflow Topics documentation
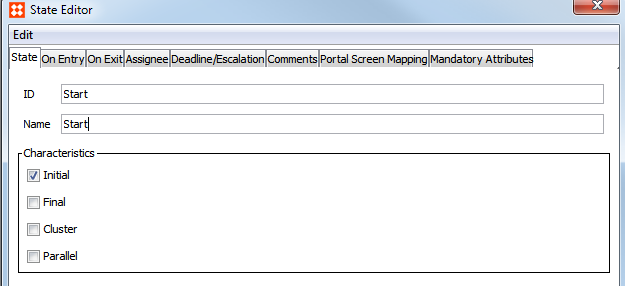
Note that IDs can be revised as needed before the workflow is saved. However, because workflow business rules are tied to state IDs, all state IDs are locked upon saving of the workflow.
State names are editable at any time, and can also be localized, allowing users to see differing names for the same state based on locale. More information on this can be found in the Localizing Workflow State Names and Events section of the Workflows documentation

No Characteristics need to be checked in the State Editor dialog box for states in between the Initial and Final States.

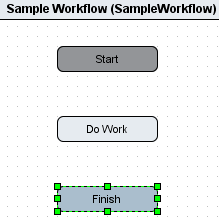
You have now created a basic workflow with three states. However, in order for tasks to be able to move through the workflow, transitions must be added between the states.
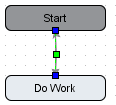
Transitions are needed between states in order for the workflow to be valid. Each state (with the exception of final states in the outer level) should have at least one transition to allow tasks to proceed through the workflow. States may have more than one transition, meaning there are multiple options for exiting the state. For example, users may need the option to move a task to a subsequent state in the workflow, as well as returning it to a previous state (e.g. to proceed or reject).
![]()
Release the mouse click to create the transition, which is then displayed as an arrow between the states.
![]()
![]()
Now there are two transitions going in opposite directions in the workflow. This allows objects to progress forward in the workflow if approved or to be rejected and sent back to a previous state if needed.

A green box will appear on the transition.
Click and drag the box to the right or left.
![]()
![]()
While not strictly necessary, adding events to transitions can increase usability of workflows as the event names are displayed to the end users. When a meaningful event name is applied, it provides an indication to the user of what is occurring when they select to Submit a task in the workflow. When multiple transitions are present from a single state, it is especially useful to have events applied so that a user can choose which selection to make (e.g. Proceed vs. Reject).
Events also enable advanced workflow options, such as applying business rules and logic to specific events. More information on advanced functions is available in the Advanced Workflow Topics section of the documentation
To add an event to a transition, follow the below steps.
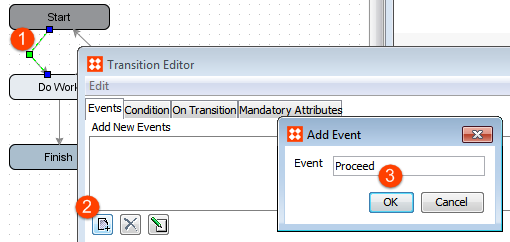
Note that if a space is put in the event name, the Designer will automatically replace the space with an underscore within the editor. However, when the event is displayed to end users in the workbench or Web UI, the underscores will render as spaces.
Note that multiple events within the workflow may have the same name.
You have now created a basic workflow, but in order to make it valid (which is required to enable saving of your work), an assignee must also be specified for the workflow.
Each state in a workflow requires an assignee to be set, regardless of whether the state represents a human task or not. The object-in-state relation must always be assigned to a STEP user or user group. This can be done one of two ways: individual assignees to each state or a single assignee to the overall workflow. If states do not have an assignee defined locally, they will by default always inherit the assignee defined by the workflow.
As the primary purpose of workflows is to assign tasks to varying actors in a controlled manner, each workflow state that requires human interaction will generally have a different assignee (rather than using the workflow default). In contrast, states that represent a system action or an automated state will often use the workflow default, which can be set to an administrator user group.
Note: Users that do not have the STEP Workflow Administrator privilege will only be allowed to see tasks assigned to themselves or a group they are member of.
There are several options for setting assignees in a workflow, including to set assignee dynamically based on information on the object or previous actions taken in the workflow. For this example, the basic functions of specifying a user or group assignee are described. More advanced assignee options are described in the Assignees in Workflows section of the Advanced Workflow Topics documentation
Once assignees have been set, the workflow should be saved:

All states with user interaction should have an assignee specified. To set the assignee locally for a state, double-click the state, select the Assignee tab in the State Editor dialog that appears, click the Select User / Group radio button, click the ellipsis button to open the Assignee Selection dialog, select a user or user group, click Select to close the selection dialog, then click the X in the upper right corner to close the State Editor dialog.
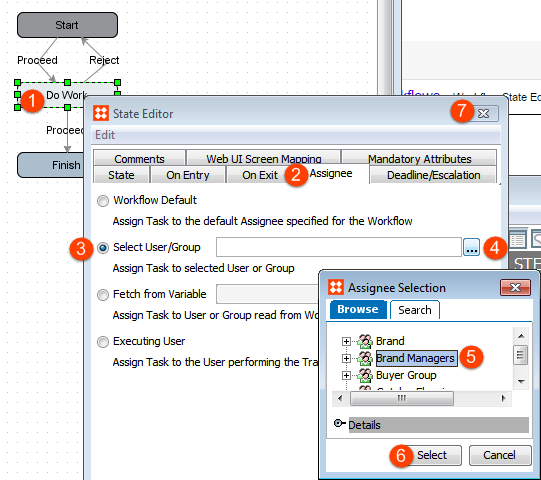
When a user group is selected, all users in that group can access tasks in the state. When a specific user is selected, only that user (or a workflow administrator) can access tasks in the state. It is most common to assign states to user groups rather than to individual users so that tasks can continue to be processed even if a specific user is unavailable, for example when sick or on holiday.
When a state has an assignee, the letter 'A' with a circle around it will appear in the state: 
If the assignee indicator does not appear, go to the View menu in the STEP Workflow Designer and check the View Content Indicators option.

The above actions can be repeated until an assignee has been designated for each state in the workflow. Alternatively, an assignee can be set for the complete workflow. When each state has an assignee (via individual assignment or the workflow default), the workflow can be saved via File > Save.
In order to save a workflow, all states must have an assignee specified. All states that do not have an assignee explicitly specified will inherit the workflow assignee. Therefore, it is often helpful to have a default assignee specified, simply to ensure that the workflow can be saved at any point. In addition, it is common to use the workflow assignee for states that are automated and/or the work occurring in the state is done by the system rather than a user as in these cases the assignee is not a meaningful designation. Typically the default workflow assignee will be an administrator user or group.
To set the default assignee for a workflow, double-click the title bar of the workflow, click the Select User / Group radio button, click the ellipsis button to open the Assignee Selection dialog, select a user or user group, click Select to close the selection dialog, then click the X in the upper right corner to close the State Editor dialog.

When each state has an assignee (via individual assignment or the workflow default), the workflow can be saved via File > Save.
Before a workflow is fully functional, it must be made valid for the object type(s) that will use it. For example, if a workflow was made specifically to review and approve packaging objects and data, it might be made valid for Each, Box, Carton, and Case.
To set validity, select the workflow from the System Setup tab, click the Validity tab, and check the appropriate object type(s). Any number of object types can be selected within the same flipper.

Note: Workflows can be made valid for several object types, but only types of the same 'super type.' As an example, you could make a workflow valid for the object types 'Shipping Address' and 'Main Address' of the super type 'Entities', but not also for 'Building Photo' of the super type 'Assets.'
The final step in creating a workflow is to set the options available on the STEP Workflow Editor tab. These settings are not required to be changed, but they provide valuable options for governing the behavior of the workflow and should be considered as part of any workflow design.

Initiate automatically - If checked, objects of the specified validity for the workflow are automatically initiated into the workflow upon creation. This option is only applicable for object types for which instances of the objects can exist in the Tree (e.g. products, classifications, assets, entities, publications, publication sections, or planned pages, but not for attributes or lists of values). This is useful for onboarding / creation workflows that are intended to process new objects as the objects are automatically placed in the workflow upon creation, without any manual initiation required.
Listen on updates from Import - If checked, the system will listen for updates on objects of the type specified by the validity of the workflow and take action as needed. Specifically, an object can be transitioned from one state to another upon update of the object via import. This is especially useful when completion of a workflow requires information from another source system. As soon as that information is received, the task can be automatically sent to the next state in the workflow. This function is only available for assets, classifications, entities, and products and requires additional configuration to enable. Complete configuration is described in the Triggering Workflow Events from Imports section of the Advanced Workflows Topics documentation
Use executing user's write privileges - Option related to the execution of business rules in the workflow. If selected, a user triggering the execution of a business rule will be prevented from making any changes or accessing any data in the system via the business rule that he / she is not normally privileged to. For example, if the user is not privileged to change a certain attribute value on an object, and the business action is configured to make such a change, a privilege exception will be thrown and the action will not be carried out. Caution should be used with this option as it can prevent desired business rules from being carried out and/or result in errors that the business rule should be written to handle gracefully. If the option is not checked, business rule are run with full access to carry out all indicated rules.
Disable transitions on terminated Workspaces - If selected, it will not be possible to perform transitions in terminated workspaces (e.g. the Approved workspace). Typically this option should be checked as it will prevent a user from submitting objects while in the Approved workspace. This is important as data cannot be modified in the Approved workspace, submission of a task to a state often involves business actions, and workflow actions are executed from the current workspace. Therefore, if a user is viewing data in the Approved workspace and attempts to submit an object from a state where submission involves the use of a business action, the user will receive an error. Checking this option makes the submission unavailable, and therefore prevents the user from receiving an unnecessary error.
Start Condition - Option available to specify a business condition that needs to be fulfilled before the workflow can start. For example, if some basic data is required to be populated prior to initiation, a condition can be selected to ensure that the required data is present. If the condition is not met (e.g. does not evaluate to true), the object will not be allowed to enter the workflow.
Important: If users will be working with tasks within the workbench (rather than Web UI), views and mappings should also be configured following creation of the workflow. Instructions for this configuration are available in the Views and Mappings section of the Getting Started with STEP Workflows material
Another way to create a workflow is to duplicate an already existing workflow. While there may be a number of reasons for duplicating an already existing workflow, some of the reasons may include:
Duplicating a workflow will result in the basic workflow structure and associated business rules being copied. However, the global workflow options (Step 7 in the previous material) will not be copied and should be set manually on the duplicated workflow. In addition, workflow-specific privileges are not carried over in a duplication.
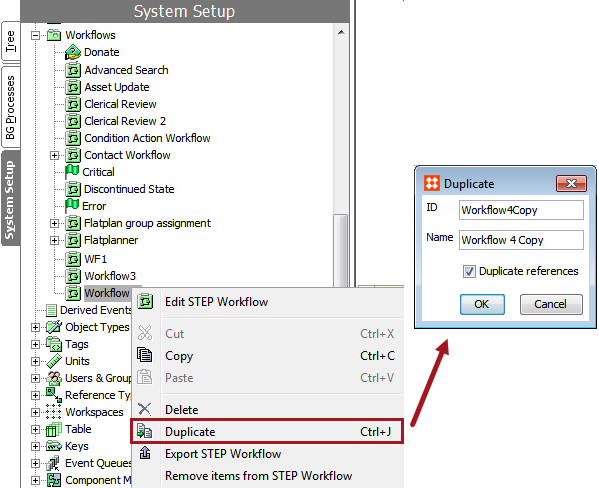
To duplicate an existing workflow, go to System Setup and right click on the desired workflow for duplication. Select Duplicate. In the dialog that appears, populate the ID and Name, and click the OK button. The 'Duplicate references' option is not applicable for workflows and can be left checked or unchecked.
2018, Stibo Systems – Confidential