Open topic with navigation
Configuring a Gateway Integration Endpoint
Once a gateway integration endpoint is created, the configuration settings allow you to identify the server housing the required data.
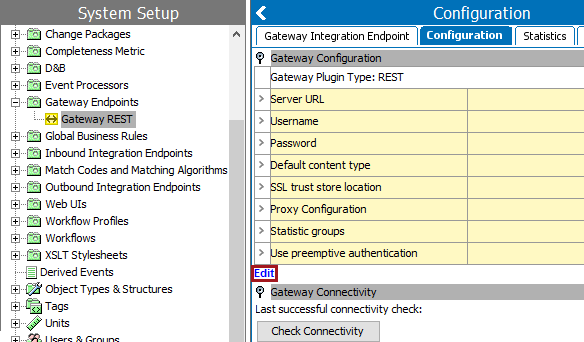
- In System Setup, expand the gateway endpoints setup group, and select the relevant gateway integration endpoint.
- On the Configuration tab, click the Edit link to display the Gateway Integration Endpoint Configuration dialog.
- On the Gateway Integration Endpoint Configuration dialog, use the following parameters to specify which external system the gateway integration endpoint will access.
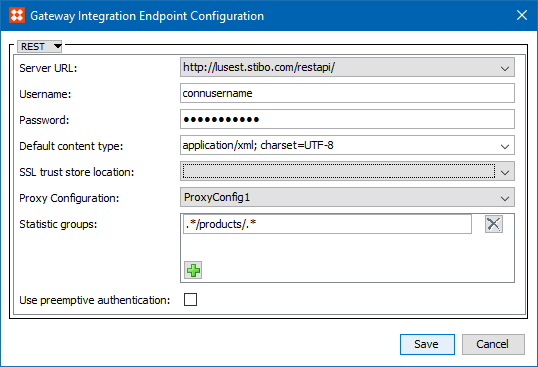
- Server URL - The URL of the server to be accessed. The available URLs are system dependent and must be configured in the sharedconfig.properties file using the RESTGateway.ServerURL property. If necessary, use a comma to separate multiple URLs. The following is an example of a complete property entry for two systems named 'qa' and 'stage,' as well as their URLs 'http://step-qa' and 'http://step-stage':
RESTGateway.ServerURL=qa=http://step-qa,stage=http://step-stage
- Username - Login required to establish the connection.
- Password - Password required to establish the connection.
- Default content type - Data format or content type to be used for the endpoint. Type your own or select from the dropdown list of the most commonly used options.
- SSL trust store location - The trust store holds certificates that verify that the system can be trusted. To display a trust store in the dropdown, first update the 'RESTGateway.SSLTrustStoreLocation' property in the sharedconfig.properties file. Contact Stibo Systems technical support for assistance in adding a trust store to your system.
If no trust store locations are selected, the gateway connection is not configured to use SSL encryption and the connection will be established using a certificate signed by a recognized CA such as Verisign or Thawte.
- Proxy Configuration - Select from this dropdown if the gateway connection must first pass through a proxy server with its own login requirement. The configurations that appear in this dropdown are populated from properties added into the sharedconfig.properties file using the dynamic property 'RESTGateway.ProxyConfiguration.' See the Proxy Configuration Setup section below for details.
- Statistic groups - Optional. Regular expression can be used to group executed REST methods on the endpoint's Statistics tab. The regular expression must match the entire URL, for example, .*/products/.*. Use the regular expression syntax available in Java in java.util.regex.Pattern class. For more information, see the Gateway Integration Endpoint Statistics section here or the Regular Expression topic in the Resource Materials online help here.
- Use preemptive authentication - Optional. Check this box to allow privileged users to grant this gateway the ability to override the default usage of normal basic authentication and use preemptive authentication instead. With preemptive authentication, every time the gateway binding invokes a request (GET, PUT, POST, etc.), the authentication header containing the user name and password will be applied to the HTTP request.
- Click Save to complete the configuration.
- Create a business action to access the gateway endpoint. For details, see Gateway Integration Endpoint Bind in the Resource Materials online help here.
Proxy Configuration Setup
The following are two examples of how the dynamic RESTGateway.ProxyConfiguration property can be configured:
RESTGateway.ProxyConfiguration.1=ProxyConfig1,10.64.8.253,808,username,password
RESTGateway.ProxyConfiguration.2=ProxyConfig2,10.64.9.253,64,user10,password1
To break the first of these two properties into its component parts (each element separated by commas), please reference the screenshot and the numbered list below:

- Required text to enable the REST Gateway Proxy configuration property
- The name of the configuration. This is what will appear in the dropdown as a selectable option, like so:

- The IP of the proxy server being accessed
- The port of the proxy server being accessed
- The username for the proxy server being accessed (optional)
- The password for the proxy server being accessed (optional)
2018, Stibo Systems – Confidential