Open topic with navigation
Configuring Match Codes
Before configuring match codes there are several things to consider:
- Closely examine the data before configuring a match code. The data profiling tool can provide a lot of valuable information, and if you are planning to use a specific attribute in the match code, always check to which degree the attribute is populated – if values are missing on a lot of objects, it is likely not a good candidate, or at least should not be used alone, as objects with 'empty' match codes will not be included in the database table.
- When working with match codes composed from several pieces of data, always put the most significant data first. For instance, if deduplicating address objects, put the ZIP code before street and street number, as ZIP codes are geographic, standardized, and mutually exclusive – which most effectively separates your addresses into discrete objects.
- Be sure to normalize the data used in match codes. If, for instance, a manufacturer name is often abbreviated, your match code definition should handle this so that the name is represented the same way in the match codes, regardless of whether it is abbreviated on the source object or not.
- The match code can be just a single piece of data like an EAN number. Furthermore, if you are only interested in comparing objects that have identical EAN numbers, a Window Size of 1 can be used. This means that only objects with identical Match Code values will be compared.
- Several match codes can be generated per source object. STEP functions can resolve to a list of multiple match codes, and in JavaScript, an array can be returned. In both cases, each element will be a separate match code. As a simple example, this could be useful if you were to identify duplicates among customer entity objects, each having a name and an address attribute. Here, the match code could be a concatenation of address and name, but with this approach, you would not be able to find duplicates for customers who have moved, as the match codes would likely be placed too far from each other. Instead, each object could be represented with two match codes: one for 'Name' and one for 'Address', meaning that the objects could be compared both due to having similar names – and having similar addresses (a hardcoded prefix should be added first to prevent comparisons across the two domains).
- Ideally, you should generate match codes that allow you to perform matching with a Window Size of 1, but where there are still not too many objects that share the same match code.
For more information on match codes, see the Matching and Linking Components section of the Matching and Linking documentation here.
For more information on data profiling, see the Data Profiles section of the Data Profiling documentation here.
Configuration
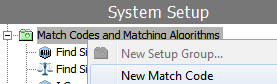
- In System Setup, right-click the node configured to house match codes and select 'New Match Code'.
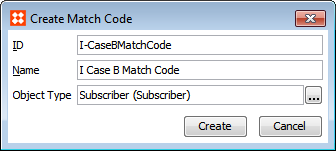
- In the 'Create Match Code' dialog, define an ID and name for the match code, specify an object type for which this match code applies, and click Create. Additional object types can be identified in the Match Code editor (see details below).
- On the new Match Code editor, navigate to the 'Match Code' tab and click the ellipsis button (…) in the 'Category' field. In the selector that appears, select a node to indicate which objects will have match codes generated.
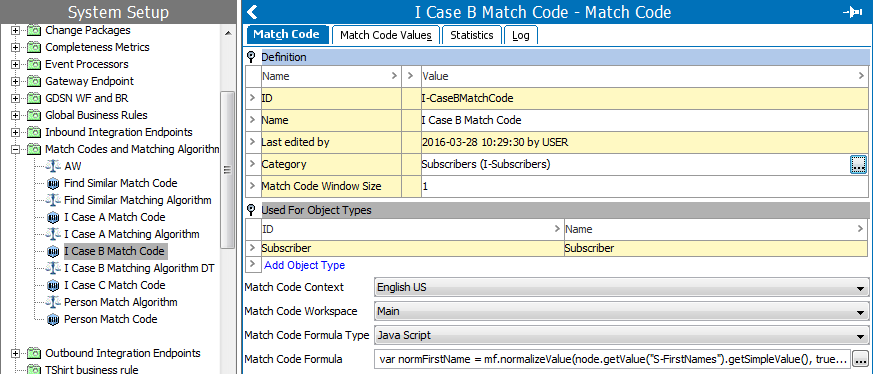
- In the 'Match Code Window Size' field, specify the window size to be used by the matching algorithm.
- If additional object types are required, in the 'Used For Object Types' section, use the Add Object Type link and selector to identify more object types for the match code.
- In the 'Match Code Context' field, specify in which context to run the match code formula. This is only required if the data is dimension dependent.
- In the 'Match Code Workspace' field, specify in which workspace to run the match code formula.
- In the 'Match Code Formula Type' field, specify 'Java Script' or 'Calculated' as the format
- In the 'Match Code Formula' field, then click the ellipsis button (…) to open up the formula editor and add your match code formula.
Binds for Match Code Formulas
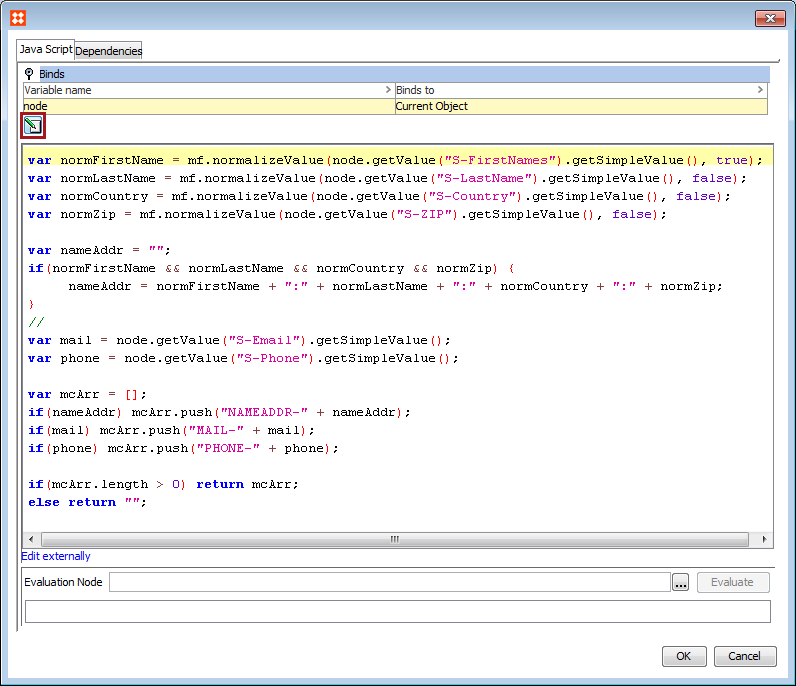
It is also possible to make use of attributes and values that are created offline, by binding them in the match code formula. This is used in cases of offline matching or matching records on import. Once inside the 'Match Code Formula' editor, open the 'Binds' flipper, and click the 'Edit Binds' button. You can declare variables and bind them to a variety of STEP elements / objects, as determined by the selected formula type.
JavaScript Match Code Formula
When using JavaScript, the current object should be bound to a variable. The ultimate goal should be to return the match code value of an object from the JavaScript. If a string is returned, it will be used as a match code value. If a JavaScript array is returned, all values in the array will be used as match code values for that object. Additional utility functions for match codes can be accessed by binding 'Matching Functions' to, for example, the context variable in JavaScript or by binding 'Lookup Table Home' to, for example, 'lth':
|
context.soundex('Stibo')
|
Returns the Soundex. For more information, see Text Functions in the Calculated Attributes documentation here.
|
|
context.metaphone3('Stibo')
|
Returns the primary value for the Metaphone 3. For more information, see Text Functions in the Calculated Attributes documentation here.
|
|
context.metaphone3alternate('Stibo')
|
Returns the alternate value for the Metaphone 3. For more information, see Text Functions in the Calculated Attributes documentation here.
|
| lth.getLookupTableValue('<asset-id>', 'LookupValue')
|
Returns the converted value from asset-id lookup table. If this is not found, it returns 'LookupValue'. For more information, see the Creating a Transformation Lookup Table section of the Data Quality documentation here.
|
Calculated Attribute Match Code Formula
When defining the formula via the calculated attribute language, all functions are available. An object's match code value can be a single string derived from the value of the formula, or it can be a list where all the values in the list are used as match code values for that object. For more information on the available STEP functions, see the Calculated Attribute Functions section of the System Setup / Super User Guide documentation here.
2017, Stibo Systems