Users who create PDF files via Print Publisher can take advantage of InDesign's Adobe PDF Presets option (also referred to as PDF Profiles) to control the quality of the created documents. This topic explains how to configure STEP to work with existing (standard) or custom PDF profiles.
In InDesign, a PDF preset is a configuration file that contains a series of options that define how a PDF file should be created. PDF presets can be accessed and defined in InDesign from the menu options located under File > Adobe PDF Presets. STEP has no concern or control over the choice made within any profile setup; the system merely calls the selected profile when presenting the document to the InDesign Server (IDS) and asks it to create the PDF.
Since Print Publisher users are assumed to have a basic familiarity with Adobe PDF Presets, this topic does not explain how to create or modify them. For more information, refer to the 'Adobe PDF options' online help topic: https://helpx.adobe.com/indesign/using/pdf-options.html.
Standard PDF Profiles
Every InDesign client and server installation includes several standard PDF presets / profiles. These configuration files have an extension of .joboptions and are stored in a specific location.
For Windows installations, assuming that Windows is installed on the C drive, the file path for Windows 10 and above is: C:\Users\'username'\AppData\Roaming\Adobe\Adobe PDF\Settings
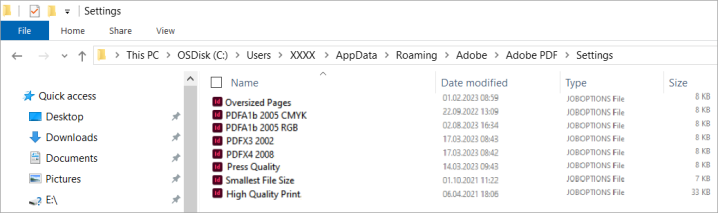
For Mac installations, the location is: /Library/Application Support/Adobe/Adobe PDF/Settings
Standard PDF Profile Configurations
Within STEP, there are several ways to request a PDF file, depending on whether you want a PDF of a Flatplan or AutoPage document, or even a product PDF proof. But, no matter which method is used to request a PDF, they all ask for which PDF profile to use. The following screenshot, taken from the Proof View tab on a product object, shows one location where a PDF Profile is chosen from a dropdown list.
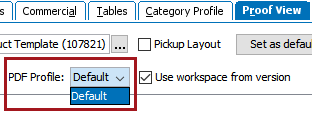
In order for the dropdown list in STEP to display more than just 'Default,'an entry must be made in the sharedconfig.properties file that lists which presets / profiles should be included in this dropdown list. The entry 'Default' is not really a selection of a profile. It just means that when STEP sends the document to InDesign without any profile selected, InDesign will use its own internal default settings.
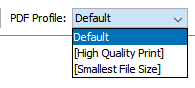
To add additional profiles to the dropdown list, create a suitably named group (e.g., 'Adobe PDF Profiles') in the sharedconfig.properties file, then add the following parameter. In this example, the added profiles are called 'High Quality Print' and 'Smallest File Size.'
InDesign.PDF.Profiles=Default,[High Quality Print],[Smallest File Size]

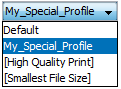
Once the profiles have been added to the sharedconfig.properties list (assuming that these profiles already exist and are located in the standard file location), the dropdown will now resemble the following:
Considerations When Adding Presets to sharedconfig.properties
Keep the following considerations in mind when adding PDF presets / profiles to the sharedconfig.properties file:
- Presets that are located in InDesign's 'standard' profiles folder must be surrounded with square brackets, as shown in the previous example. This is so the IDS will know whether the profile is standard (brackets) or custom (no brackets). The server will look in one folder location or the other, depending on the presence or absence of the square brackets. This is not a STEP designed requirement; it is Adobe's.
- The list of profiles is comma separated—do not put a space after the comma.
- Adding this entry to the sharedconfig.properties file will require a restart of both the STEP application server and the IDS.
Custom PDF Profile Configurations
If none of the standard presets / profiles suits your requirements, you can add a custom PDF profile to the IDS. This profile must first be created in an InDesign client as a .joboptions file. Then, the .joboptions file must be copied to a folder on the IDS. All PDF profiles have the extension .joboptions. So if you create a profile with the name 'My Special PDF Profile,' its file name will be My Special PDF Profile.joboptions.
Note: You should only copy your custom PDF Profile to the IDS when you are completely satisfied that it meets your requirements. It is not practical to troubleshoot PDF profiles by using STEP to generate PDFs via the IDS.
When you are satisfied that your PDF profile is doing what you need it to do, then you have two options when copying the profile to the IDS. But, first you need to know where to find the custom profile that you created on your local machine, because it is not stored in the same folder as the standard profiles.
For Windows installations, assuming the software is installed on the C drive, the location of the custom profiles is: C: \Users\'username'\AppData\Roaming\Adobe\Adobe PDF\Settings

For Mac installations, the location is: Users/'username'/Library/Application Support/Adobe/Adobe PDF/Settings
Note: In both cases 'username' = the user name you entered when you signed on to the PC or Mac. For both PC and Mac, the custom profiles will be held in folders that are specific to the user.
Copying Custom Profiles to the InDesign Server
Two options are available when copying the custom profile (e.g., 'My Special PDF Profile.joboptions') to the IDS:
- Save the profile in the Adobe IDS folder for the standard profiles
- Copy it to the location where the custom ('user') profiles are held
Depending on what you choose, the entry you make in the sharedconfig.properties file will be slightly different.
Note: Creating custom profiles and copying the .joboptions files to the IDS will in itself have absolutely no effect on the dropdown list in STEP for the selection of a PDF profile. The only profiles that STEP knows about is what you have entered in the sharedconfig.properties file.
If you copy your custom profile(s) into the IDS 'standard' folder, then the entries in your sharedconfig.properties file will look something like this, with all profiles (except Default) surrounded in square brackets:
InDesign.PDF.Profiles=Default,[My Special PDF Profile],[High Quality Print],[Smallest File Size]
If you copy your custom profile(s) into the folder specific to the user 'stibosw' on the IDS (stibosw is the standard user set up in an IDS installation), then your entries in the sharedconfig.properties file will look something like this, with no brackets around the profile names:
InDesign.PDF.Profiles=Default,My Special PDF Profile,[High Quality Print],[Smallest File Size]
In other words, if the profile is located in the 'standard' folder, the entry in the properties file must have square brackets surrounding it. If the profile is in the folder specific to the user, then it does not have surrounding square brackets.
Location Considerations for Standard vs. Custom PDF Profiles
Though it may seem that the custom .joboptions files should always be copied into the standard folder on the IDS instead of the user-specific folder, if the IDS server software is reinstalled or upgraded to a different patch level, the 'standard' folder will be overwritten. When this happens, you will lose your custom profiles, unless you have saved a copy of them and put them in a safe place.
For Windows installations— assuming the software is installed on the C drive and that stibosw is the user name that was used when the Print Publisher service was started—the location of the custom profiles is: C: \Users\stibosw\AppData\Roaming\Adobe\Adobe PDF\Settings
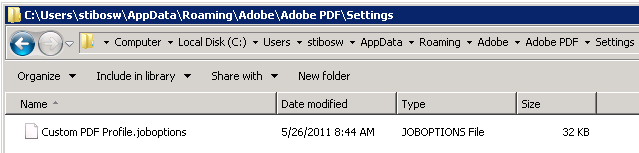
For Mac installations, again assuming that stibosw is the user name, the location is: Users/stibosw/Library/Application Support/Adobe/Adobe PDF/Settings.
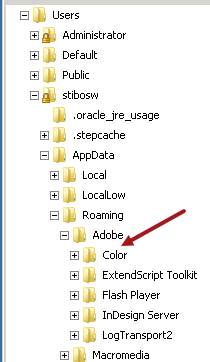
In some cases, the user-specific folder is not created on the IDS. To place your custom profiles in the user-specific folder, you must create the folder. The below screenshot shows an IDS machine where the user-specific Adobe PDF folder (to hold the custom profiles) is not present, so it must be created manually.
Additional Considerations for PDF Profiles – Font and Setup Issues
Two common issues that may occur when setting up PDF profiles for STEP concern fonts and incorrect configurations in the setup.
PDF Profiles – Common Font Problems
It is the user's responsibility to make sure that all appropriate fonts have been properly loaded to the IDS so that they can be embedded in the resultant PDF files (to avoid any font substitution issues).
For example, fonts that have been introduced to a Mac-based IDS may not have been made available to all users (the 'computer'), and are only valid to the user that logged on to the machine. This may cause InDesign to produce PDF files with substitute fonts, because it cannot find the fonts that were loaded and made available to a user other than 'stibosw.' This is by far the most popular cause of font substitution issues on a Mac-based IDS.
For a Windows-based IDS, the most common issue concerning fonts is that even though installing a font onto a Windows machine is very straightforward, the font is not registered until the Windows machine has been rebooted. Thus, if you install a font on a Windows-based IDS, you can view that the font is available, but it will not be read by the IDS until the Windows machine has been rebooted. Thus, it is not sufficient to stop and restart the InDesign Server.
PDF Profiles – Common Setup Problem
The following example shows a 'user error' scenario in which the PDF profiles are not recognized by the system due to an incorrect configuration.
User configuration:
- You created a custom profile on your InDesign client and called it My_Special_Profile.
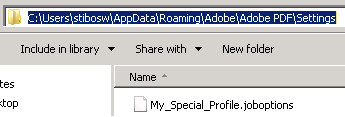
- You copied the My_Special_Profile.joboptions file to the IDS at the location: C:\Users\stibosw\AppData\Roaming\Adobe\Adobe PDF\Settings
- You made sure that you updated the sharedconfig.properties file correctly, i.e., you did not surround the profile name with square brackets. So:InDesign.PDF.Profiles=Default,My_Special_Profile,[High Quality Print],[Smallest File Size]
- You restarted both the IDS and the App server.
- You tried creating a PDF using the 'standard' profile High Quality Print. It was successful. But when you tried to create a PDF of a product using the profile My_Special_Profile, you were greeted with an error message:
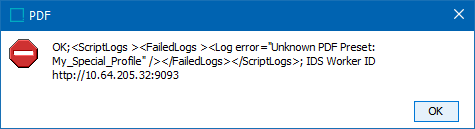
What went wrong?
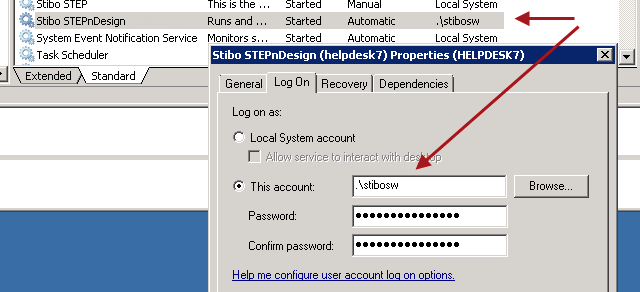
- The IDS never detected the presence of the .joboptions file in the stibosw (user-specific) folder because the setup of the Stibo Systems STEPnDesign service did not specify which username/login should be used to start up the InDesign service. It was set to 'Local System.' Thus, the IDS never looked into the folder structure \Users\stibosw, etc., to try and find the .joboptions file.
- Once the Log On properties were changed so that a specific user name was used when starting the STEPnDesign service, the IDS did find the presence of the .joboptions file in the stibosw folder structure, and the PDF could be created using the custom PDF profile.
Using PDF Profiles to Generate Multi-versioned Publications in Layered PDFs
If generating a PDF of a publication with multiple versions, content from all versions will be mounted onto a single layer in the PDF unless a PDF profile is used that is specifically configured to export Acrobat layers. For example, if generating a PDF of a multi-versioned publication in AutoPage, if you select 'All' for 'Version,' the system will not automatically generate a layered PDF; all publication versions will be embedded in a single layer within the PDF unless a special PDF profile has been configured.
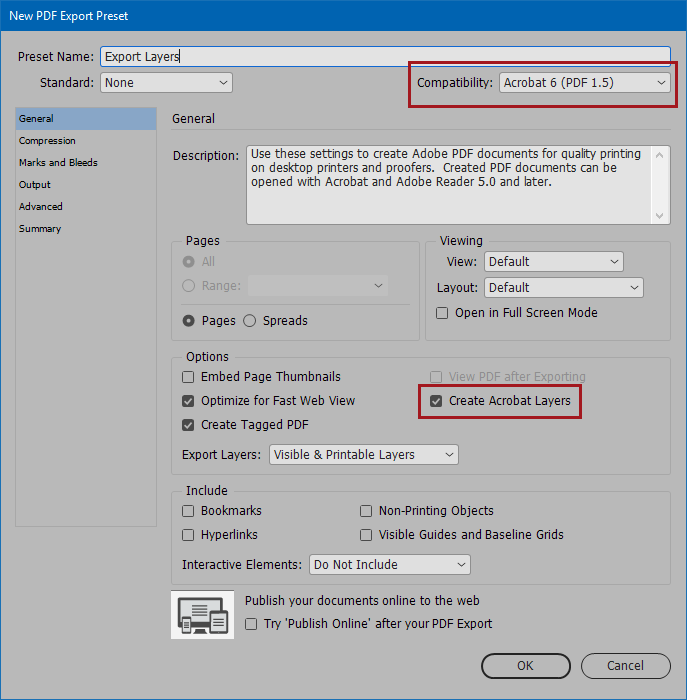
To get a separate layer for each publication version in the PDF generated from STEP, you must select a PDF profile that exports to PDF version 1.5 or above and has Create Acrobat Layers checked.
Note: Not all PDF viewers support showing layers. E.g., Adobe Acrobat does, but preview on a Mac does not.
For more information on publication layers, refer to the Working With Version Layers topic here. For information on creating PDFs of multi-layered publications using AutoPage; refer to Generating PDFs in AutoPage in the Print AutoPage documentation here.