The Advanced Settings screen provides a series of options that are not required on a day-to-day basis for data imports. Options are displayed as disabled, or are hidden completely, when the user running the import does not have valid permissions to run the option.
Important: Advanced Settings options are generally used to clean up data within STEP. However, if you are not careful, you can cause data integrity issues. Double-check your load file and your System Setup before using any of these options. Common setup is to perform a test on a test server first, and to start testing with small files to verify the results before changing large amounts of data.
After setting the options as defined below, click the Finish button to display the Save Import Configuration dialog as described in Running a Data Import.
General Advanced Settings
- Context - If you are creating a new configuration, the context shown is the one that is currently selected in STEP. That is usually the safest way to import data. You can, however, select a context different than the currently select one. If you selected an existing configuration, the context that was set up in that configuration is shown. Dimension Point specific mappings will overrule this setting. Consider the context setting when creating an Import Configuration that will be used repeatedly. You can only import to one context at a time, so if you have several languages, you will have to do several imports.
Note: If there are transformations applied in the Map Data step, to import the data in different contexts, the same will still be applicable. Additionally, when importing ETIM6, you selected a Language in the Select Format step. Verify that you choose the Context that should be updated with the selected language.
- Import Process Template - This is used to specify a workflow process. The default is Importer, which is the standard workflow.
- Match Units By - When the system loads data, it has the capability of trying to separate actual values from their units in the load file. Use this option to indicate if units in the data file should be matched on the unit’s ID or the unit’s name (default).
- Approve Import Changes - This option is used to approve the changes that the import causes. When checked, the import mode option 'Force Domain Import' is automatically selected and cannot be changed. If business rules are applied from the previous step this option cannot be selected - instead it is possible to approve the entire object from business rules.
Important: If business rules are not applied in the Select Business Rules step, imported reference approvals can get special treatment. If the reference target has not yet been imported, the reference import does not fail but is deferred. Once all objects are imported, the reference is attempted again, and if Approve Import Changes is checked, the approval is attempted again for each source of the imported, deferred references.
- Auto-Initiate STEP Workflows on Item Creation - If a workflow is valid for either products, classifications, assets, or entities, it is possible to have an instance of a given workflow created whenever an object of the valid object type(s) is created. That is, a workflow is automatically started when the object is created. This functionality is available for workflows set to Auto Initiate on Object Creation. Users with the privilege Disable STEP Workflow Auto-initiation in Imports are allowed to disable auto-initiation in the Import Manager for tabular imports, or directly in the XML for XML imports by setting AutoInitiate="N" in the STEP-ProductInformation tag.
<?xml version="1.0" encoding="UTF-8" standalone="no"?>
<STEP-ProductInformation ContextID="Context1" WorkspaceID="Main"AutoInitiate="N"
- Trigger STEP Workflow import events on Item updates - This option controls whether or not the import triggers events. In XML, the functionality is enabled / disabled using the STEP-ProductInformation tag attribute 'STEPWorkflowImportEvent' that can be set to "Y" or "N." The option is typically used in imports based on pre-configured Import Configurations. When checked, the import mode option 'Force Domain Import' is automatically selected and cannot be changed.
- Suppress Re-Translations - Checking Suppress Re-Translation, prevents products, classifications, entities or assets from getting the status Re-Translation Needed. This option only has effect if the data import is set to be approved too.
- Import Mode options - If the previous two options 'Approve Import Changes' or 'Trigger STEP Workflow import events on Item Updates' are selected, these options are disabled and cannot be modified.
Important: The following options are displayed and enabled based two factors: the privileges of the user running the import and the content of the import. When importing products, the user must have all user privileges to the product hierarchy root (without any restrictions). When importing entities, the user must have all user privileges to the entity hierarchy root (without any restrictions). Restrictions could include some attribute groups, or dimension points, or having limited privileges assigned to any of the object type being imported.
Auto Select Import Mode - Choose this option to allow STEP to analyze the import file and its size and run either Domain or Database import mode, as appropriate. Users should be aware that if the Database import mode is selected after the STEP analysis, then events are not generated for changes to externally maintained values during an import. If generating events is necessary for your operations, then using Force Domain Import (explained below) is recommended.
Force Database Import - This option should only be used when the inbound data is of high quality. Since no additional privilege checks are made, this mode can allow for a faster import and is useful for very large imports, data migration, and when working with externally maintained data or commercial data. This option does not allow creating, editing, or deleting global revisable objects. Reference creation speed is the same for both Database and Domain import modes. There are further limitations for event generation (defined in the Core Events topic of System Setup documentation) and for business rule invocation (defined in the Import Manager - Select Business Rules topic). Database mode is not available when running In-Memory (defined in the In-Memory Database Component for STEP topic within the Resource Materials online help documentation).
Force Domain Import - All user privileges are validated during the import, which can impede performance in this mode. Generally, this mode delivers a more detailed execution report. If access is not allowed, the import fails and the error "Not privileged to change value ..." is included in the import execution report. Reference creation speed is the same for both Database and Domain import modes.
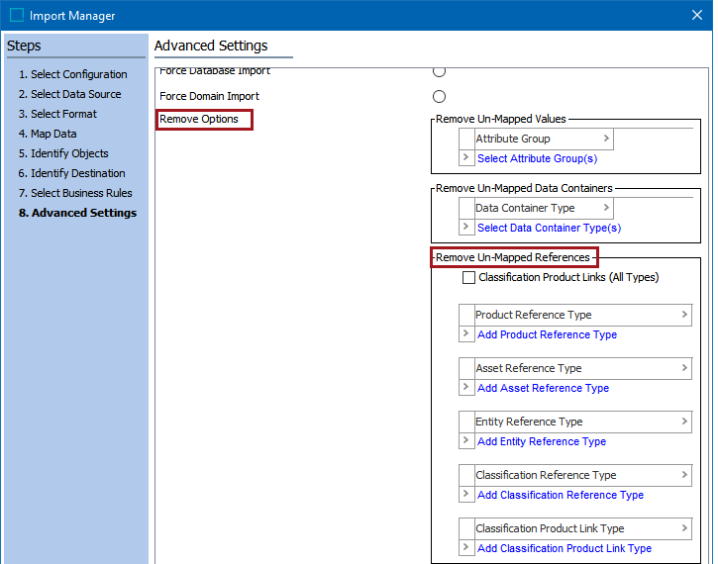
Remove Options
Setting any of the Remove Options means that any existing data for the selected option type will be removed on the objects included in the import file, and only the data of the selected option type for the objects in the import file will exist in STEP after the import. Essentially, the remove options allow you to remove existing data from STEP and replace it with the data in the inbound file for the objects being imported.
Note: Remove Options are designed for use with tabular file formats, such as CSV, Excel, TXT, etc. When importing a STEPXML file, the links shown in the images below are not displayed. To remove data via a STEPXML import, use Replacement Rules as defined in the ReplacementRules Tag in STEPXML topic.
Leave the Remove Options set as default to add the imported data to the existing data in STEP.
Important: The Remove Options can both add and remove data from STEP. Prior to using them, it is a good idea to first create an export file of the data being modified. This provides a way to restore the unmodified data, in the event that the import does not have the desired effect.
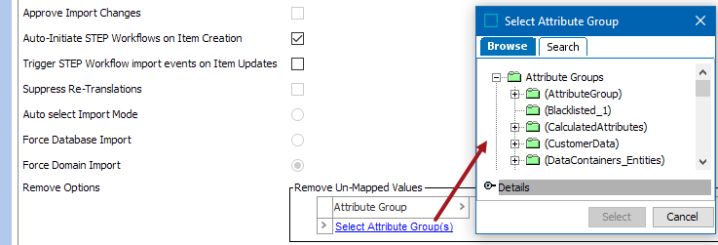
Remove Un-Mapped Values
This option enables you to remove attribute values from one or more selected attribute groups and replace them with the values specified in the load file, leave them blank, or return them to their inherited value.

Important: Use this option with care as it can both add and remove data from STEP.
Click the 'Select Attribute Group(s)' link. In the Select Attribute Group dialog, select the Attribute groups available in the STEP that should be modified by the import. Only values included in the import file will exist for the selected groups after the successful import.
For example, you have 200 products listed in your load file, and they are all gloves of one type or another. You use eight product attributes to define these gloves. Now you want to use just four attributes. Furthermore, all of the original eight attributes are in their own attribute group. You load the 200 products using just the four attributes that you want to use, and you then select the attribute group under the 'Remove Un-Mapped Values' option. STEP removes all attribute values in that attribute group for those 200 products only, and then loads the attribute values as specified in the load file. Thus, it has removed all eight old attribute values for all 200 products, and it will show only the four attribute values present in the load file.
Important: When importing values for a multi-valued attribute, the STEP importer will not append, but instead replace, existing multi-valued attribute values with the new values that are being imported (e.g., if a multi-valued attribute in STEP has a value of 'x' and a value of 'y' is imported for that multi-valued attribute, the new value for that multi-valued attribute will now be 'y', not 'x' and 'y'). For more information on multi-valued attributes, refer to the Single and Multi-Valued Attributes topic in the System Setup documentation.
Remove Un-Mapped Data Containers
Data container types can be removed from the entities being imported into STEP via the Data Containers type option. A dialog allows you to confirm that you want to remove all unmapped types for the imported objects.

Important: Use this option with care as it can both add and remove data from STEP.
Click the 'Select Data Container Type(s)' link. In the Select Data Container Type dialog, select the Data Container type available in the STEP that should be modified by the import. After a successful import, only values for the selected Data Container Types included in the import file will exist on the imported objects.
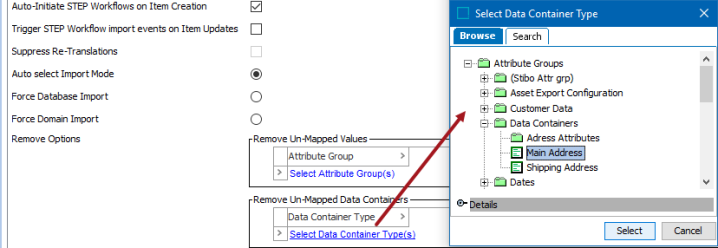
For example, you have a data container type that allows for multiple data containers (e.g., Shipping Address). Your warehouse usually ships to all the locations in Shipping Address, but now your warehouse has been designated to ship to addresses in a different data container type named Shipping Addresses - West. Instead of adding all new addresses to Shipping Addresses, you can do an import and unmap the original data container type and import only the applicable data container type and the associated data containers.
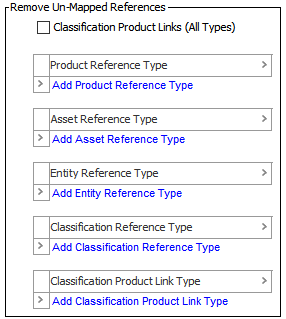
Remove Un-Mapped References
Selecting a reference option allows a user to specify which reference type they would like to remove. Information and examples for each reference type follows. For each type, a dialog allows you to confirm that you want to remove all unmapped types for the imported objects.
For more information, refer to Reference Types in the System Setup documentation.
For details on how to add or remove references types, refer to the Adding and Removing Un-Mapped References section below.
Important: Use these options with care as they can both add and remove data from STEP.
- Classification Product Links (All Types) -
Note: Recommended practice is to leave this box unchecked. If you do use it, know that there is no easy way to undo the changes.
This is a legacy option and checking this box affects all 'Product to Classification Link Types' (explained in the Product to Classification Link Types topic), not just those selected in the Classification Product Link Type option below. This checkbox has no effect on product-to-classification references (explained in the Reference Types topic). The option exists because, at one time, Types were not available for 'Product to Classification Links', and product-to-classification references were not allowed.
For example, in the image below, using any import format (including a Smartsheet), a single Classification Product Link Type of 'Supplier Link' has been selected.
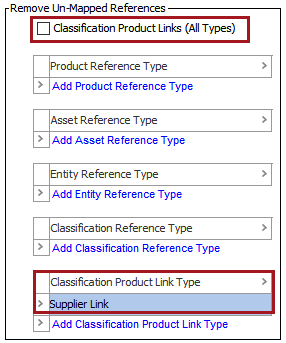
- If the 'Classification Product Links (All Types)' checkbox is not checked (as shown above), only the 'Supplier Link' type is affected by the removal of unmapped references.
- However, if the 'Classification Product Links (All Types)' checkbox is checked, all Product to Classification Link Types defined in System Setup are affected by the removal of unmapped references.
Important: The recommended option for handling Product to Classification Link Types is to use the 'Classification Product Link Type' option defined below. For Classification Reference Types, use the 'Classification Reference Type' option defined below.
- Product Reference Type - This option enables you to clean up product-to-product references, classification-to-product references, or entity-to-product references.
For example, if you have products in your system that reference other products using the reference type 'Replacement Product.' Over time, products that really are replacement products have been linked to other products using other reference types such as 'Obsolete Product' or 'Similar Product.' To clean up, you list the products and their valid reference types in your load file, map them, and then select the reference type(s) that you want to remove from these products.
The system then reads your load file and finds the source product, which is mapped to the ID and will be linked to one or more target products. All references are then removed from that product to all other products that have the reference type(s) selected in this import wizard screen. The source product is linked in the load file to the target product(s) using the reference type that was selected when you specified the target product.
For example, Product 123 is linked to products 456, 567, 678, and 789 with the reference type of 'Obsolete.' All those links are incorrect. Therefore, you specify in your load file that 123 should link to 567 with the reference type of 'Replacement Product', and nothing else. There are no other entries for product 123 are in the load file. In this screen, you select the reference type 'Obsolete.' After this load file has been processed, there are no links from product 123 to any product with the reference type 'Obsolete', and there is a link from 123 to 567 with the reference type of 'Replacement Product.'
Note: You can only unlink the specified reference types. To unlink all references from a product, regardless of the type, you must select each reference type.
To make two references between two products (and all the other product ID pairs listed in the input file), you must load the file twice, specifying one reference type the first time, and the other reference type the second time. For the second import, do not use the Remove Un-Mapped References option.
- Asset Reference Type - This option refers to product-to-asset references, classification-to-asset references, or entity-to-asset references. It enables you to clean up references, for example, by removing some or all references between products and assets and applying only those listed in the load file.
For example, in STEP you have products that are linked to images using the reference type 'Primary Image.' However, images that are really manufacturer logos have been linked to various products using this reference type, instead of using the 'Vendor Logo' reference type as intended. You therefore list the products and images in the load file together with the correct reference type, map the columns, and then select the reference type to be removed ('Primary Image') from the product / image. The system removes the selected reference type(s) and only the reference type(s) listed in the load file is available after import.
- Entity Reference Type - This option refers to any reference with a target of entity. It enables you to clean up references, for example, by removing some or all references between classifications, products, assets, entities, or publications and entities, and applying only those listed in the load file.
For example, in STEP you have entities that are linked to entities using the reference type 'Address 1.' However, for identification purposes, they should have been linked using the 'Primary Address' reference type. You therefore list the entities and the address data (also an entity object in STEP) in the load file together with the correct reference type, map the columns, and then select the reference type to be removed ('Address 1') from the entity. The system removes the selected reference type and only the reference type listed in the load file is available after import.
- Classification Reference Type - When you have mapped a Classification Reference Type, this option allows you to specify the type(s) that should be removed during the import. This reference type is used when an asset / product / classification is the source, and a classification is the target.
- Classification Product Link Type - When you have mapped a Product to Classification Link Type, this option allows you to specify the type(s) that should be removed during the import. This is used to link a classification as the source to a product as the target, and display the product as a child of the classification. For more information on classification product link types, refer to Product to Classification Link Types in the System Setup documentation.
For example, if you have products that are linked multiple times to different classifications, you can use this option to clean up product to classification links not specified by the import file. You therefore define certain products that are linked only to the classifications you list in your load file and not to any other classification.
Do that by listing the products and classifications in the load file, mapping them, and then selecting the types that should be removed.
Adding and Removing Un-Mapped References
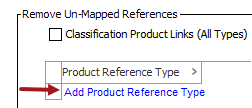
Interacting with the various Remove Un-Mapped References options is the same. An example of how to add and remove a reference type is explained below using the 'Product Reference Type.'
- Click the option 'Add Product Reference Type.'
- A dialog allows the user to confirm that they want to remove all unmapped Product references for the imported object.
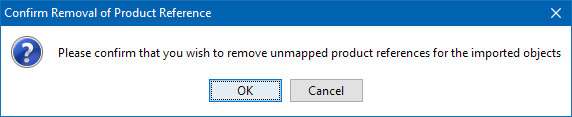
- Click OK, and then select the appropriate reference type from the dropdown list.
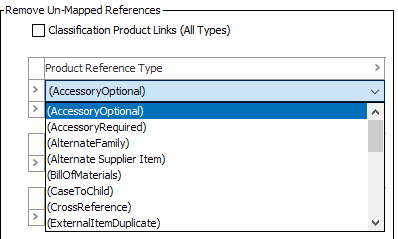
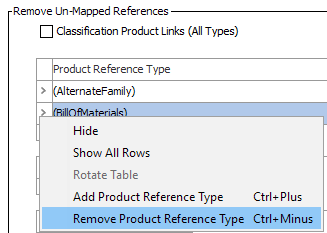
- Right-click on the field of the Reference type will give the following options:
- Hide - hides the selected reference type from the dropdown list.
- Show all Rows - shows all the selected reference types.
- Add Reference Type - adds an additional reference.
- Remove Reference Type - removes the selected reference type.