The Multi Workspace Screen is a Web UI screen type designed to display both the Main and Approved workspaces, allowing a user to quickly view the differences between the current draft data and approved (cannot be edited) data for a given object. Users can also easily edit attribute values for the Main workspace using the Multi Workspace Editor.
Similar functionality is available in the workbench. Users can switch to workspace mode, which allows them to view the Main and Approved workspaces at the same time.
This topic addresses:
- Using a Multi Workspace Screen
- Configuring a Multi Workspace Screen here
Using a Multi Workspace Screen
Using a Multi Workspace Screen allows users to more easily edit attribute values for an object while viewing the values that have previously been approved.
In the Main workspace, object information is editable (unless it is configured as read only). However, in the Approved workspace, the user can only view values that have been approved. If an object has never been approved, then only Main will display.
There are a variety of ways to configure the Multi Workspace Screen. It can be configured with the Hide Equal and/or Mark Different tools to help the user quickly identify which values do not match across the two workspaces and focus on values that differ from each. For more information on the Hide Equal and Mark Different Buttons, refer to the Comparing Data Using Hide Equal and Mark Different documentation here. Additionally, the attributes that you want to view values for can be added via the Multi Workspace Editor.
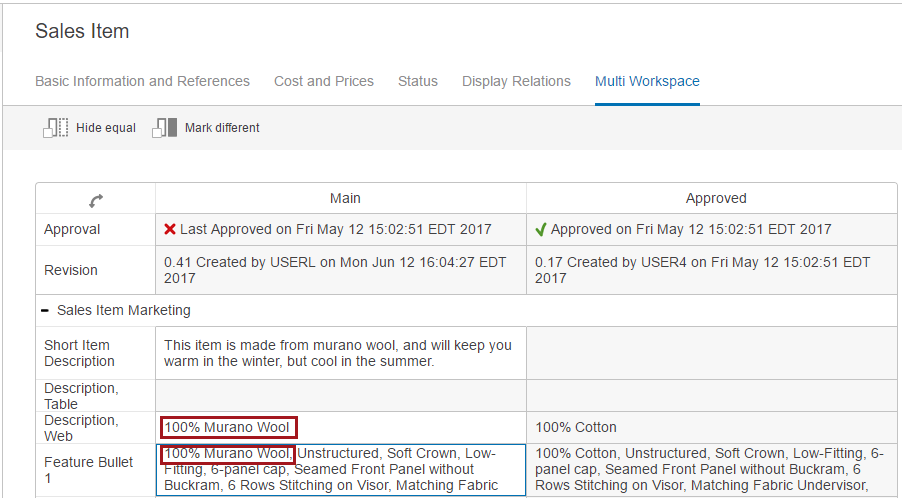
In the example that follows, when a user navigates to a 'Sales Item' object, the Multi Workspace Screen displays as a sub screen tab page on a Node Details screen. The user has access to both the Hide equal and Mark different actions, can edit attribute values for the Main workspace, and view the attribute values for the Approved workspace.
Because the Property Direction parameter for the Multi Workspace Editor has been set to vertical instead of horizontal (default), the Main and Approved workspaces display as column headers, and the configured attributes display as rows. In this scenario, to view the Main and Approved Workspaces as rows instead of columns, select the flip table ![]() icon.
icon.

For the example above, the Multi Workspace Screen / Multi Workspace Editor Properties are configured as follows:
- Show Hide Equals Button is enabled in the configuration (but not activated in the Multi workspace screen)
- Show Mark Different Button is enabled
- Title value is set by default
- Headers Approved, Revision, Attribute Value Header (In this example it is: Description Long, Description Table, Feature Bullet 2, Feature Bullet 3, Feature Bullet 4)
- Property Direction is VERTICAL
- Use Immediate Save is enabled (For details, refer to the Auto-Save in the Web UI topic here.)
Editing Attribute Values
A user can edit configured attribute values by double clicking within a Main workspace cell. The cell being edited is not disabled compared with the field that cannot be edited in the Main or Approved workspace.
In the example below, the 'Description, Web' attribute value and the 'Feature Bullet 1' attribute value for the Main workspace needs to display '100% Murano Wool.'
While the cursor is in the edited cell, the blue line border remains. However, the Multi Workspace Screen configuration determines how the changes are saved. If the configuration uses immediate save, then the changes will be saved after the cursor leaves the edited cell. If immediate save is not enabled, then after the cursor leaves the edited cell, the edited cell will be shaded and the save icon will activate. In this case, the changes are saved once the cursor leaves the edit cell.
Information regarding configuration can be found in the Configuring a Multi Workspace Screen topic here.