After configuring an event processor, it must be enabled before it can run on schedule or be invoked manually. Event processors run in optimistic mode, meaning that savepoints will not be created, thus decreasing execution time and increasing performance.
The status of an event processor is very important. This section addresses the different event processor status options and how to enable, invoke, or disable an event processor.
Event Processor Status Options
An event processor can be in one of three statuses: Enabled, Disabled, and Stopped.
The table below displays each icon and a description of each event processor status.
| Icon | Description |
|---|---|
|
|
Enabled: the event processor is connected and running. |
|
|
Disabled: the event processor has been disabled by user request. |

|
Stopped: the event processor has stopped because of a failure. |
When viewing a list of event processors within STEP Workbench > System Setup the status of each processor can easily be identified by the color of the icon.
In the example below, a list of event processors is displayed within the Workbench > System Setup > Event Processors. Using the event processor status icons makes it easy to decipher the status of each of the event processors.

The event processor status information is also displayed in text on the Event Processor tab of the editor. For more information see the EP - Event Processor Tab documentation here.
When configuring and managing event processors, it is important to monitor their status, because an event processor only functions when it is enabled.
Enable Event Processor
When an event processor is created, it is in a stopped or disabled status, and must be enabled to be of use.
The steps below describe how to enable an event processor when it has been disabled or stopped because of failure.
- Go to System Setup > expand the Setup Group created for event processors > select the Event Processor you want to enable.
- Right-click the event processor, and click Enable Event Processor.

- Confirm the event processor is now enabled by viewing the
- Enabled icon
 next to the specific event processor.
 - Enabled parameter is set to 'Yes' within the event processor editor.
- Processor Status parameter is set to 'Running', and highlighted green within the event processor editor.

Important: If you are ready for the processor to apply the actions based on the events processed, make sure the Queue Status parameter is also set to Read Events, otherwise the enabled event processor will not function. For more information see the Queue Status section of the EP - Event Processor Tab topic here.
Invoke Event Processor
An event processor can only be invoked if its status is Enabled.
Steps to invoke an event processor are below.
- On the System Setup tab, select the event processor to be invoked.
- Right-click to display and select the Invoke Event Processor option.
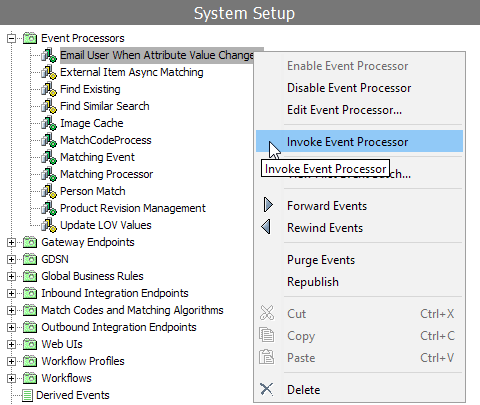
- If successful, the Current Background Process Log will display the following 'Poll invoked by (user name) (Date and Time Stamp)'.

Disable Event Processor
If an event processor is no longer necessary, or needs to be stopped for a period of time, then a user can disable it, and if necessary enable it at a later date. The option to disable an event processor is only available when an event processor is in the enabled status.
The steps below describe how to disable an event processor in an enabled status.
- Go to System Setup > expand the Setup Group created for Event processors > select the Event Processor you want to enable.
- Right-click the event processor, and click Disable Event Processor.

- Confirm the event processor is now disabled by viewing the:
- Disabled icon
 next to the specific event processor.
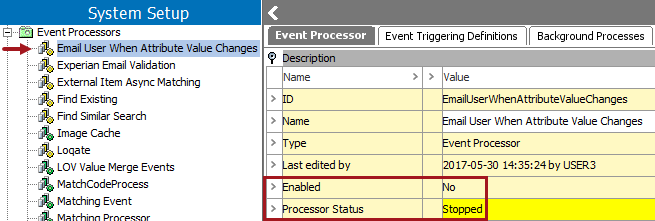
 - Enabled parameter within the event processor editor is set to 'No.'
- Processor Status parameter within the event processor editor is set to 'Stopped,' and highlighted yellow.
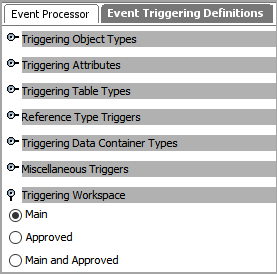
Generating Events from Main
By default, approval triggers an event for workspace revisable objects, meaning that from the Main workspace saving an edit (but not approving it) does not generate an event. To change the triggering workspace, go to the Event Trigger Definitions tab and change your selection under the Triggering Workspace flipper.