Products that are already classified in STEP can be handled by the MLAC service via an exported Excel or CSV file. While data for a hierarchy must be submitted in a single file (as defined in the Manual Export of Hierarchies for MLAC topic here), data for products that are already classified can be submitted in one or multiple Excel or CSV files. Each file should contain hierarchy information for all hierarchies for which predictions should be generated.
File Requirements
As outlined in the Map Data steps below, the export file must have the following headers / columns in the specified order. For Excel, no quotes should be included in the header values.
- 'id' - ID of the classified product. Mandatory.
- 'description' - The description of the product. Mandatory. This must be a 'raw' source description not modified after the product was classified. Values for multiple description attributes can be supplied either by creating a calculated attribute that concatenates the values or by mapping multiple attributes to this column. More about mappings is defined below.
- 'sourceId' - Source identification, for instance a vendor ID. Optional. A column with this header must be present in the generated file even when data is not exported. Include data if the source information is available and if it has significance for the classification of the product.
- '[Hierarchy ID 1..n]' - ID of the classification (hierarchy node ID) in the hierarchy identified via the header value. Header values must correspond with the agreed upon IDs for the hierarchies.
For the primary product hierarchy case, if there are intermediate hierarchy levels between the product and the classification / hierarchy node (for example, a product family level), a calculated attribute can be used to output the appropriate hierarchy node ID for this column.
Important: The example scripts should not be used as-is without thorough testing, including updating the script to match object and link types that exist on your system. JavaScript variable names are case-sensitive.
The example below shows a function that will output either the ID of the parent or ID of the grandparent, based on whether the parent is of a specific object type.
{
  i:=path(),
  parent:=listitem(i,listlen(i)-1),
  grandparent:=listitem(i,listlen(i)-2),
  parentobjecttype:=iterate(parent, 'stepobjecttype()')
} if (exact(parentobjecttype, "Sales Item Family"), iterate(grandparent, 'stepid()'), iterate(parent, 'stepid()'))
In this example, 'stepobjecttype()' returns the object type name and not the ID. Thus, on systems with dimension dependent object type names, consider the object type for the Context of the export when making the comparison on the name.
Export Classified Products
Exporting classified products involves the following steps:
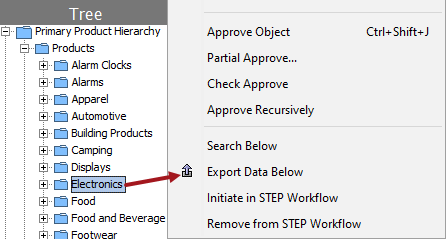
- In workbench on the Tree tab, select an appropriate root node for the export, right-click and select the 'Export Data Below' option to display the Export Manager with the selected objects.
- If the MLAC service is only used for classifying products into a STEP classification hierarchy ('yellow hierarchy'), the root node can be the classification hierarchy root.
- If the MLAC service is used for classifying into the product hierarchy or multiple different hierarchies, the root node should be a product node below which all relevant products can be found.
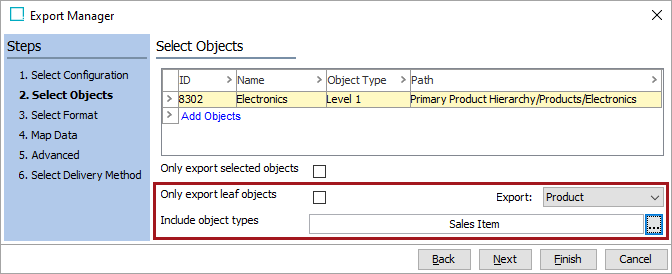
- On the 'Select Objects' step:
- Uncheck the 'Only export leaf object' option.
- In the 'Export' dropdown select 'Product' based on the type of hierarchy being exported.
- In the 'Include object types' parameter, click the ellipsis button (
 ) to display the 'Select Object Types for Export' dialog. Select the object type(s) for the hierarchy and press the OK button.
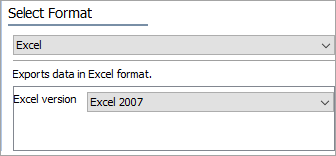
- Click the Next button, and on the 'Select Format' step, choose one of the following file formats from the dropdown:
- Excel
- For the 'Excel version' parameter, select Excel 2007.
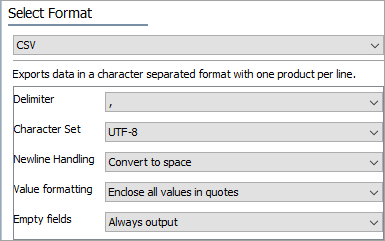
- CSV
- For the 'Delimiter' parameter, select the comma (,).
- For the 'Character Set' parameter, select UTF-8.
- For the 'Newline Handling' parameter, select Convert to space.
- For the 'Value formatting' parameter, select Enclose all values in quotes.
- For the 'Empty fields' parameter, select Always output.
Note: See the File Requirements section above for definitions of the mapping elements below.
- Click the Next button to display the 'Map Data' step.
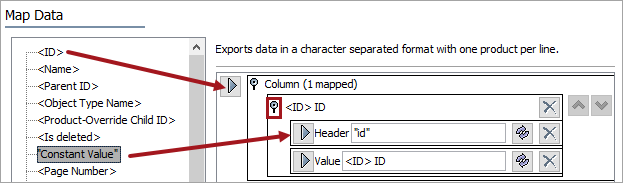
- Map the <ID> data source.
- Open the '<ID> ID' flipper and map 'Constant Value' as a Header row. On the 'Enter Value' dialog enter id (without quotes) and click the Save button.
- Click the delete button (
 ) for the original header so the Header mapping matches the image below.
- Map the Select Attribute data source and choose the attribute that holds the description.
- Open the description attribute flipper and map 'Constant Value' as a Header row. On the 'Enter Value' dialog enter description (without quotes) and click the Save button.
- Click the delete button () for the original header so the Header mapping matches the image below.
- If multiple attributes hold description information, map them as additional value elements as have been mapped below for the 'Consumer Short Description' and the 'Long Advertising Copy Value' attributes.

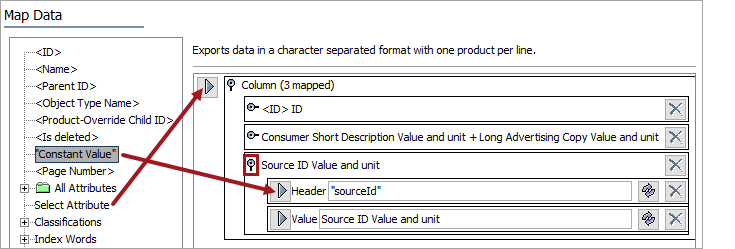
- Choose a method to handle the source ID with significance for the classification:
- If a source ID that has significance for the classification is available in an attribute, map the Select Attribute data source and choose that attribute.
- Open the source ID attribute flipper and map 'Constant Value' as a Header row. On the 'Enter Value' dialog enter sourceId (without quotes) and click the Save button.
- Click the delete button () for the original header so the Header mapping matches the image below.
- If a source ID that has significance for the classification is not available in an attribute, map the Constant Value data source.
- On the 'Enter Value' dialog, leave the 'Enter constant value' parameter blank and click the Save button.
- Open the 'Constant' flipper and map 'Constant Value' as a Header row. On the 'Enter Value' dialog enter sourceId (without quotes) and click the Save button.
- Click the delete button () for the original header so the Header mapping matches the image below.
- For the Value row, click the transform button (
 ), delete the 'Constant' text from the Source parameter, and click the Save button.
The final Header and Value mapping should match the image below.

- Choose a method to map a column for each hierarchy, in each instance replace the header with the hierarchy ID:
- For a primary product hierarchy where there are no intermediate levels between the product and the hierarchy node, use <Parent ID> for the value.
- For intermediate level hierarchies, map a calculated attribute that holds the appropriate hierarchy node ID.
- For classification hierarchies, use 'Product Classification Links' data source to map the appropriate link type.
For example, in the screenshot below, two hierarchy columns have been mapped. One by mapping a calculated attribute, and one by mapping a link type.

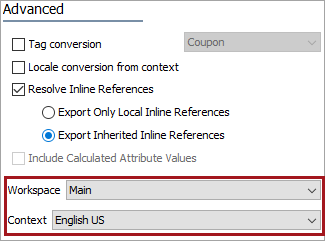
- Click the Next button to display the 'Advanced' step.
- For the Workspace parameter, choose the workspace to be used for the export. This is typically the 'Approved' workspace and should be the same as used for exporting hierarchies.
- For the Context parameter, choose the same context for export as was used for exporting hierarchies.
- Click the Next button to display the 'Select Delivery Method' step and click the Finish button.
- On the 'Save Export Configuration' dialog, optionally save the configuration. For more information, see the Running a Data Export topic in the Data Exchange documentation here.
- Click the OK button to start the Export Manager Pipeline background process. For more information, see Monitoring a Data Export topic in the Data Exchange documentation here.
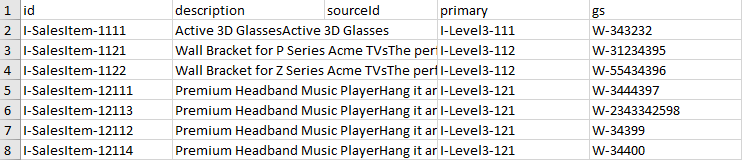
Output Examples
The generated file should look similar to the examples below. The number of hierarchy columns depends on the use case.
Excel
CSV
