Suppress Rows/Columns
The Suppress Rows/Columns transformation suppresses rows or columns based on specified matching criteria or whether all values in a specified row or column are equal or non-equal. For example, rows or columns can be suppressed if:
- an exact text string is matched to a value
- a string is detected that matches a specified regular expression
- all values are equal
- all values are different
- all values are equal except for a specified text string or regular expression
In the case of equal values, this transformation may be useful for rendered tables that have retrieved values using the 'Attribute Group Attributes' content definition. In some cases, these values will be the same for all the rendered products. This transformation enables these rows / columns to be suppressed if the values are equal.
Prerequisites
The instructions in this topic assume that you have already added the transformation to your table by following the instructions in the Add a Transformation to a Table or Table Type subsection of the Table Transformations topic here.
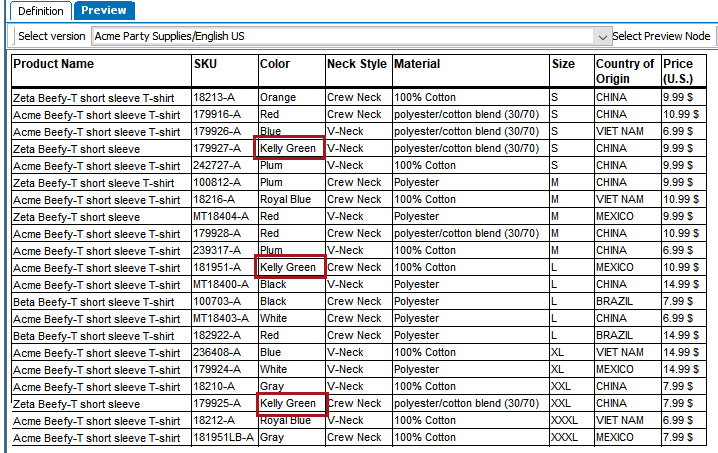
Example – Suppression Using a Basic Text String
In the following example, any rows that contain the Color value of Kelly Green will be suppressed. A sample use case could be that this color is only available for spring, but the summer catalog is about to publish. So, shirts of this color will be suppressed in the table so they do not appear in the summer catalog. They can be unsuppressed later for next spring's catalog.
Before
This is how the table appears before the suppression of the Kelly Green shirt rows.
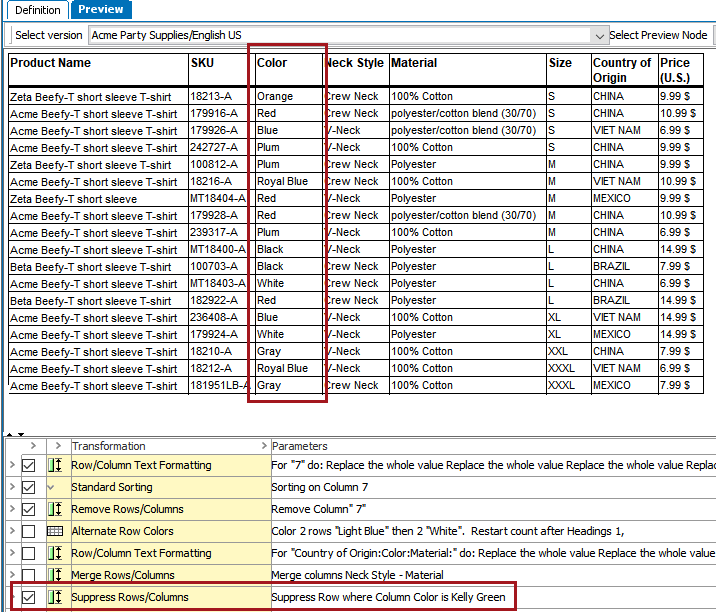
After
This is how the table appears after. The Kelly Green T-Shirts no longer appear.
Example – Suppression Using a Regular Expression
The following example uses an extremely basic regular expression that suppresses rows by matching on a single character. For more detailed information about regular expressions, see the Regular Expression section of the Resource Materials online help here.
Before
Before applying the transformation, the table is very tall and contains what appear to be duplicate products, which have an underscore and number at the end of their STEP Names, e.g., Christmas Party Hat_2, Christmas Party Hat_3, and so forth.
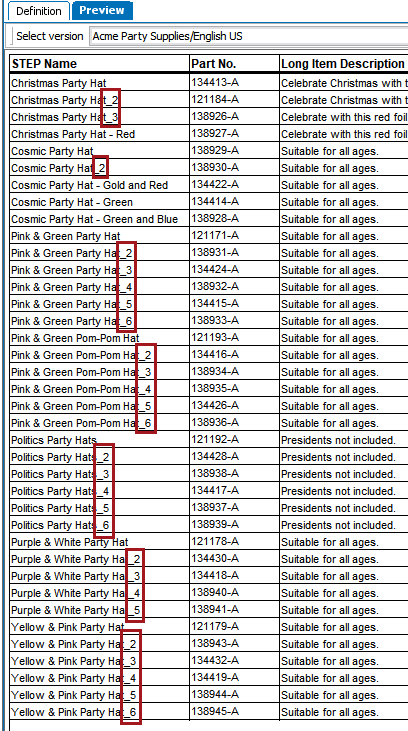
To suppress all rows that contain these products, the Column 'STEP Name' is chosen for Column; the 'is' radio button is selected; an underscore character is entered into the text field; and 'regular expression' is checked.

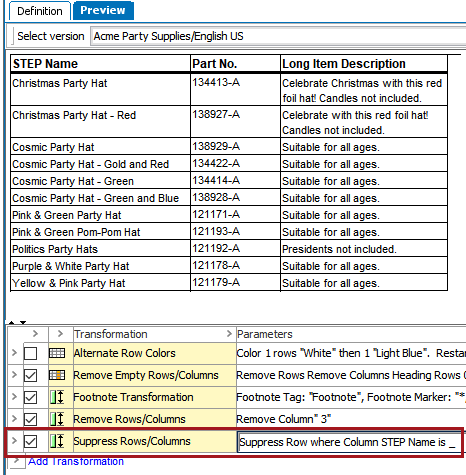
After
After applying the transformation, the table looks like this. All rows are removed where the STEP Name value contained an underscore.
Example – Suppressions Using Equal and Non-equal Values
The following example shows how two tables can be derived from the same product family, with one table holding only the common values for the children and the second holding only the different values for the children. Both tables start with an identical setup, loaded with the same data.
Before
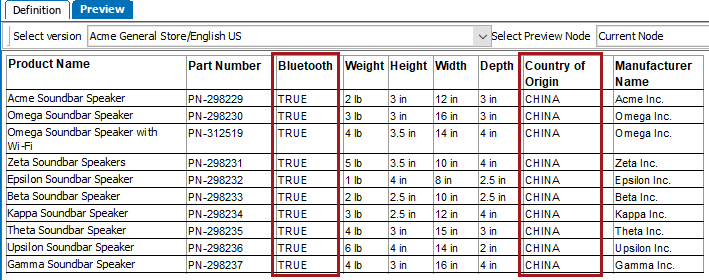
The below screenshot shows how both tables look originally. All columns have different values for the children except for the 'Bluetooth' and 'Country of Origin' columns, which have identical values for each child. All columns in the table are a normal column type (Spec Column) except for the 'Product Name' column, which is a column header.
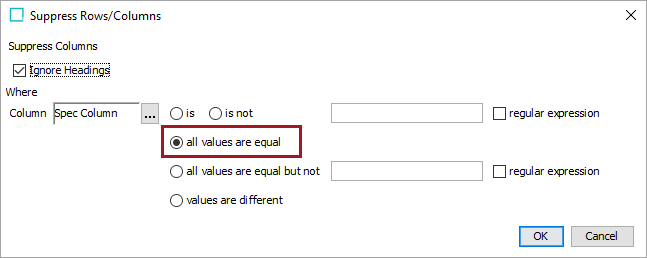
The desired result for 'Table 1' is to only show the child values that are different. So, the Suppress Rows/Columns transformation is applied to remove all columns where the values in that column are the same (equal).
After
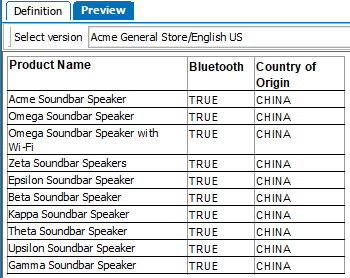
Once applied, the 'Bluetooth' and 'Country of Origin' columns are removed.

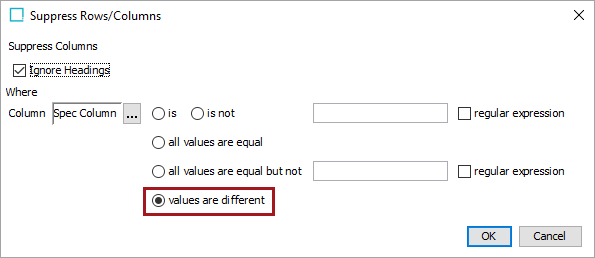
The desired result for 'Table 2' is to only show the values that are the same for the children. So, the Suppress Rows/Columns transformation is applied to remove all columns where the values in the column are different.
Once applied, only the 'Bluetooth' and 'Country of Origin' columns remain. (The 'Product Name' column remains because it is a header column type, and the transformation has been configured to 'Ignore Headings.')
Steps
- After adding the transformation, under Parameters, click the ellipsis button (
 ). The Suppress Rows/Columns dialog displays.

- Select Ignore Headings if you do not want to apply the transformation to headings.
- In the 'Where' section, click the ellipsis button () in the Column or Row field to display the Select Row/Column dialog. Select Row to suppress rows and Column to select columns.
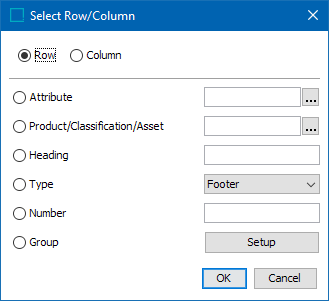
- Select Attribute to apply the transformation to the row or column that contains the specified attribute. Click the ellipsis button () to search or browse for the relevant attribute.
- Select Product/Classification/Asset to apply the transformation to the row or column that contains the specified object. Click the ellipsis button () to search or browse for the relevant object.
- Select Heading to identify the row or column by typing the header text of the relevant row or column.
- Select Type to choose a specific row or column type from the dropdown list.
- Select Number to identify the row or column by entering the sequence number. For example, to apply the transformation to the third column, type 3.
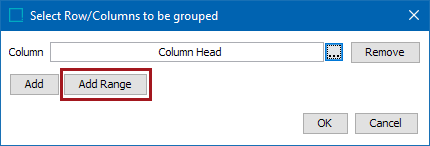
- Select Group to apply the transformation to a group of rows / columns and/or a range of row / columns, then click the Setup button.
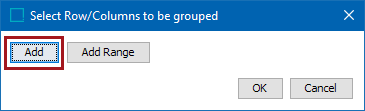
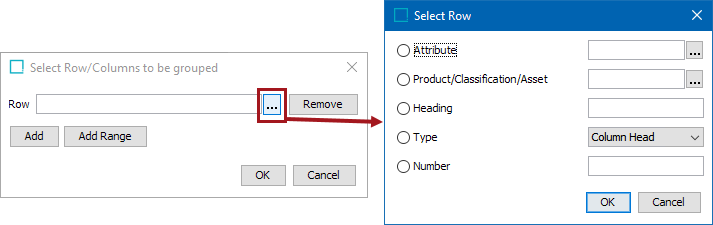
- Click Add in the Select Row/Columns to be grouped dialog to add rows or columns to the group individually.
After clicking Add, either a Row or Column field displays, depending on whether you are selecting a row or column. Click the ellipsis button () to launch another Select Row/Column dialog. This is identical to the previous 'Select Row/Column' dialog, except without the Group option. Click OK after making your selection.
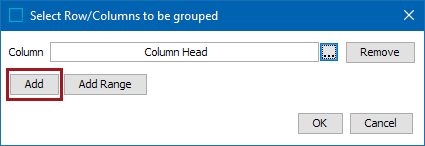
Click Add again on the 'Select Row/Columns to be grouped' dialog to repeat the previous steps and add more columns to the group. Click OK when done.
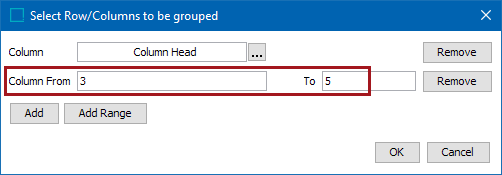
- To add a Range of columns to the group, click Add Range.
Enter the starting and ending column numbers in the Column From and To fields, then click OK when done. To enter a range that will contain the remainder of the table if rows or columns are added later, enter a large number in the 'To' field such as 5999. Note that these fields can only contain integer values.
- After making the selections from the Select Row/Column dialog, choose one of the following 'Where' options:
- Select is or is not to suppress rows / columns that match a certain text string. To match on exact text, enter the text value in the text field. To use a regular expression, check the regular expression box and enter a regular expression in the text field.
- Select all values are equal to suppress rows or columns in which all values are equal within the specified row or column.
- Select all values are equal but not to suppress rows or columns in which all values are equal except for a specified text string or regular expression.
- Select values are different to suppress rows or columns in which all values are different within the specified row or column.
- Click OK to finish configuring the transformation.