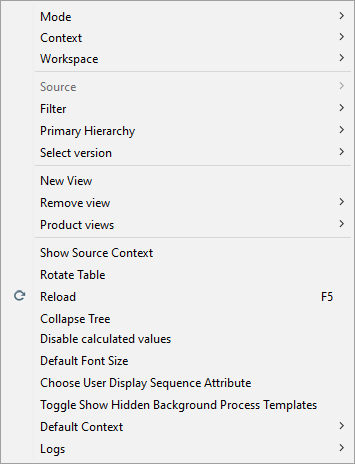
View Menu
The View Menu's purpose is to change the way a user views objects in the STEP system. In this menu, users may change the viewable workspace, context, and mode, add a filter, change the primary hierarchy, and other options to customize the view to their needs.
Note: This menu does not edit or change any of the values. For more information to edit these values, see the Maintain Menu topic of this documentation here.
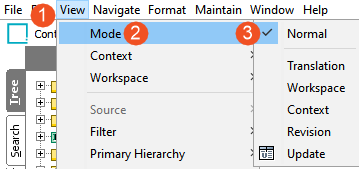
Mode
The 'Mode' sub-menu includes options that allows the user to view STEP data in a variety of ways, dependent on the need. These options are mirrored on the toolbar. For more information, see the Toolbar topic in this documentation here.
- Normal mode is the view where the majority of object maintenance occurs. From the toolbar, it is represented with the
 icon.
icon. - Translation mode shows the split view of the different contexts for objects. To use the Translation mode, select a Source context from the View menu. From the toolbar, it is the
 icon. Online Translation can be done from this Translation Tab. Fields highlighted in green color can be translated within STEP from this Translation Mode. For more information on translating data into other languages, see the Translations documentation here.
 - Workspace mode shows a comparison of values between Main and Approved workspaces. From the toolbar, it is the
 icon. For more information on workspaces, see the Workspaces topic in the System Setup / Super User Guide documentation here.
 - Context mode shows a comparison of values between different contexts. From the toolbar, it is the
 icon. For example, this will allow a user to view values for all languages or for all price versions. For more information on contexts, see the Contexts topic in the System Setup / Super User Guide documentation here.
 - Revision shows a comparison of values between different revisions. From the toolbar, it is the
 icon. If you have selected any object in STEP, then switched to the revision view, it will show a comparison screen of the two latest revisions. The latest revision is displayed in the first column and the older revision is displayed next. These revisions are also listed under the Status tab in a product editor. For more information on managing revisions, see the Revisions topic of the System Setup / Super User Guide documentation here.
 - Update shows a comparison between objects across workspaces (Approved and Main) and allows the user to update the object in the current workspace from a source workspace.
Context
When an object is selected, 'Context' displays all available contexts in a dropdown. By selecting one of these contexts, the viewed context for the current object and all other objects, is changed to the selected context.
Workspace
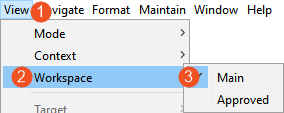
Workspace shows all available workspaces. It is possible to change the viewed workspace and view objects as they appear in different workspaces. In this example, there are only two workspaces: Main and Approved. However, more can be added as desired. For more information on setting up and using workspaces, see the Workspaces topic in the System Setup / Super User Guide documentation here.
In the toolbar next to the context selector, a toggle icon (![]() ) allows you to switch between the Main and Approved workspaces.
) allows you to switch between the Main and Approved workspaces.
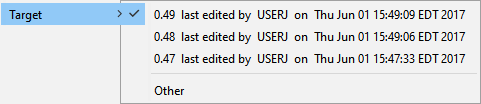
Target / Source
The 'Target' and 'Source' sub-menu allows users to choose alternative dimensions to show in the Context mode.
Depending on the view chosen, this function label changes from target to source.
- In the Translation view, this allows the user to select the source language.
![]()
- In the Workspace view mode, this allows the user to select the target workspace.

- In the Context view mode, this allows the user to select a single target as context or multiple contexts to compare the content.

- In the Revision view mode, this allows the user to select a past revision(s), provided there is a recorded change in STEP. If the revisions are older than the current session, the 'Other' option will display a window to select necessary revision for comparison. When the Revision view is selected, the selected object will show the current version and the immediately previous version. By using target, users may select specific revisions for comparison.
- In the Update view mode, this allows the user to select the source workspace.

Filter

Select a view to filter out empty attribute values, show only mandatory attributes, show only editable attributes, and/or show only legal attributes.
Primary Hierarchy
An object may be located in multiple hierarchies. When locating objects, there may be a reason that a user wants the object's path to specify one of those hierarchies instead of all the applicable hierarchies. Changing this view can be done by switching the primary hierarchy view used for workbench. This path is displayed in the object details within workbench, but the path is also used when navigating to an object via a search results set.
For example, object 12345 is in a supplier hierarchy and a primary product hierarchy. When doing a search for object 12345, upon clicking the 12345 link in the search results, User A wants the object to be displayed in the Tree within the primary product hierarchy. User B wants to click on the 12345 link and be taken to the object within the suppliers hierarchy. Both scenarios can be accommodated when each user sets their own view.

An objects' path can be changed based on the selected primary hierarchy. To change the display view, select Primary Hierarchy from the View menu, and then select the desired hierarchy. For many, the Primary Product Hierarchy will be the default selection.
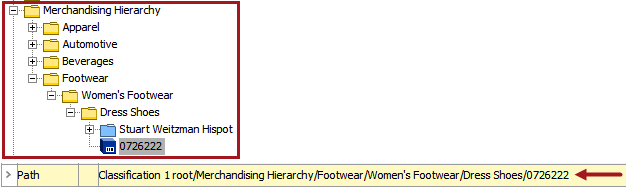
In the below example, Object 0726222 is a product object type being viewed in the Primary Product Hierarchy. This path echos the location of the object in the Tree tab.

Examples of how objects will be displayed can be seen with the Merchandising Hierarchy selection. Notice the changed path and the object's location in the Tree tab.
Select Version
Allows the user to set the default publication or version used for proofing.
New View
Select multiple products from Tree to enable this option and display a multi-editor tab where a view can be used. Views are not valid with non-product object types. Multi-Editors and views are defined in the Editing Objects in Tree topic here. A view allows a user to customize the attributes shown for more than one object, instead of displaying all attributes for all selected objects.
Remove View
Select multiple products from Tree to enable this option and display a multi-editor tab where a view can be used. Views are not valid with non-product object types. Multi-Editors and views are defined in the Editing Objects in Tree topic here. A view that is no longer needed can be remove with this menu option.
Product Views
Select multiple products from Tree to enable this option and display a multi-editor tab where a view can be used. Views are not valid with non-product object types. Multi-Editors and views are defined in the Editing Objects in Tree topic here. The Product Views option displays all saved views.
Show Source Context
Attribute names may be translated. This option allows a user to view attribute values in both a foreign language and in the source language.
Rotate Table
This will flip the selected table so that the columns become rows and vice versa. This is most often used in a multi-product editor.
Reload
Retrieves updated information from the database including other users’ changes.
Collapse Tree
Collapses the folders in the Tree navigator.
Disable calculated values
Disables the automatic calculation of calculated attributes. This will make the STEP interface load faster.
If Disable calculated attributes is checked, calculated attributes can be rendered one-by-one by clicking the Calculate button on a calculated parameter in the product editor.

Default Font Size
Allows the user to change GUI font.
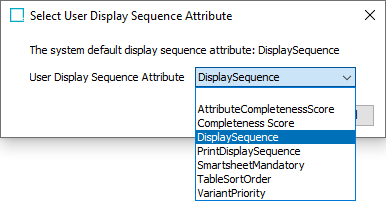
Choose User Display Sequence Attribute
Allows the user to select a user-specific Display Sequence Attribute. This option is different from the Attribute set under Users & Groups in System Setup. For more information on using Display Sequence Attributes, see Display Sequence Attribute topic in the System Setup / Super User Guide documentation here.
Toggle Show Hidden Background Process Template
Once selected, any previously hidden Background Process Template will display.
Default Context
Sets the default context used when logging in.
Logs
Displays Workspace and System Setup logs.